Introduzione
This manual provides detailed instructions for the operation and maintenance of your GTMEDIA Z3 Portable DAB+/FM RDS Radio. Please read this manual thoroughly before using the device to ensure proper functionality and to maximize your listening experience.
Informazioni importanti sulla sicurezza
- Non esporre il dispositivo a pioggia, umidità o temperature estreme.
- Evitare di far cadere o sottoporre il dispositivo a forti impatti.
- Non tentare di smontare o riparare l'unità da soli. Per qualsiasi intervento di assistenza, rivolgersi a personale qualificato.
- Utilizzare solo il cavo di ricarica e l'adattatore di alimentazione specificati.
- Tenere fuori dalla portata dei bambini.
Contenuto della confezione
Assicurarsi che tutti gli articoli siano presenti nel pacco:
- 1 x GTMEDIA Z3 DAB+/FM Radio
- 1 cavo di ricarica USB
- 1 x Manuale utente

Image: The GTMEDIA Z3 radio, its retail box, USB charging cable, and user manual.
Prodotto finitoview
The GTMEDIA Z3 is a portable DAB+/FM RDS radio featuring a 2.4-inch TFT-LCD screen. It supports 60 preset stations for both DAB+ and FM, and includes functions such as clock, alarm, and sleep timer. The device is powered by a rechargeable 18650 lithium battery.
Controlli e display del pannello frontale
- Pulsante di accensione/standby: Turns the radio on/off or puts it in standby mode.
- Pulsante di scansione: Avvia la scansione della stazione.
- Pulsante DAB/FM: Switches between DAB+ and FM modes.
- Pulsante Menu: Accede al menu principale.
- Pulsante EQ: Regola le impostazioni dell'equalizzatore.
- Pulsante di preselezione: Accede alle stazioni preimpostate.
- Manopola Volume/Selezione: Adjusts volume and navigates/selects menu options.
- 2.4-inch TFT-LCD Display: Mostra informazioni sulla stazione, l'ora e le opzioni del menu.
Pannello posteriore e porte

Image: The back of the GTMEDIA Z3 radio, highlighting the 18650 lithium battery compartment and the DC 5V USB charging port.
- 18650 Lithium Battery Compartment: Contiene la batteria ricaricabile.
- Porta di ricarica USB CC 5V: Per caricare il dispositivo.
Guida all'installazione
1. Carica della batteria
- Locate the USB charging port on the rear of the radio.
- Connect the provided USB charging cable to the radio and to a compatible USB power adapter (DC 5V, ≥1500mA) or a computer USB port.
- The battery indicator on the display will show charging status. A full charge typically provides 4-7 hours of operation.
Image: The GTMEDIA Z3 radio's rear panel, illustrating the USB charging port and battery specifications.
2. Accensione iniziale e selezione della lingua
- Premere e tenere premuto il tasto Alimentazione/Standby pulsante per accendere la radio.
- Upon first use, you may be prompted to select a language. Use the Volume/Seleziona knob to navigate and press to confirm your choice. English is the default language.
3. Sincronizzazione dell'ora
The clock can be set manually or synchronized automatically with DAB+ or FM signals.
- Sincronizzazione automatica: When tuned to a DAB+ or FM station that broadcasts time information, the radio will automatically update its clock.
- Regolazione manuale: Accedi alle impostazioni di sistema tramite Menu button to manually set the time and date.
Istruzioni per l'uso
1. Radio Modes (DAB+/FM)
Modalità di commutazione:
Premere il tasto FM/DAB pulsante per passare dalla modalità radio DAB+ a quella FM.
Scansione delle stazioni:
- Scansione automatica (FM): In modalità FM, premere il tasto Scansione pulsante per cercare e memorizzare automaticamente le stazioni disponibili.
- Local Scan (DAB+): In modalità DAB+, premere il Scansione button to perform a local scan for DAB+ stations. Manual tuning is also supported.
Stazioni di preselezione:
The radio supports 60 preset stations for both FM and DAB+ (10 quick access presets). To save a station:
- Sintonizzati sulla stazione desiderata.
- Premere e tenere premuto il tasto Preimpostato pulsante.
- Utilizzare il Volume/Seleziona knob to choose a preset number and press to confirm.
Per richiamare una stazione preimpostata, premere brevemente il tasto Preimpostato pulsante e utilizzare il Volume/Seleziona manopola per selezionare.
FM RDS Station Name Display:
When tuned to an FM station broadcasting RDS (Radio Data System) information, the 2.4-inch TFT-LCD screen will display the station name and other relevant data.
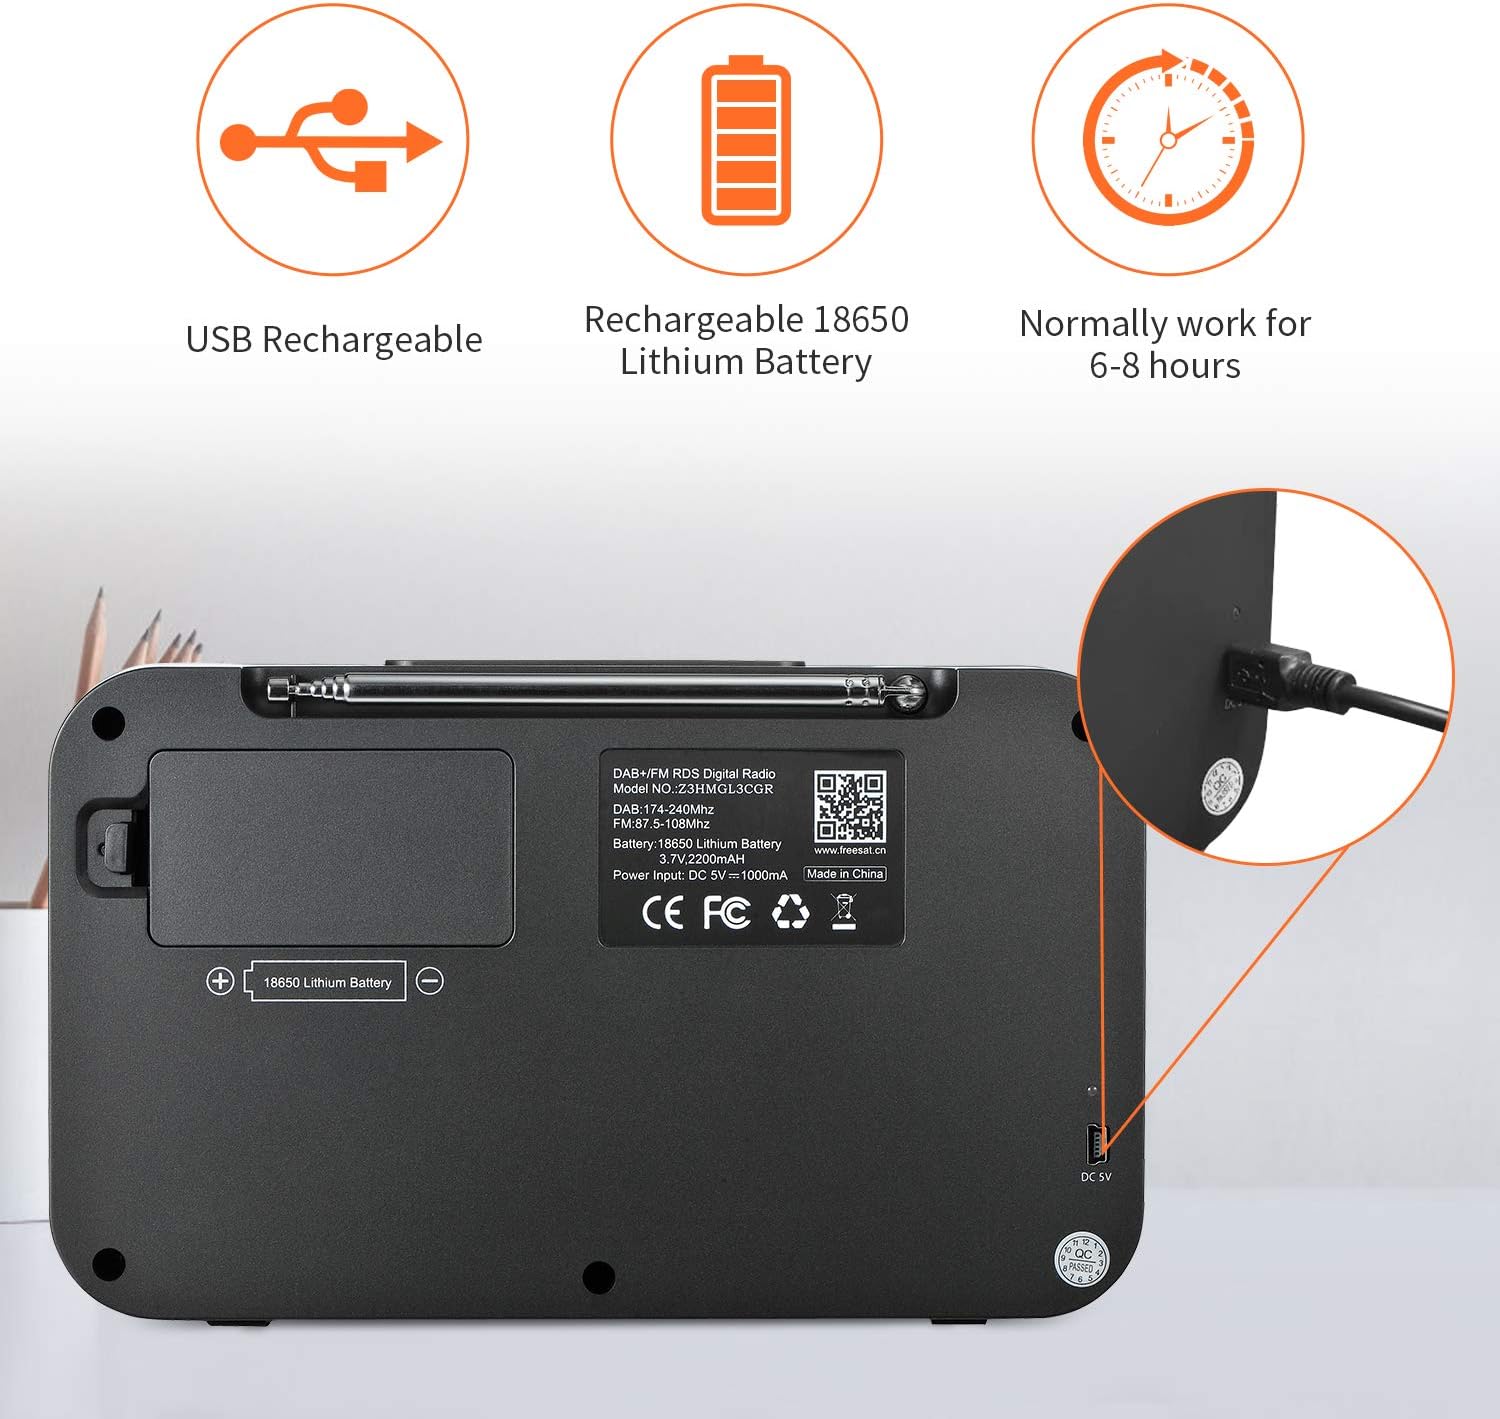
Image: The GTMEDIA Z3 radio's display showing "FM" and "90.500MHz" along with a station name, demonstrating the RDS feature.
2. Orologio, sveglia e timer di spegnimento
The GTMEDIA Z3 radio includes integrated clock, alarm, and sleep timer functions for enhanced convenience.

Image: The GTMEDIA Z3 radio with icons representing clock, alarm, and sleep timer functions, depicted in a bedroom setting.
Impostazione della sveglia:
- Premere il tasto Menu button and navigate to the "Alarm" settings.
- Utilizzare il Volume/Seleziona knob to set the alarm time, duration, and alarm source (e.g., buzzer, DAB+, FM).
- Conferma le tue impostazioni.
Impostazione del timer di spegnimento:
- Premere il tasto Menu button and navigate to the "Sleep Timer" settings.
- Utilizzare il Volume/Seleziona knob to choose the desired sleep duration (e.g., 15, 30, 60 minutes).
- La radio si spegnerà automaticamente dopo l'orario impostato.
3. Riproduzione di musica
The GTMEDIA Z3 supports playback of various music formats including MP3, FLAC, and WAV. Playback modes include single play, repeat, and shuffle. Specific instructions for accessing and controlling music playback are typically found within the device's menu system.
Manutenzione
Pulizia:
- Pulire la radio con un panno morbido e asciutto.
- Non utilizzare detergenti liquidi o materiali abrasivi.
Cura della batteria:
- Per prolungare la durata della batteria, evitare di scaricarla completamente frequentemente.
- Caricare la batteria regolarmente, anche se la radio non viene utilizzata frequentemente.
- Quando non si utilizza la radio per lunghi periodi, conservarla in un luogo fresco e asciutto.
Risoluzione dei problemi
| Problema | Possibile causa | Soluzione |
|---|---|---|
| Nessun potere | La batteria è scarica. | Caricare la batteria utilizzando il cavo USB in dotazione. |
| Scarsa ricezione radio | Segnale debole; antenna non estesa. | Extend the telescopic antenna fully. Try repositioning the radio. Perform a new scan for stations. |
| Nessun suono | Volume too low; Mute activated. | Aumentare il volume utilizzando il Volume/Seleziona knob. Check if mute is active in settings. |
| Display non chiaro | Impostazione della luminosità troppo bassa. | Adjust LCD brightness in the system settings. |
Specifiche
| Caratteristica | Dettaglio |
|---|---|
| Marca | MEDIA MEDIA |
| Modello | Z3 |
| Tecnologia sintonizzatore | DAB Plus, FM RDS |
| Bande radio supportate | DAB+ (174.92-239.20 MHz), FM (87.5-108 MHz) |
| Display | 2.4-inch TFT-LCD (240 x 320 pixels) |
| Stazioni preimpostate | 60FM, 60DAB+ |
| Fonte di alimentazione | Alimentato a batteria |
| Tipo di batteria | 18650 Lithium Battery (3.7V 2200mAh) |
| Orari di apertura | 4-7 hours (typical) |
| Ingresso di ricarica | DC 5V, ≥1500mA (via USB) |
| Tecnologia di connettività | USB |
| Caratteristica speciale | Portable, Clock, Alarm, Sleep Timer, USB Upgradeable |
| Peso dell'articolo | 620 grammi |
| Dimensioni del prodotto | Dimensioni: 20 x 5 x 12 cm |
| Temperatura di esercizio | 0 ~ + 45 ° C |
| Temperatura di conservazione | -10~+60°C |
| Formati musicali | MP3, FLAC, WAV |

Image: Dimensions of the GTMEDIA Z3 radio, showing approximate measurements of 200mm x 120mm x 50mm.
Aggiornamento del firmware
The GTMEDIA Z3 radio supports firmware upgrades via a USB connection to a PC. For the latest firmware and detailed instructions, please visit the official support websito.

Image: The GTMEDIA Z3 radio connected to a laptop via a USB cable, indicating its upgradeable feature.
Garanzia e supporto
For technical support, warranty information, or any questions regarding your GTMEDIA Z3 radio, please visit the official GTMEDIA support websito: