EVERSECU B08B4RSS7J
EVERSECU 4-Camera Wireless Vehicle Backup System with 7-inch Monitor Instruction Manual
Model: B08B4RSS7J
Introduzione
This manual provides comprehensive instructions for the installation, operation, and maintenance of your EVERSECU 4-Camera Wireless Vehicle Backup System. This system is designed to enhance safety and convenience for various vehicles, including RVs, SUVs, vans, pickups, trucks, and trailers, by providing clear rear, side, and front views.
The system features a 7-inch color monitor and four wireless cameras, offering a robust solution for parking assistance and general vehicle maneuvering. Please read this manual thoroughly before installation and use to ensure proper functionality and safety.

Image: The complete EVERSECU 4-Camera Wireless Vehicle Backup System, showing the 7-inch monitor, four wireless cameras, and a remote control.
Contenuto della confezione
Verifica che tutti gli articoli elencati di seguito siano inclusi nella confezione. Se qualche componente risulta mancante o danneggiato, contatta l'assistenza clienti.
- 4 x Wireless Car Backup Cameras
- 1 x 7-inch Color Car Monitor
- 5 x Antennas (4 for cameras, 1 for monitor)
- 4 x Power Cables for Cameras
- 1 x telecomando
- 1 x staffa di montaggio per monitor
- 1 x Manuale utente (questo documento)

Image: All components included in the product package, laid out for inspection. This includes the monitor, cameras, antennas, power cables, remote, and mounting bracket.
Specifiche tecniche
Monitor wireless da 7 pollici
- Frequenza operativa: 2400-2483.5 MHz (Standard: 2370Mhz)
- Formato di compressione: MPEG 4 video
- Frequenza di trasmissione: 18 dBm
- Velocità di trasmissione: 12 Mbps
- FHSS: Spettro diffuso a salto di frequenza
- Hopping Rate: 1200 / L
- Dimensioni dello schermo: 7-inch 16:9 widescreen
- Risoluzione: 800 RGB x 480 dots
- Sistema: PAL / NTSC
- Volume di eserciziotage: 12V / 24V CC
- Consumo energetico: ≤8.64W
- Temperatura di esercizio: -10 ℃ a +65 ℃
- Caratteristica facoltativa: Supporto audio
2.4GHz Wireless Camera
- Standard: NTSC: 510 * 492 pixels, PAL: 510 * 582 pixels
- Risoluzione: 420 TVL
- Lente: 2.5mm
- Illuminazione minima: 0 Lux (LED acceso)
- Luci a infrarossi: 18 pezzi
- Distanza di visione notturna: 15 metri
- Grado di impermeabilità: Grado di protezione IP67
- Viewangolo di ing: 120°
- Volume di eserciziotage: 12V / 24V CC
- Temperatura di esercizio: -20 ℃ a +70 ℃
- Materiale della calotta: Alluminio
- Materiale del supporto: Metallo
Generale
- Peso dell'articolo: 3.76 libbre
- Batterie: 1 CR2 battery required (included for remote controller)
Configurazione e installazione
Proper installation is crucial for optimal performance. This system is suitable for RVs, SUVs, vans, pickups, trucks, and trailers. Consider the placement of cameras for rear, side, or front views based on your vehicle type and needs.
1. Posizionamento e montaggio della telecamera
Determine the desired locations for each of the four cameras. Common placements include the rear of the vehicle for backup, and sides for blind spot monitoring. Ensure the chosen locations provide a clear line of sight and are protected from direct impact.
- Mount each camera securely using the provided metal brackets.
- Regolare l'angolazione della telecamera per ottenere l'effetto desiderato viewzona di ingaggio.

Image: An illustration demonstrating typical wireless camera placements on a truck and trailer, highlighting the 2.4G wireless signal range.
2. Alimentazione delle telecamere
Each camera requires a 12V-24V DC power supply. Connect the camera power cables to a suitable power source on your vehicle.
- For rear cameras, connect to the vehicle's reversing light circuit so the camera activates when reverse gear is engaged.
- For side or front cameras, connect to a constant 12V-24V power source or an accessory circuit that can be switched on/off as needed.
- Ensure all connections are secure and properly insulated to prevent short circuits and water damage.
3. Monitorare l'installazione
Install the 7-inch monitor in a location that provides a clear view per il conducente senza ostacolare la guida view o airbag.
- Fissare il monitor alla staffa di montaggio.
- Secure the mount bracket to the dashboard or windshield using the provided adhesive pad or screws.
- Regolare l'angolazione del monitor per una visione ottimale viewing.
4. Accensione del monitor
The monitor can be powered via the included DC car charger or by wiring it directly to your vehicle's 12V/24V electrical system.
- Adattatore per accendisigari: Collega il caricabatteria per auto alla presa accendisigari del tuo veicolo.
- Cablaggio diretto: Connect the DC power cable to a switched 12V/24V power source (e.g., ignition-controlled circuit) to ensure the monitor turns on and off with the vehicle.
5. Collegamento dell'antenna
Screw the antennas onto the designated ports on both the cameras and the monitor. Ensure they are tightened securely for optimal wireless signal transmission.
Operazione
Once installed and powered, the system will automatically attempt to connect to the cameras. The monitor will display the camera feed.
Cambio di fotocamera Views
- The 7-inch monitor supports 4-channel video input.
- Utilizzare il V1/V2 button on the monitor or the remote controller to cycle through the connected camera views (Camera 1, Camera 2, Camera 3, Camera 4).
- The system typically displays one camera view alla volta.
Funzioni del telecomando
The included remote controller allows for convenient adjustment of monitor settings and camera switching without directly touching the monitor.
- Pulsante di accensione: Accende o spegne il monitor.
- Channel Switch Buttons: Selects the desired camera channel (V1, V2, V3, V4).
- Pulsante Menu: Accesses monitor settings (brightness, contrast, color, etc.).
- Pulsanti di navigazione: Utilizzato per navigare tra le opzioni del menu e regolare i valori.
Manutenzione
Una manutenzione regolare garantisce la longevità e le prestazioni ottimali del sistema di telecamere di retromarcia.
- Cleaning Cameras: Pulire periodicamente le lenti della fotocamera con un panno morbido eamp panno per rimuovere sporco, polvere o macchie d'acqua che potrebbero oscurare il viewEvitare detergenti abrasivi.
- Cleaning Monitor: Use a soft, dry cloth to clean the monitor screen. For stubborn smudges, a screen-safe cleaning solution can be applied to the cloth (not directly to the screen).
- Controllare le connessioni: Regularly inspect all power cables and antenna connections for signs of wear, corrosion, or looseness. Secure any loose connections.
- Impermeabilizzazione: While cameras are IP67 waterproof, ensure that power cable entry points are sealed to prevent water ingress, especially after installation or maintenance.
- Sostituzione della batteria: Replace the CR2 battery in the remote controller when its functionality diminishes.
Risoluzione dei problemi
If you encounter issues with your EVERSECU backup camera system, refer to the following common problems and solutions:
No Image on Monitor / Black Screen
- Controlla la potenza: Ensure the monitor is receiving power. Verify the car charger is securely plugged in or direct wiring is correctly connected to a live circuit. Check the vehicle's fuse box if necessary.
- Potenza della fotocamera: Confirm that the cameras are powered on. Check their power connections to the vehicle's electrical system.
- Connessione dell'antenna: Ensure all antennas are securely attached to both the monitor and cameras.
- Selezione canale: Use the V1/V2 button on the monitor or remote to cycle through all camera channels.
Weak or Intermittent Signal / Fuzzy Picture
- Ostruzioni: Wireless signals can be affected by metal objects, vehicle structure, or other electronic devices. Try to minimize obstructions between the camera and monitor.
- Distanza: The effective wireless range is up to 50 meters in an open environment and up to 25 meters with obstacles. For longer vehicles like trailers, signal degradation may occur. Consider repositioning cameras or monitor for better line of sight.
- Orientamento dell'antenna: Ensure antennas are oriented vertically for best reception.
- Interferenza: Other 2.4GHz wireless devices (Wi-Fi, Bluetooth) can cause interference. Try to operate the system away from such sources if possible.
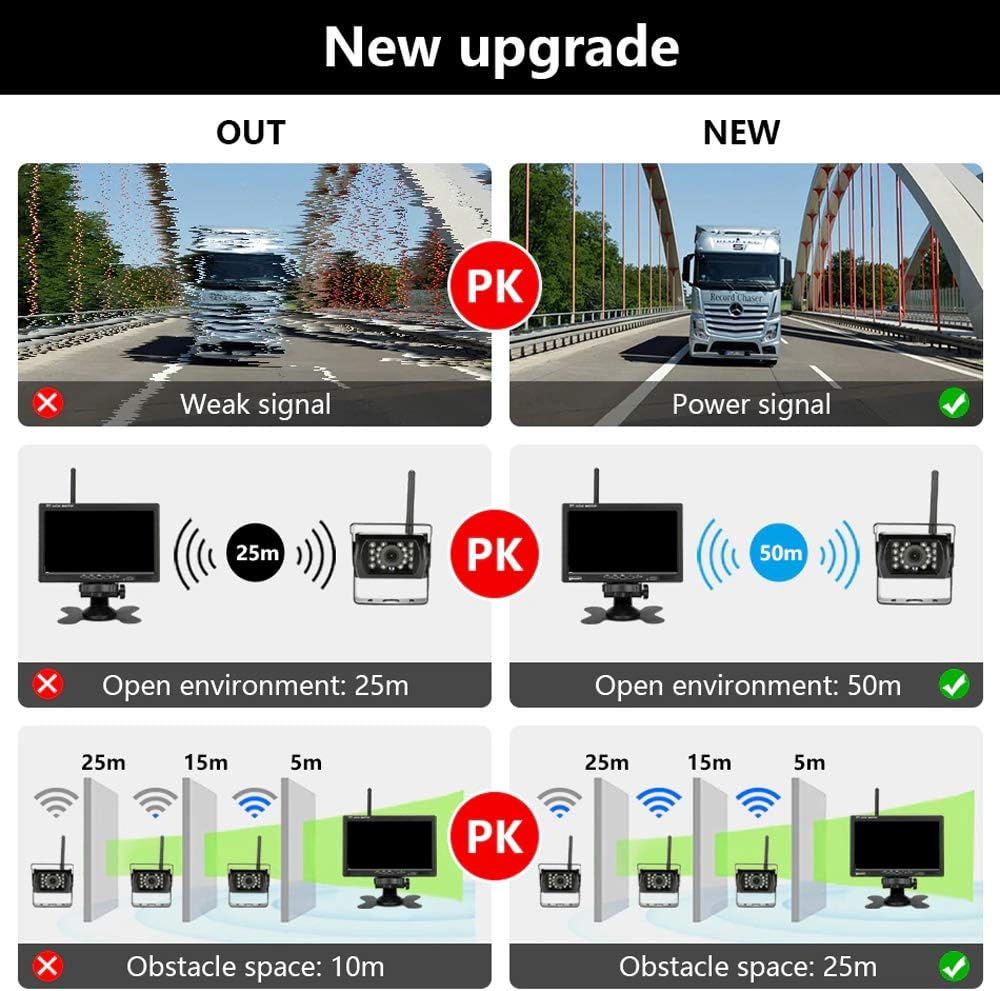
Image: A visual comparison illustrating the impact of signal strength and obstacles on wireless transmission range, showing improved performance with a stronger signal and reduced obstacles.
Image is Upside Down or Mirrored
- Access the monitor's menu settings using the remote control. Look for options related to "Mirror Image" or "Flip Image" and adjust as needed.
Il telecomando non funziona
- Batteria: Replace the CR2 battery in the remote controller.
- Linea di vista: Assicurarsi che ci sia una linea di vista libera tra il telecomando e il ricevitore IR del monitor.
System Stops Working After a Short Period
- Alimentazione elettrica: Verify the power supply to both the monitor and cameras is stable and within the specified voltage range (12V-24V DC). Fluctuations or insufficient power can cause intermittent operation.
- Surriscaldamento: Ensure adequate ventilation around the monitor and cameras, especially in enclosed spaces.
- Collegamenti allentati: Recheck all wiring connections for security.
Garanzia e supporto
For warranty information, technical support, or assistance with installation and troubleshooting beyond this manual, please contact EVERSECU customer service. Refer to the product packaging or the official EVERSECU websito per i dettagli di contatto più aggiornati.
Produttore: EVERSECU
Per ulteriori risorse, puoi visitare il EVERSECU Store on Amazon.
Ask a question about this manual
Ask about setup, troubleshooting, compatibility, parts, safety, or missing instructions. Manuals+ will review the question and use this page’s manual context to help answer it.