1. Introduzione
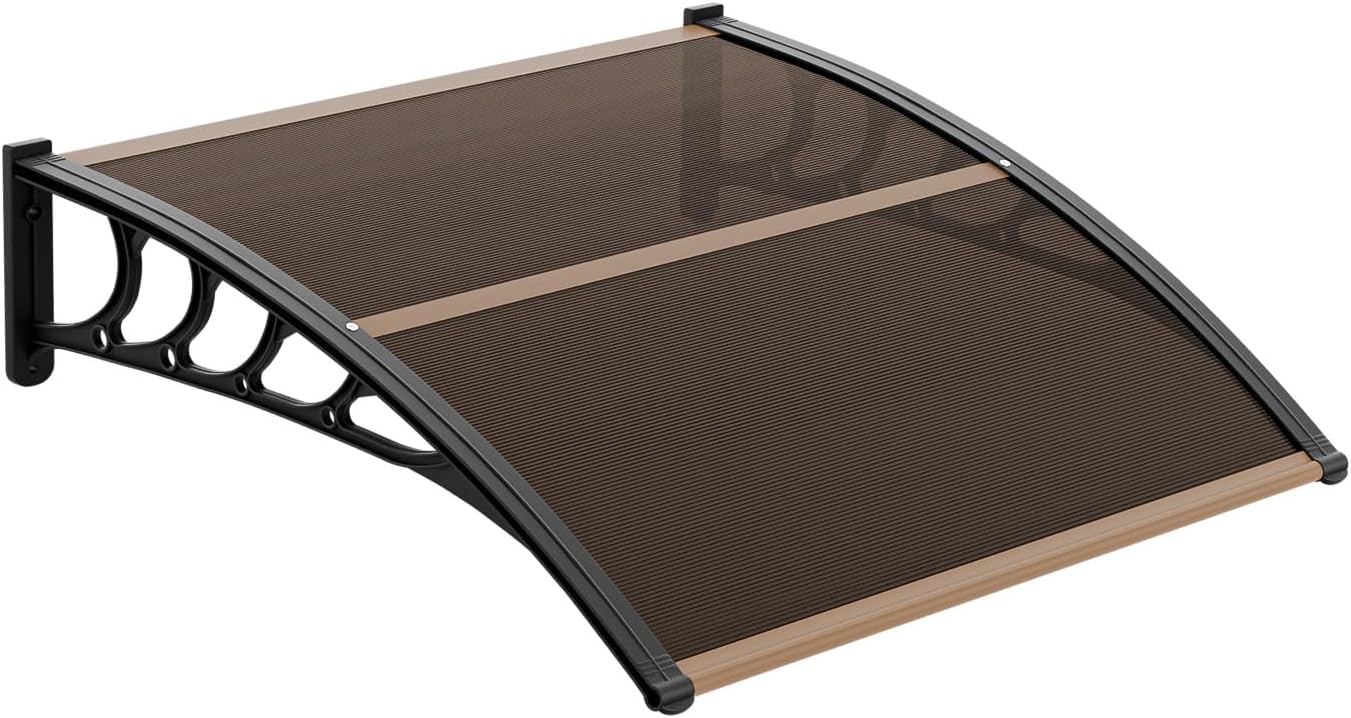
Figure 1.1: VINGLI Window Awning Door Canopy.
This manual provides comprehensive instructions for the assembly, installation, operation, and maintenance of your VINGLI Window Awning Door Canopy. Please read this manual thoroughly before installation and use to ensure proper function and safety.
The VINGLI Window Awning Door Canopy is designed to provide protection from various weather conditions, including rain, snow, sun, and harmful UV rays, for your windows and doors.
1.1 Informazioni sulla sicurezza
- Attenzione: Ensure proper installation and secure anchoring to prevent accidents.
- This product is not suitable for areas with extreme wind conditions.
- Installation may require two people for safety.
- Non superare la capacità di peso specificata.
- Always wear appropriate safety gear during installation.
2. Componenti del prodotto
Before beginning assembly, verify that all components listed below are present and undamaged. If any parts are missing or damaged, contact VINGLI customer support.

Figura 2.1: Esploso view of awning components and assembly points.
- Polycarbonate Panel (Hollow Sheet)
- ABS Brackets
- Aluminum Bars (Front and Rear)
- Hardware di montaggio (viti, tasselli, rondelle)
- Rubber Seals (for panel edges)

Figure 2.2: Detail of the durable ABS bracket and UV-resistant polycarbonate sheet.
3. Configurazione e installazione
Installation requires careful attention to detail. It is recommended that two people perform the installation for safety and ease.
3.1 Considerazioni pre-installazione
- Posizione: Choose a suitable location above a window or door.
- Superficie: Ensure the mounting surface is sturdy and capable of supporting the awning's weight and wind loads. This product is not suitable for vinyl siding without additional reinforcement.
- Dimensioni: Refer to the sizing guide below to ensure the awning fits your intended application.

Figure 3.1: Guide for selecting the correct awning size. Ensure at least 15 inches between the top of the awning and the top of the door frame, and that the awning width is greater than the door opening.
3.2 Fasi di assemblaggio
- Preparare i pannelli: Insert the polycarbonate panels into the designated grooves of the ABS brackets. Ensure the panels are securely seated.
- Fissare le barre di alluminio: Slide the front and rear aluminum bars onto the edges of the polycarbonate panels and into the bracket slots. These bars help secure the panels and provide structural integrity.
- Sigillare i bordi: Apply the rubber seals along the edges of the polycarbonate panels where they meet the brackets to prevent water leakage.
- Connessioni sicure: Use the provided screws to firmly connect all components, ensuring a tight and stable assembly.

Figure 3.2: The aluminum connector design ensures a leak-proof seal, preventing water from seeping through joints.
3.3 Montaggio a parete
- Segnare i punti di foratura: Hold the assembled awning against the wall at the desired installation height. Use a pencil to mark the drilling points through the holes in the ABS brackets.
- Fori di perforazione: Drill pilot holes at the marked points using an appropriate drill bit for your wall material (e.g., masonry bit for brick/concrete, wood bit for studs).
- Inserisci ancore: If installing into masonry or drywall, insert the appropriate wall anchors into the drilled holes.
- Tenda da sole di montaggio: Align the awning brackets with the drilled holes/anchors. Insert the mounting screws and tighten them securely. Ensure the awning is level and firmly attached to the wall.
- Seal Gaps (Optional but Recommended): For enhanced weather protection, apply exterior-grade caulk around the edges where the awning brackets meet the wall.

Figura 3.3: Esample of a properly installed VINGLI awning over a door.
4. Funzionamento
The VINGLI Window Awning Door Canopy is a fixed, manual operation awning designed to provide continuous protection. No active operation is required after installation.
- Provides shade and reduces heat gain from direct sunlight.
- Deflects rain and snow away from windows and doors, keeping entryways dry.
- Protects exterior elements like air conditioning units from direct weather exposure.

Figure 4.1: The awning offers effective sun and rain protection.
5. Manutenzione
Regular maintenance will extend the lifespan and maintain the appearance of your awning.
- Pulizia: Clean the polycarbonate panel and brackets periodically with mild soap and water. Avoid abrasive cleaners or harsh chemicals that could damage the material. Rinse thoroughly with clean water.
- Ispezione: Annually inspect all mounting hardware for tightness. Re-tighten any loose screws. Check the polycarbonate panel for cracks or damage and the seals for deterioration.
- Rimozione della neve: While the awning is designed to withstand snow, heavy accumulation should be gently removed to prevent excessive stress on the structure, especially in regions with heavy snowfall.
6. Risoluzione Dei Problemi
| Problema | Possibile causa | Soluzione |
|---|---|---|
| Water leakage at joints | Improperly seated panels or seals, loose connections. | Ensure panels are fully inserted and seals are correctly positioned. Tighten all screws. Apply silicone sealant if necessary. |
| Awning feels unstable or loose | Mounting screws are loose or anchors are not secure. | Re-tighten all mounting screws. If anchors are failing, consider using stronger anchors or longer screws suitable for your wall type. |
| Polycarbonate panel appears cloudy or scratched | Abrasive cleaning agents used, or natural wear over time. | Clean with mild soap and soft cloth only. Minor scratches may be polished with specialized plastic polish. |
| Awning detaches during strong winds | Inadequate anchoring or installation in unsuitable wind conditions. | Reinforce mounting points with stronger hardware. If your area experiences extreme winds, this awning may not be suitable. Consult a professional for alternative solutions. |
7. Specifiche
| Caratteristica | Dettaglio |
|---|---|
| Marca | VINGLI |
| Numero di modello | newawning |
| Misurare | 40x40 pollici |
| Dimensioni del prodotto | 40"P x 40"L x 40"A |
| Colore | Brown Board & Black Bracket |
| Materiale | Acrylonitrile Butadiene Styrene (ABS), Aluminum, Polycarbonate |
| Peso dell'articolo | 5.99 libbre |
| Assemblaggio richiesto | SÌ |
| Modalità di funzionamento | Manual (Fixed) |
| Protezione UV | Sì (UPF 50+) |
8. Garanzia e supporto
For warranty information or technical support, please contact VINGLI customer service. Details regarding specific warranty periods and terms are typically provided with your purchase documentation or can be found on the official VINGLI websito.
When contacting support, please have your product model number (newawning) and purchase date available.
Risorse online: For additional information and FAQs, visit the official VINGLI store: Negozio VINGLI su Amazon