Cecotec 05606
Manuale d'uso del deumidificatore Cecotec Big Dry 4000 Expert
Modello: 05606
1. Introduzione
Grazie per l'acquistoasing the Cecotec Big Dry 4000 Expert Dehumidifier. This manual provides important information for the proper use, maintenance, and troubleshooting of your appliance. Please read it thoroughly before operation and keep it for future reference.
Informazioni sulla sicurezza
- Posizionare sempre il deumidificatore su una superficie piana e stabile.
- Assicurare una ventilazione adeguata attorno all'unità. Non ostruire le prese d'aria o le uscite.
- Non utilizzare l'unità vicino all'acqua o in ambienti eccessivamente umidi.
- Scollegare l'unità prima di pulirla o di effettuare qualsiasi intervento di manutenzione.
- Tenere fuori dalla portata dei bambini e degli animali domestici.
- Non inserire oggetti nelle prese d'aria.
- Utilizzare solo l'alimentatore specificato.
2. Componenti del prodotto
Familiarize yourself with the main parts of your Cecotec Big Dry 4000 Expert Dehumidifier.

Figura 2.1: Davanti view of the Cecotec Big Dry 4000 Expert Dehumidifier. This image shows the overall design of the dehumidifier, highlighting its compact and modern appearance with the Cecotec logo visible.

Figura 2.2: Lato view of the dehumidifier with the removable water tank. The image clearly indicates the location and design of the 2.5-liter water collection tank, which slides out for easy emptying.

Figura 2.3: Close-up of the top control panel. This view displays the LED screen showing humidity and temperature, along with touch controls for Timer, Setting, and Power functions.

Figura 2.4: Superiore view showing the air outlet. This image illustrates the dehumidifier's top grille where dry air is expelled, with visual cues of air circulation.
Componenti chiave:
- Pannello di controllo: LED display for humidity and temperature, touch buttons for various functions.
- Ingresso/Uscita dell'aria: Posizionati sul retro e sulla parte superiore per favorire la circolazione dell'aria.
- Serbatoio dell'acqua: Serbatoio rimovibile da 2.5 litri per la raccolta dell'acqua di condensa.
- Ruote: Per una facile trasportabilità.
- Filtro dell'aria: Located at the air inlet, requires regular cleaning.
3. Impostazione
- Disimballaggio: Estrarre con cautela il deumidificatore dall'imballaggio. Conservare il materiale di imballaggio per un eventuale stoccaggio o trasporto futuro.
- Posizionamento:
- Place the unit on a firm, level surface in the area where dehumidification is desired.
- Assicurarsi che ci siano almeno 20 cm (8 pollici) di spazio libero attorno a tutti i lati dell'unità per un corretto flusso d'aria.
- Evitare di posizionare l'unità vicino a fonti di calore, alla luce solare diretta o in aree eccessivamente polverose.
- Collegamento elettrico: Collegare il cavo di alimentazione a una presa elettrica con messa a terra. Assicurarsi che il volumetage corrisponde alle specifiche dell'unità.
- Controllo iniziale: Before first use, ensure the water tank is correctly inserted and empty.
4. Istruzioni per l'uso
Accensione/spegnimento
- Premere il tasto Energia button (refer to Figure 2.3 for button location) on the control panel to turn the unit ON or OFF. The LED display will illuminate when the unit is on.
Impostazione dell'umidità desiderata
- Premere il tasto Collocamento button (refer to Figure 2.3 for button location) repeatedly to cycle through desired humidity levels (e.g., 40%, 50%, 60%, 70%, 80% or continuous operation). The display will show the selected humidity.
- L'unità funzionerà automaticamente per mantenere il livello di umidità impostato.
Funzione timer
- Premere il tasto Timer button (refer to Figure 2.3 for button location) to set the operating time (e.g., 1-24 hours). The unit will automatically turn off after the set time.
- To cancel the timer, press the Timer button until "00" or "OFF" is displayed.
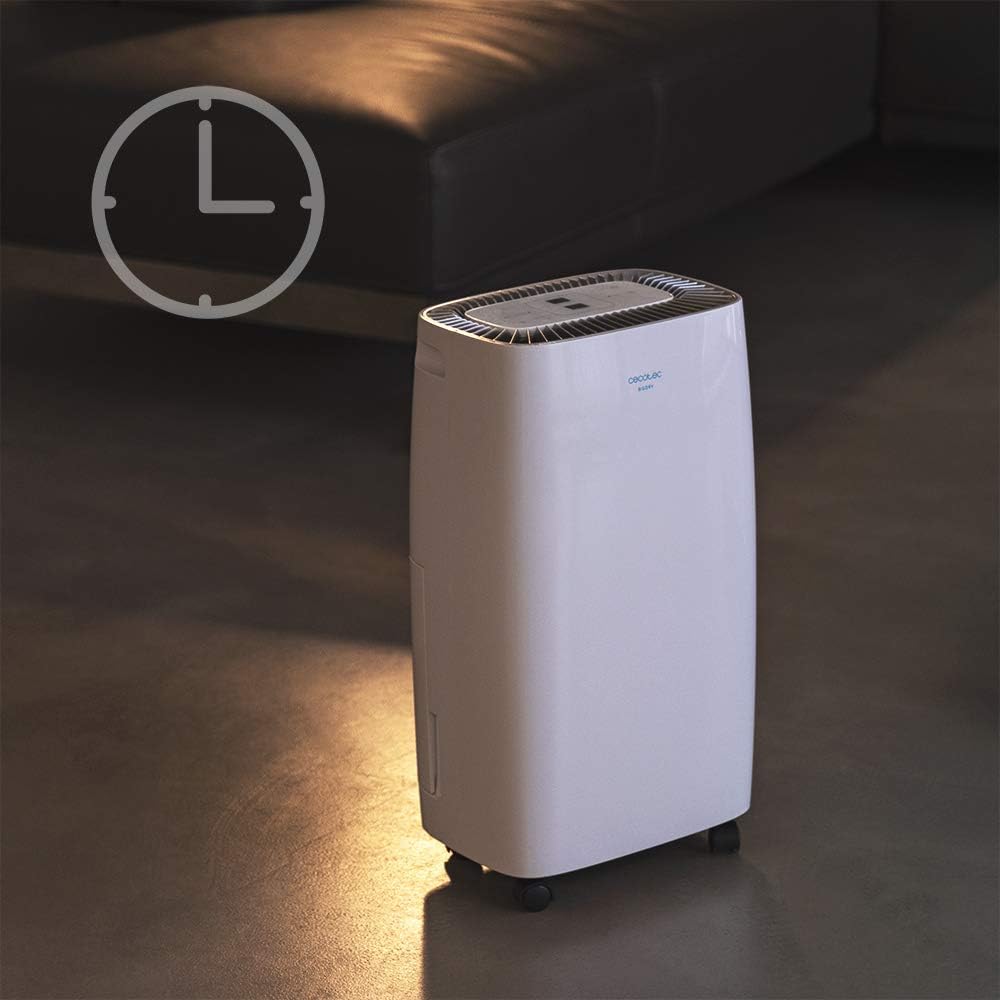
Figura 4.1: Dehumidifier operating with the timer function. This image visually represents the timer feature, showing the unit in a room setting with a clock icon overlay, indicating scheduled operation.
Velocità della ventola
- The unit features 2 fan speeds. Refer to the control panel for specific fan speed adjustment options, usually indicated by fan blade icons or "High/Low" indicators.
Automatic Shut-off and Full Tank Indicator
- The dehumidifier will automatically shut off when the water tank is full to prevent overflow.
- A "FULL" indicator light (often red) on the control panel will illuminate, and the unit may beep to alert you.

Figura 4.2: Control panel showing the "FULL" indicator light. This close-up highlights the illuminated red light next to the "FULL" icon, signaling that the water tank needs to be emptied.
5. Manutenzione
Svuotamento del serbatoio dell'acqua
- When the "FULL" indicator light illuminates, gently pull out the water tank from the side of the unit.
- Trasportare con cautela il serbatoio in un lavandino o in uno scarico e svuotare l'acqua raccolta.
- Risciacquare periodicamente il serbatoio con acqua pulita per prevenire la formazione di muffa o funghi.
- Reinserire il serbatoio vuoto nell'unità finché non scatta in posizione. L'unità riprenderà a funzionare.
Pulizia del filtro dell'aria
Il filtro dell'aria deve essere pulito ogni due settimane o più frequentemente, a seconda dell'utilizzo e della qualità dell'aria.
- Spegni e scollega il deumidificatore.
- Locate the air filter (usually on the back or side, behind a removable grille).
- Rimuovere il filtro.
- Pulisci il filtro con un aspirapolvere per rimuovere la polvere. In caso di sporco ostinato, lavalo delicatamente con acqua tiepida e sapone.
- Lasciare asciugare completamente il filtro all'aria prima di reinserirlo. Non utilizzare un'asciugatrice o fonti di calore dirette.
- Reinsert the dry filter and close the grille.
Pulizia generale
- Pulire l'esterno dell'unità con un panno morbido, damp panno. Non usare detergenti abrasivi o solventi.
- Assicurarsi che non penetri acqua nei componenti elettrici.
6. Risoluzione Dei Problemi
| Problema | Possibile causa | Soluzione |
|---|---|---|
| L'unità non si accende. | Nessuna alimentazione; cavo di alimentazione allentato; serbatoio dell'acqua pieno o inserito in modo errato. | Check power connection; ensure tank is empty and properly seated. |
| Il deumidificatore non raccoglie acqua. | Room humidity too low; temperature too low; air filter clogged; unit too small for space. | Check room conditions; clean air filter; ensure unit is appropriately sized for the area. |
| L'unità è rumorosa. | Unità non posizionata su una superficie piana; filtro dell'aria intasato; problema con i componenti interni. | Place on a level surface; clean air filter. If noise persists, contact support. |
| La spia "FULL" è accesa, ma il serbatoio non è pieno. | Float switch stuck or sensor malfunction. | Remove and reinsert tank; check float switch for obstructions. |
7. Specifiche
| Caratteristica | Specificazione |
|---|---|
| Marca | Cecotec |
| Nome del modello | Big Dry 4000 Expert (Model Number: 05606) |
| Capacità di deumidificazione | 10 Litri al giorno |
| Capacità del serbatoio dell'acqua | 2.5 litri |
| Superficie consigliata | Up to 40 Square Meters (105 m³/h coverage) |
| Dimensioni del prodotto (P x L x A) | 20.87"P x 9.06"L x 12.2"A |
| Peso dell'articolo | 21.7 libbre |
| Cosatage | 4000 watt (Note: This value is from product specifications. Actual operational wattage for dehumidifiers is typically lower.) |
| Gas refrigerante | R290 |
| Caratteristiche speciali | Removable Tank, 24h Timer, LED Display, Auto Power Off, Silent Operation |
8. Garanzia e supporto
Per informazioni sulla garanzia, supporto tecnico o richieste di assistenza, fare riferimento alla scheda di garanzia inclusa con il prodotto o visitare il sito ufficiale Cecotec websito. Conservare la ricevuta d'acquisto come prova d'acquisto per eventuali reclami in garanzia.
Cecotec Ufficiale Websito: www.cecotec.com
Ask a question about this manual
Ask about setup, troubleshooting, compatibility, parts, safety, or missing instructions. Manuals+ will review the question and use this page’s manual context to help answer it.