1. Introduzione
1.1 Prodotto finitoview
The Necchi EX100 is a versatile sewing machine designed for various projects, including quilting, garment construction, and home decor. It features a user-friendly interface for direct stitch selection and enhanced visibility with wide-angle LED lighting. An included extension table provides ample workspace for larger projects.
Caratteristiche principali:
- 100 Built-in Stitches, including 6 Buttonholes
- Bobina con gancio rotante completo a caricamento dall'alto
- Easy Convenience Buttons: Start/Stop, Reverse, Locking Stitch, Needle Up/Down, Automatic Thread Cutter
- Maximum Stitch Width: 7mm
- Included 16" x 11" Extension Table and Optic Magnifier

Figure 1.1: The Necchi EX100 Sewing Machine with its extension table attached, showcasing il suo design e i suoi componenti principali.
2. Impostazione
2.1 Disimballaggio
Estrarre con cautela la macchina per cucire e tutti gli accessori dall'imballaggio. Conservare l'imballaggio originale per un eventuale stoccaggio o trasporto futuro. Assicurarsi che tutti i componenti elencati nella distinta di imballaggio siano presenti.
2.2 Collegamento di alimentazione
Connect the AC adapter to the machine's power input jack, then plug the adapter into a standard electrical outlet. Ensure the power switch is in the 'OFF' position before connecting.
2.3 Fissaggio del tavolo di prolunga
To attach the extension table, slide its mounting tabs into the corresponding slots on the free arm of the sewing machine until it clicks securely into place. This provides a larger, flat work surface.

Figure 2.1: The Necchi EX100 with the extension table properly installed, expanding the work area.
2.4 Avvolgimento della bobina
- Posizionare un rocchetto di filo sul portarocchetto.
- Far passare il filo attraverso la guida del filo superiore e attorno al disco di tensione dell'avvolgimento della bobina.
- Posizionare una bobina vuota sul perno dell'avvolgitore.
- Wrap the thread clockwise around the bobbin a few times.
- Spingere l'alberino avvolgitore della bobina verso destra.
- Press the Start/Stop button to begin winding. The machine will stop automatically when the bobbin is full.
- Tagliare il filo e spingere il fuso dell'avvolgitore della bobina verso sinistra.
2.5 Infilatura della macchina
- Sollevare il piedino premistoffa e l'ago nella posizione più alta.
- Posizionare un rocchetto di filo sul portarocchetto.
- Seguire il percorso di infilatura numerato indicato sulla macchina, assicurandosi che il filo passi attraverso tutte le guide e la leva di avvolgimento.
- Use the automatic needle threader for easy needle threading, or thread manually from front to back.
- Inserire la bobina avvolta nella capsula sotto la placca ago, assicurandosi che il filo venga alimentato correttamente.

Figura 2.2: Un dettaglio view of the Necchi EX100's control panel and the upper threading path, highlighting key operational areas.
3. Istruzioni per l'uso
3.1 Controlli di base
- Pulsante di avvio/arresto: Initiates and halts sewing without the foot controller.
- Pulsante inverso: Sews in reverse to secure stitches at the beginning and end of seams.
- Locking Stitch Button: Creates a neat, secure locking stitch at the end of a seam.
- Pulsante Ago Su/Giù: Positions the needle either fully up or fully down, useful for pivoting fabric.
- Tagliafilo automatico: Trims both upper and bobbin threads with a single press.

Figure 3.1: Close-up of the Necchi EX100's convenience buttons, including Start/Stop, Reverse, Locking Stitch, Needle Up/Down, and Automatic Thread Cutter.
3.2 Selezione del punto
The EX100 offers 100 built-in stitches, including 6 types of buttonholes. Use the direct stitch selection interface on the machine's front panel to choose your desired stitch. Refer to the stitch chart for visual guidance.
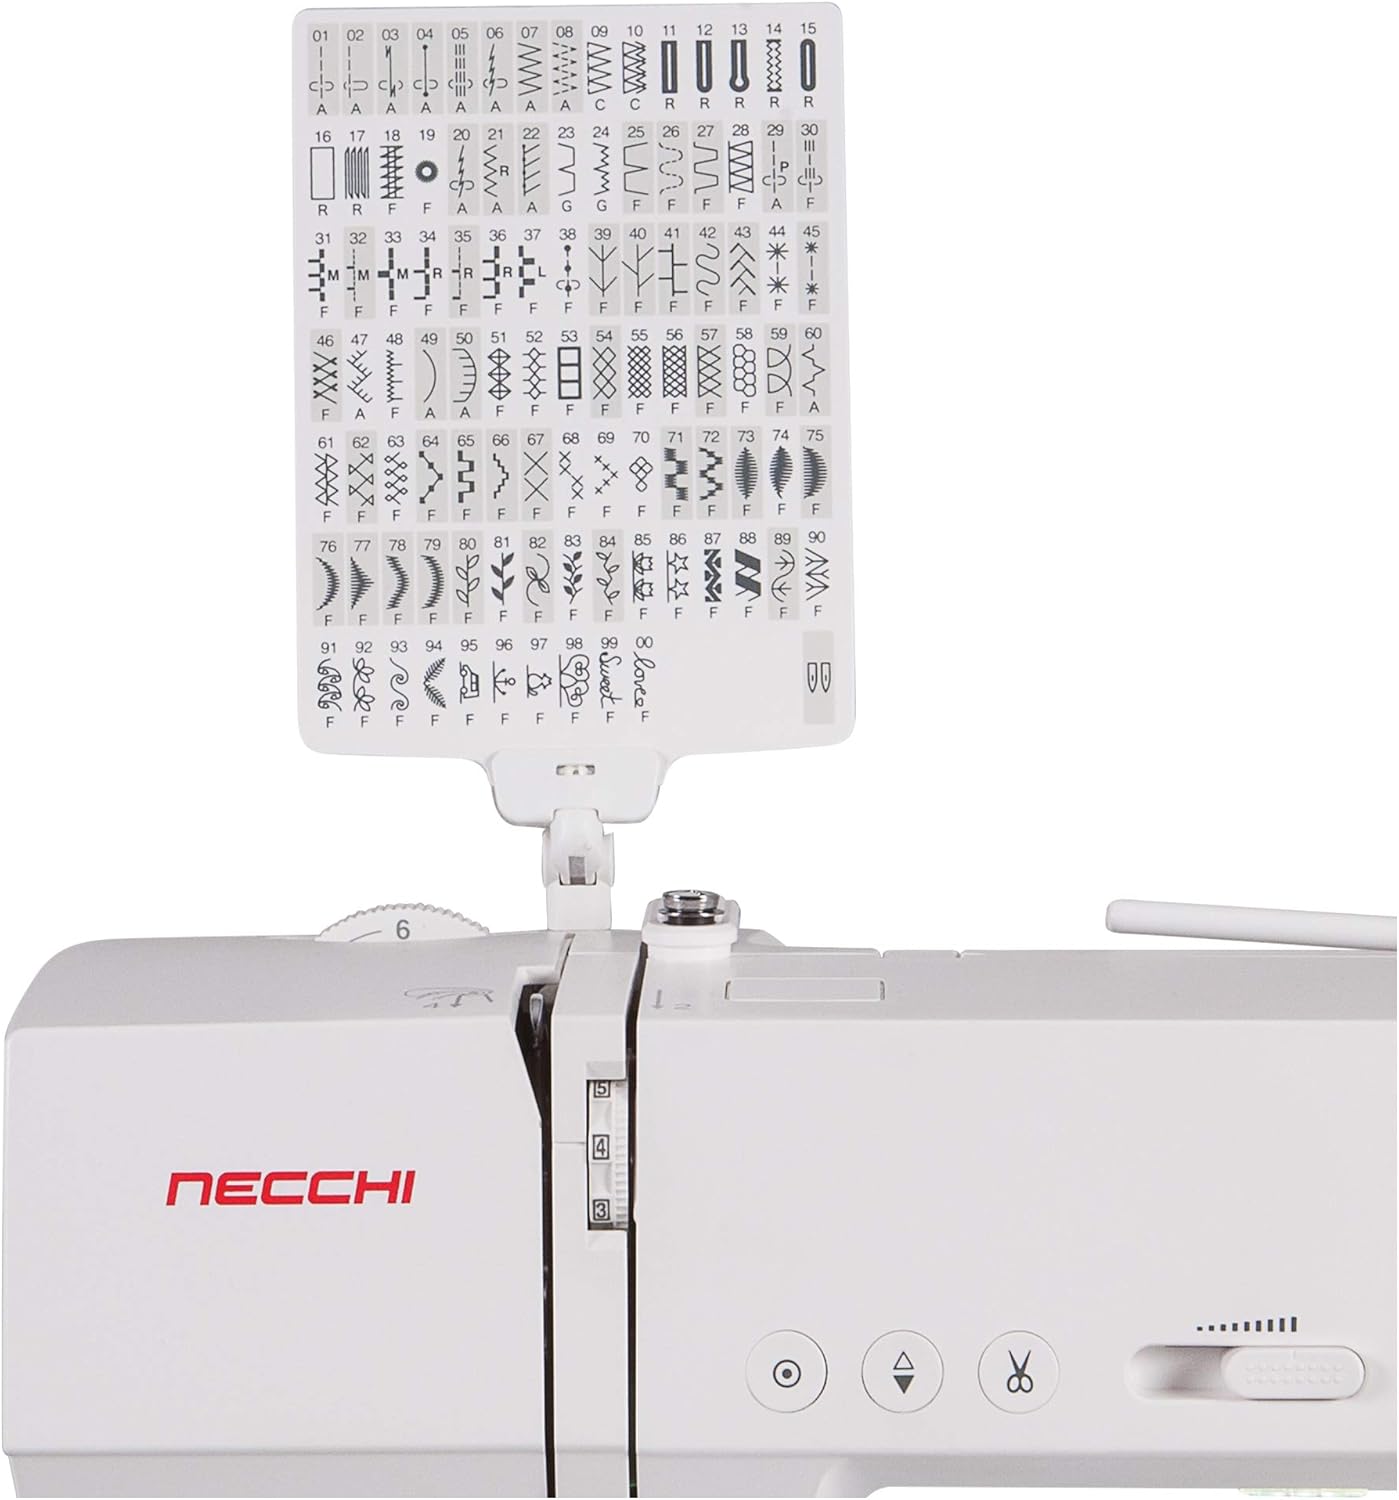
Figure 3.2: The comprehensive stitch chart for the Necchi EX100, displaying all 100 built-in stitch patterns and their corresponding numbers.
3.3 Regolazione delle impostazioni del punto
The machine allows adjustment of stitch length and width. The maximum stitch width is 7mm. Consult the display panel and your manual for specific instructions on modifying these settings for different stitch types and fabric requirements.
3.4 Using the Optic Magnifier
The included optic magnifier can be attached to the machine to provide enhanced visibility for intricate sewing tasks or for users with vision challenges. Position it directly over the needle area for optimal viewing.
4. Manutenzione
4.1 Pulizia
Regularly clean the bobbin area, feed dogs, and needle plate to remove lint and thread buildup. Use a small brush and avoid compressed air, which can push debris further into the machine. Ensure the machine is unplugged before cleaning.
4.2 Sostituzione dell'ago
Change the needle frequently, especially after 8-10 hours of sewing or if it becomes bent or dull. Use the correct needle type and size for your fabric. Loosen the needle clamp vite, rimuovere il vecchio ago, inserire il nuovo ago con il lato piatto rivolto verso la parte posteriore e serrare saldamente la vite.
5. Risoluzione Dei Problemi
This section addresses common issues you might encounter during operation. For more complex problems, refer to the full service manual or contact customer support.
| Problema | Possibile causa | Soluzione |
|---|---|---|
| Punti saltati | Ago sbagliato, ago piegato, infilatura non corretta. | Replace needle with correct type/size, re-thread machine, ensure needle is fully inserted. |
| Rottura del filo | Infilatura non corretta, tensione errata, ago danneggiato, filo di scarsa qualità. | Re-thread machine, adjust tension, replace needle, use good quality thread. |
| Punti irregolari | Incorrect tension, wrong needle for fabric, lint in bobbin case. | Adjust tension, change needle, clean bobbin case. |
| La macchina non si avvia | Power cord not connected, power switch off, bobbin winder engaged. | Check power connections, turn power switch on, disengage bobbin winder. |
6. Specifiche
| Caratteristica | Dettaglio |
|---|---|
| Marca | Necchi |
| Numero di modello | EX100 |
| Colore | Bianco |
| Materiale | Metallo, Plastica |
| Peso dell'articolo | 23.79 libbre |
| Fonte di alimentazione | Adattatore CA |
| Punti incorporati | 100 (including 6 buttonholes) |
| Larghezza massima del punto | 7mm |
| Tavolo allungabile | Included (16" x 11") |
| Caratteristiche speciali | Optic Magnifier, Automatic Thread Cutter, Needle Up/Down, Start/Stop Button |
7. Garanzia e supporto
7.1 Informazioni sulla garanzia
The Necchi EX100 Sewing Machine comes with the following warranty:
- 1 year labor
- 25 year housing/casting
- 5 year electronics
Conservare la prova d'acquisto per eventuali richieste di garanzia.
7.2 Assistenza clienti
For technical assistance, troubleshooting beyond this manual, or warranty service, please contact Necchi customer support. Refer to the contact information provided with your product packaging or visit the official Necchi websito per i dettagli sul supporto attuale.