1. Introduzione
The Optim CW-3000 Industrial Water Chiller is a compact and efficient cooling device suitable for small water cooling applications. It is specifically designed for cooling 0.8KW or 1.5KW CNC router spindles. This chiller features a professional forced air-cooled radiator, water flow completion, and a high-temperature alarm function to ensure reliable operation. Its economical design makes it easy to install, operate, and move.
2. Informazioni sulla sicurezza
Please read all safety instructions carefully before operating the device. Failure to follow these instructions may result in electric shock, fire, or serious injury. Keep this manual for future reference.
- Assicurarsi che l'alimentazione corrisponda al volume del refrigeratoretage requirements (AC 110V 60HZ or AC 220V 50HZ).
- Do not operate the chiller with damaged power cords or plugs.
- Keep the chiller away from heat sources and direct sunlight.
- Garantire un'adeguata ventilazione intorno all'unità per evitare il surriscaldamento.
- Do not immerse the chiller in water or other liquids.
- Scollegare sempre l'alimentazione prima di effettuare qualsiasi operazione di manutenzione o pulizia.
- Tenere fuori dalla portata dei bambini.
3. Prodotto finitoview
The CW-3000 Industrial Water Chiller is designed for efficient heat dissipation. Below are the key components and their functions.

Figura 3.1: Fronte view of the Optim CW-3000 Industrial Water Chiller.
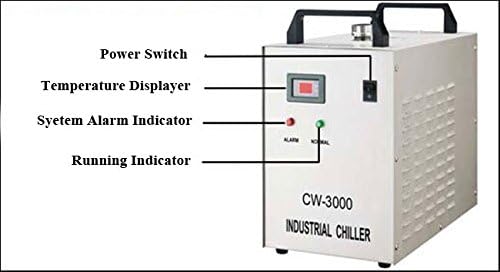
Figure 3.2: Front panel with labels for Power Switch, Temperature Display, System Alarm Indicator (red), and Running Indicator (green).

Figura 3.3: Posteriore view of the chiller, showing the cooling fan and product label with specifications.
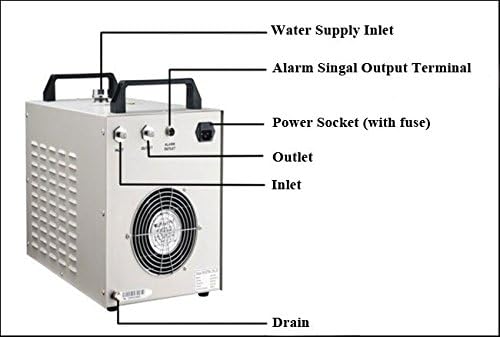
Figure 3.4: Rear panel with labels for Water Supply Inlet, Alarm Signal Output Terminal, Power Socket (with fuse), Outlet, Inlet, and Drain.
4. Istruzioni per l'installazione
Follow these steps to properly set up your CW-3000 Industrial Water Chiller.
4.1 Connecting Water Pipes
Connect the water inlet and outlet pipes to the chiller and your cooling application (e.g., CNC spindle).

Figure 4.1: Close-up of the chiller's water inlet, outlet, and alarm output ports.
For a visual guide on connecting the water pipes and setting up the chiller with a water pump, please refer to the video below:
Video 4.1: This video demonstrates the connection and installation method for an aquarium cooler, which can be applied to the CW-3000 chiller's water pipe setup. It shows how to connect the pipes to the chiller and the water pump, and how to place the pump in the water tank.
4.2 Riempimento del serbatoio dell'acqua
Fill the external water tank (not included) with clean, distilled water. Ensure the water pump is fully submerged.
5. Istruzioni per l'uso
Once the chiller is set up, follow these steps to operate it.
5.1 Accensione
Connect the chiller to a suitable power outlet. The temperature display will light up. The green 'NORMAL' indicator light on the front panel will illuminate when the unit is running correctly.
5.2 Impostazione della temperatura
The chiller features an electronic thermostat for precise temperature control. You can set the desired temperature and the temperature difference for operation.

Figure 5.1: Front panel showing the temperature display and control buttons (SET, Up, Down, RST).
For a detailed demonstration on how to set the temperature, including the temporary stop temperature and temperature difference, please watch the video below:
Video 5.1: This video illustrates the temperature setting procedure. It explains how to set the target temperature and the temperature difference, which determines when the chiller will temporarily stop and restart cooling.
6. Manutenzione
Una manutenzione regolare garantisce prestazioni ottimali e prolunga la durata del tuo refrigeratore.
- Clean the Radiator Fins: Periodically clean the radiator fins to ensure efficient heat dissipation. Use a soft brush or compressed air to remove dust and debris.
- Controllare la qualità dell'acqua: Regularly inspect the water in the external tank. Replace with clean distilled water if it appears dirty or contaminated.
- Ispezionare i tubi flessibili e i collegamenti: Check all water hoses and connections for leaks or damage. Tighten any loose connections.
- Spegnimento quando non in uso: If the chiller will not be used for an extended period, disconnect it from the power supply and drain the water.
7. Risoluzione Dei Problemi
This section addresses common issues you might encounter with your CW-3000 chiller.
| Problema | Possibile causa | Soluzione |
|---|---|---|
| Il refrigeratore non si accende | Nessuna alimentazione, collegamento allentato, fusibile bruciato. | Check power cord, outlet, and replace fuse if necessary. |
| Raffreddamento insufficiente | Blocked radiator fins, low water level, incorrect temperature setting. | Clean radiator fins, refill water tank, verify temperature settings. |
| High-temperature alarm (red indicator) | Overheating due to poor ventilation, high ambient temperature, or insufficient water flow. | Ensure adequate ventilation, check water flow, reduce load if possible. |
| Perdita d'acqua | Loose pipe connections, damaged hoses. | Tighten all connections, inspect hoses for damage and replace if needed. |
8. Specifiche
| Caratteristica | Dettaglio |
|---|---|
| Marca | Ottimale |
| Numero di modello | CW-3000 (Manufacturer Reference: 120A2-600W) |
| Fonte di alimentazione | AC |
| Voltage | 220 Volts (Also available in 110V 60HZ) |
| Peso dell'articolo | 19 chilogrammi |
| Dimensioni del pacco | Dimensioni: 54 x 46 x 31 cm |
| Capacità di raffreddamento | Suitable for 0.8KW / 1.5KW CNC router spindles |
| Codice UPC | 704619563030 |
| ASIN | B07H2XY79T |
9. Garanzia e supporto
Per informazioni sulla garanzia, supporto tecnico o richieste di assistenza, contattare direttamente il rivenditore o il produttore. Conservare la ricevuta d'acquisto come prova d'acquisto.