Introduzione
The KLARSTEIN Lucia Argentea is a versatile multi-functional kitchen machine designed to simplify various food preparation tasks. It combines a powerful stand mixer with a meat grinder and a mixing blender, offering a comprehensive solution for baking, cooking, and beverage preparation. Its robust 650W motor and 6-speed levels ensure efficient processing of ingredients, from light batters to heavy doughs.
This manual provides detailed instructions for the safe and effective operation, maintenance, and troubleshooting of your Lucia Argentea kitchen machine. Please read it thoroughly before first use and keep it for future reference.
Prodotto finitoview e componenti
The Lucia Argentea kitchen machine comes with several key components and attachments to maximize its functionality.

Figura 1: Main unit with stand mixer, meat grinder, and blender attachments. This image shows the complete multi-functional kitchen machine, highlighting its primary components.

Figura 2: All included accessories for the Lucia Argentea. This includes the mixing bowl, dough hook, stirring beater, whisk, splash guard, blender jug, meat grinder attachment with various discs, and pasta shaping molds.
Unità principale
- Alloggiamento del motore: Contains the 650W motor and control knob for speed selection.
- Tilt-Head Mechanism: Allows for easy attachment and removal of accessories and access to the mixing bowl.
- Terrina: 5.3 qt (5 liter) stainless steel bowl for mixing, kneading, and whipping.
- Manopola di controllo della velocità: Offers 6 speed levels for precise control over various tasks.
Allegati
- Gancio per impastare: Made of die-cast aluminum, ideal for heavy masses like sourdough or yeast dough.
- Stirring Beater: Made of die-cast aluminum, suitable for uniform stirring of large quantities, such as cake batters.
- Frusta: Stainless steel whisk for whipping cream, egg whites, and light mixtures.
- Paraspruzzi: Coperchio trasparente per evitare schizzi durante il funzionamento.
- Brocca del frullatore: 1.3 qt (1.2 liter) glass jug with lid and mini measuring cup for shakes, smoothies, and purees.
- Accessorio tritacarne: Includes 3 power discs (fine, medium, coarse) and 6 pasta shaping molds for various pasta types (spaghetti, macaroni, vermicelli). Also includes a sausage pipe with holder and disc.
Installazione e assemblaggio
Before first use, ensure all parts are clean. Refer to the "Maintenance and Cleaning" section for initial cleaning instructions.
- Posizionamento dell'unità: Posizionare l'unità principale su una superficie stabile, piana e asciutta. Garantire un'adeguata ventilazione attorno all'apparecchio.
- Fissaggio della ciotola per mescolare:
- Lift the tilt-head by pushing the release lever.
- Posizionare la ciotola in acciaio inossidabile sulla base, allineando le scanalature, e ruotarla in senso orario finché non si blocca saldamente.
- Lower the tilt-head until it clicks into place.
- Attaching Mixer Accessories (Dough Hook, Stirring Beater, Whisk):
- Lift the tilt-head.
- Insert the desired attachment (dough hook, stirring beater, or whisk) into the accessory shaft. Push upwards and turn counter-clockwise until it locks.
- Lower the tilt-head.
- Attach the splash guard by sliding it onto the tilt-head until it covers the bowl opening.
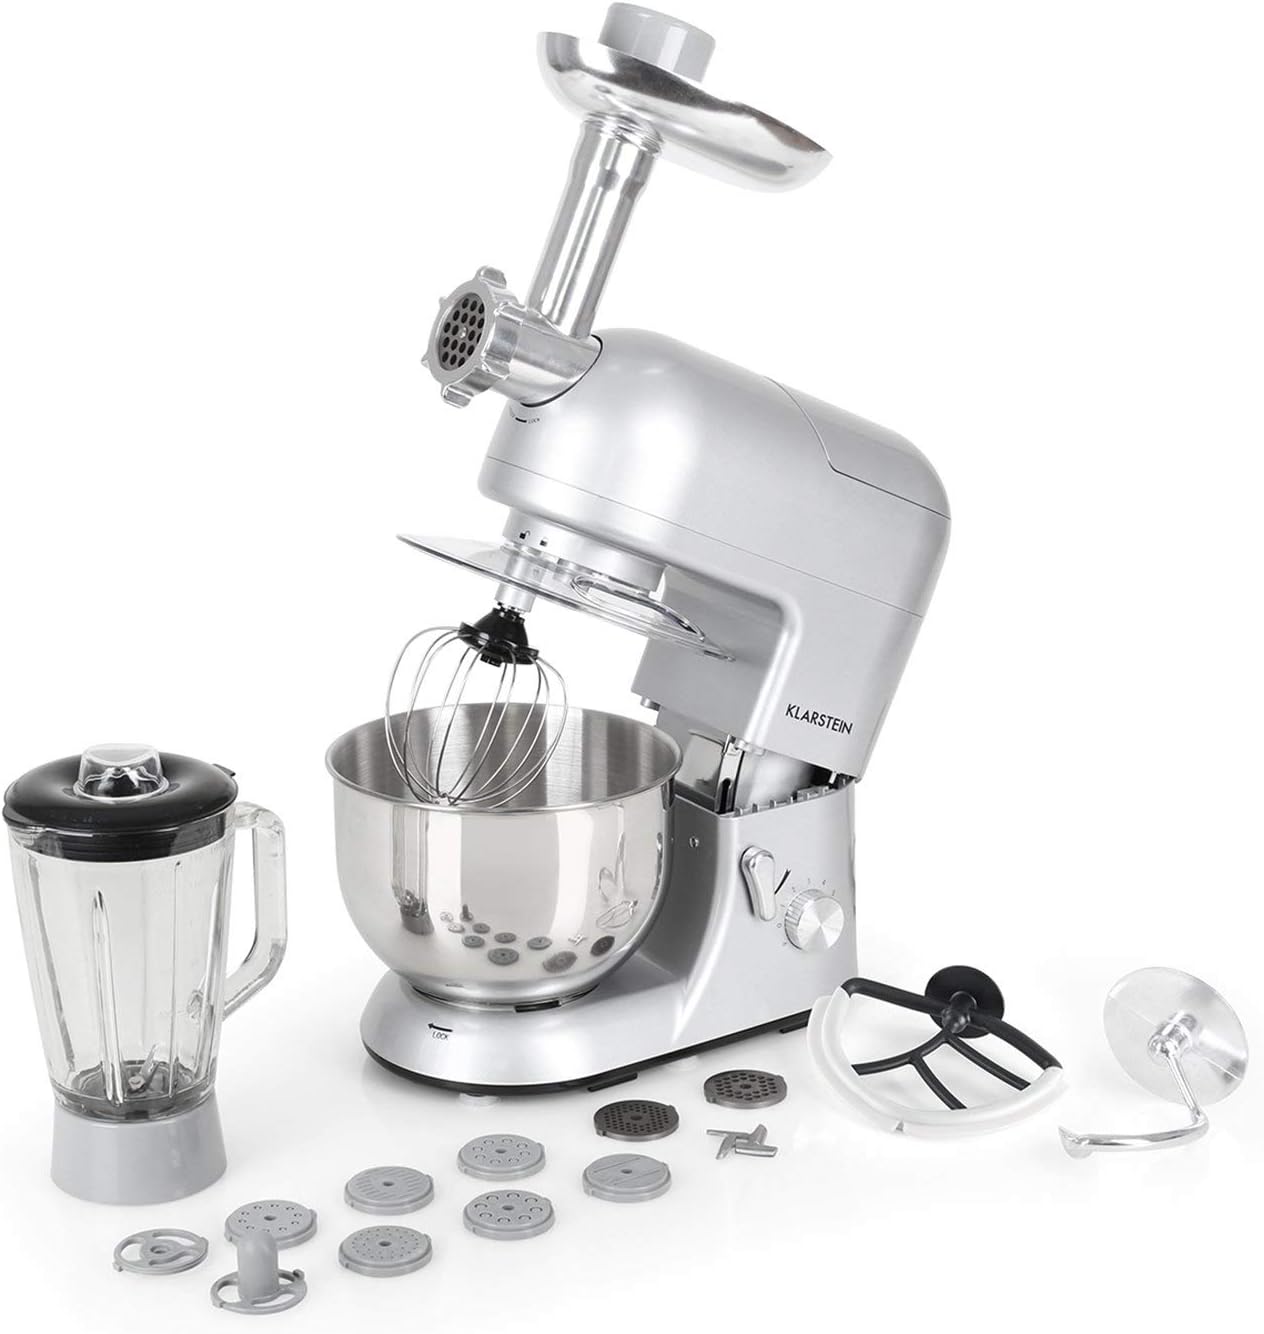
Figura 3: The 5.3 qt stainless steel bowl with splash guard, designed for thorough and homogeneous mixing results.
- Attaching the Blender Jug:
- Assicurarsi che l'unità principale sia scollegata.
- Rimuovere il coperchio dalla porta di collegamento superiore dell'unità principale.
- Place the blender jug onto the port, aligning the base with the drive shaft, and turn clockwise to secure.
- Add ingredients and secure the blender lid.
- Attaching the Meat Grinder/Pasta Maker:
- Assicurarsi che l'unità principale sia scollegata.
- Rimuovere il coperchio dalla porta di collegamento anteriore sull'unità principale.
- Assemble the meat grinder components (screw, blade, disc, ring) and attach the assembled unit to the front port, turning to lock.
- For pasta making, attach the desired pasta shaping mold to the meat grinder outlet.

Figura 4: A selection of discs and molds for meat grinding and pasta making, offering versatility for different culinary needs.
Istruzioni per l'uso
Always ensure the appliance is properly assembled and secured before operation. Do not operate the machine empty.
Stand Mixer Operation
- Place the mixing bowl and desired attachment (dough hook, stirring beater, or whisk) as described in the "Setup" section.
- Add ingredients to the mixing bowl. Do not exceed the maximum capacity of 5.3 qt (4.4 lbs of dough).
- Ensure the tilt-head is securely locked down.
- Collegare l'apparecchio a una presa di corrente idonea.
- Ruotare la manopola di controllo della velocità fino all'impostazione desiderata (1-6). Iniziare con una velocità più bassa e aumentare gradualmente se necessario per evitare schizzi.
- Allow the machine to mix until the desired consistency is achieved. The planetary mixing action ensures thorough and homogeneous results.
- To stop, turn the speed control knob to "0" (off) and unplug the appliance.
- Lift the tilt-head to remove the attachment and bowl.
1 video: Demonstration of the KLARSTEIN Lucia Orangina Kitchen Machine's various functions, including mixing, blending, and pasta making. This video provides a visual guide to operating the different attachments.
Funzionamento del frullatore
- Attach the blender jug to the top port as described in "Setup."
- Add liquids and solid ingredients to the blender jug. Do not overfill.
- Securely close the blender lid.
- Collegare l'apparecchio alla corrente.
- Turn the speed control knob to the desired blending speed. For pulse blending, use the "P" setting.
- Blend until smooth or to the desired consistency.
- Turn the speed control knob to "0" (off) and unplug the appliance before removing the jug.
Meat Grinder / Pasta Maker Operation
- Attach the meat grinder unit to the front port as described in "Setup." Ensure the correct disc or pasta mold is installed.
- Place a bowl or plate beneath the grinder outlet to collect processed food.
- Collegare l'apparecchio alla corrente.
- Turn the speed control knob to a suitable speed (usually medium to high for grinding/pasta).
- Feed pre-cut meat or prepared pasta dough into the feeding tube using the food pusher. Never use your fingers or other utensils to push food into the grinder.
- Once processing is complete, turn the speed control knob to "0" (off) and unplug the appliance.
- Disassemble the unit for cleaning.
Manutenzione e pulizia
Regular cleaning ensures the longevity and hygienic operation of your kitchen machine. Always unplug the appliance before cleaning.
Unità principale
- Pulire l'alloggiamento del motore con adamp panno. Non immergere l'unità principale in acqua o altri liquidi.
- Avoid abrasive cleaners or scouring pads, as they can damage the surface.
Attachments and Bowls
- The stainless steel mixing bowl, whisk, dough hook, and stirring beater are dishwasher safe.
- The glass blender jug and its components should be disassembled and washed with warm soapy water. Rinse thoroughly and dry.
- The meat grinder components (screw, blade, discs, molds) should be disassembled immediately after use and washed with warm soapy water. Dry thoroughly to prevent rust, especially for metal parts.
- The plastic splash guard can be washed by hand with warm soapy water.
Nota: For stubborn residue, soak parts in warm soapy water before cleaning.
Risoluzione dei problemi
If you encounter issues with your KLARSTEIN Lucia Argentea, refer to the following common problems and solutions:
| Problema | Possibile causa | Soluzione |
|---|---|---|
| L'apparecchio non si accende. | Not plugged in; power outlet faulty; tilt-head not locked; safety fuse activated. | Check power connection; try another outlet; ensure tilt-head is fully locked; allow unit to cool down if overheated (auto-shutoff after 10 mins continuous use). |
| L'accessorio per mescolare non raggiunge gli ingredienti. | Insufficient quantity of ingredients in the bowl. | Increase ingredient quantity to ensure proper engagement with the attachment. |
| Rumore o vibrazioni eccessivi. | Overloaded; unstable surface; attachment not properly secured. | Reduce load; place on a stable surface; ensure attachment is locked in place. |
| Splashing during mixing. | Speed too high; splash guard not installed. | Reduce speed; ensure splash guard is correctly installed. |
| Meat grinder/blender not functioning. | Attachment not properly secured; ingredients too large/hard. | Ensure attachment is fully locked; cut ingredients into smaller pieces. |
Se il problema persiste dopo aver provato queste soluzioni, contattare l'assistenza clienti KLARSTEIN.
Specifiche
- Marca: CHIAROSTATO
- Nome modello: Lucia Argentea
- Colore: Argento
- Dimensioni del prodotto: 18.9"P x 9.1"L x 25.2"A
- Materiale della lama: Acciaio inossidabile
- Caratteristica speciale: Controllo della velocità regolabile
- Capacità della ciotola per mescolare: 5 Liters (approx. 5.3 qt)
- Capacità della caraffa del frullatore: 1.3 qt
- Tipo di controlli: Manopola
- Peso dell'articolo: 24.3 libbre
- Energia: 650W
- Parti lavabili in lavastoviglie: Yes (Mixing bowl, whisk, dough hook, stirring beater)
- Codice UPC: 819885020252

Figura 5: Detailed dimensions of the KLARSTEIN Lucia Argentea kitchen machine, showing its height, depth, and width.
Garanzia e supporto
For warranty information, product registration, or technical support, please refer to the official KLARSTEIN webo contattare direttamente il servizio clienti. Conservare la ricevuta d'acquisto come prova d'acquisto per eventuali reclami in garanzia.
Supporto online: www.klarstein.com