
Informazioni importanti sulla sicurezza
Please read and understand all instructions before beginning installation. Failure to do so may result in electric shock, fire, or other injuries that could be fatal or cause property damage.
- AVVERTENZA: Rischio di incendio. Utilizzare solo su circuiti da 120 volt 60Hz.
- Adatto per damp posizioni.
- Prima di installare il tuo apparecchio di illuminazione, rifare a fondoview manuale di installazione allegato.
- Se non si ha sufficiente esperienza in materia di cablaggio elettrico, consultare un manuale di cablaggio fai da te oppure far installare l'apparecchio da un elettricista qualificato e autorizzato.
- All electrical connections must be in accordance with Local and National Electrical Code (NEC) Standards.
- Reliable operating temperature is 0°F - 120°F.
- If flickering occurs in low level dimming, increase light level.
- Compatible with most standard dimmers. Dimmable to 10% with most dimmers.
- For more information including dimmer compatibility visit www.inlightmotion.com.
Cosa c'è nella scatola
- GETINLIGHT 7-Inch Flush Mount LED Ceiling Light Fixture
- Viti di montaggio
- Dadi a filo
- Manuale di installazione

Image: Packaging of the GETINLIGHT Flush Mount LED Ceiling Light, showing the light fixture, mounting hardware, and instruction manual.
Strumenti necessari
- Cacciavite (a croce e/o a taglio)
- Spellafili
- Pinze (facoltative)
- Voltage Tester (consigliato)
Specifiche
| Caratteristica | Specificazione |
|---|---|
| Marca | GETINLIGHT |
| Numero di modello | IN-0302-2-SN |
| Dimensioni del prodotto | 7 x 7 x 1.02 pollici |
| Peso dell'articolo | 12.8 once |
| Temperatura del colore | 3000K (bianco morbido) |
| Luminosità | 750 lumen |
| Cosatage | 14 Watt |
| Voltage | 120 Volt |
| Tipo di finitura | Nichel spazzolato |
| Materiale | Metal housing, Plastic shade |
| Tipo di installazione | Flush Mount (Surface-Mounted) |
| Caratteristiche speciali | Dimmable, Instant On, Driver on Board Technology |
| Certificazione | ETL & cETL wet location listed |
| Assemblaggio richiesto | SÌ |
Istruzioni per l'installazione
This GETINLIGHT LED ceiling light is designed for quick and easy installation on a standard 3" or 4" junction box. Always ensure power is turned off at the circuit breaker before beginning any electrical work.
Passaggio 1: preparare l'area di installazione
Turn off power to the light fixture at the circuit breaker. Remove any existing light fixture, exposing the electrical wires from the junction box.

Immagine: Frontale view of the GETINLIGHT 7-Inch Flush Mount LED Ceiling Light.
Passaggio 2: identificare i fili
Identify the supply wires from the junction box: typically white (neutral), black (hot), and green/bare copper (ground). The light fixture will have corresponding wires.
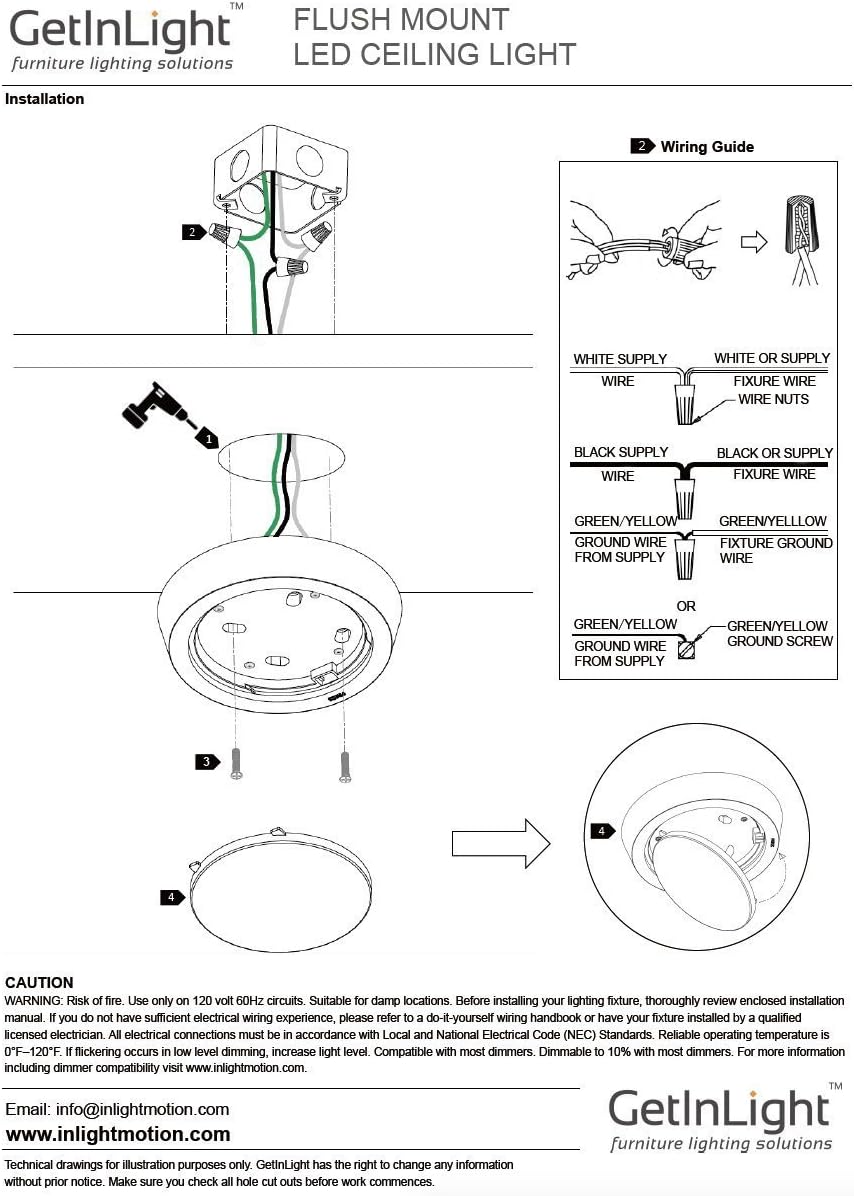
Image: Detailed wiring guide showing connections for white, black, and green/yellow ground wires.
Passaggio 3: collegare il cablaggio
Connect the fixture's white wire to the supply's white wire using a wire nut. Connect the fixture's black wire to the supply's black (or red) wire using a wire nut. Connect the fixture's ground wire (yellow/green) to the supply's ground wire (green or bare copper) or to the junction box's ground screw. Ensure all connections are secure.

Image: Close-up of the LED light engine and internal wiring connections before final assembly.
Fase 4: montare il dispositivo
Carefully tuck all wires into the junction box. Align the fixture's mounting holes with the screw holes on the junction box. Secure the fixture to the junction box using the provided mounting screws. The unique "press-click-open" design allows the diffuser to be secured to the housing after mounting.
Step 5: Attach Diffuser
Once the fixture is securely mounted, attach the matte polycarbonate diffuser by aligning its tabs and pressing it into place until it clicks securely.
Videoguida all'installazione
For a visual step-by-step guide, please watch the official installation video below:
Video: Official installation guide for the GETINLIGHT IN-0302 Series Ceiling Light, demonstrating the wiring and mounting process.
Istruzioni per l'uso
This LED ceiling light is designed for simple operation. Once installed and power is restored, it will function like a standard light fixture controlled by a wall switch.
- Accensione/spegnimento: Per accendere o spegnere la lampada, utilizza l'interruttore a parete esistente.
- dimming: The fixture is dimmable with most standard dimmers. For optimal performance and to avoid flickering, ensure your dimmer switch is compatible with LED lighting. If flickering occurs at low light levels, slightly increase the dimmer setting.
- Accensione immediata: The LED light provides instant illumination without any warm-up time.
Manutenzione
The GETINLIGHT LED ceiling light requires minimal maintenance. Ensure power is off before cleaning.
- Pulizia: Wipe the fixture and diffuser with a soft, dry, or slightly damp panno. Non utilizzare detergenti abrasivi o solventi, poiché potrebbero danneggiare la finitura o i componenti elettrici.
- Longevità dei LED: LED lights are designed for long life and do not require bulb replacement.
Risoluzione dei problemi
| Problema | Possibile causa | Soluzione |
|---|---|---|
| La luce non si accende. | No power to the fixture; loose wiring connection; faulty switch or circuit breaker. | Check circuit breaker and wall switch. Verify all wire connections are secure. Test power with a voltagetester. |
| Sfarfallio di luce. | Incompatible dimmer switch; loose wiring; low light level setting on dimmer. | Ensure dimmer is LED compatible. Tighten wire connections. Increase dimmer setting. |
| La luce è troppo fioca o troppo intensa. | L'impostazione del dimmer non è corretta. | Regola il dimmer sul livello di luminosità desiderato. |
| Fixture feels warm. | Normal operation for LED fixtures; excessive heat could indicate poor ventilation or faulty installation. | A slight warmth is normal. Ensure the fixture is not enclosed in a way that restricts airflow. If it's excessively hot, turn off power and consult a qualified electrician. |
Garanzia e supporto
This product comes with a Manufacturer and Seller Combination Warranty. Please refer to the product packaging or contact GETINLIGHT customer service for specific warranty details and support.
For technical assistance or customer service, please visit www.inlightmotion.com oppure contatta direttamente il venditore.