Introduzione
Welcome to the Necchi N82 Automatic Sewing Machine instruction manual. This guide provides essential information for the safe and efficient operation of your new sewing machine. Please read this manual thoroughly before using the machine to ensure proper setup, operation, and maintenance.
The Necchi N82 is a robust and versatile sewing machine, ideal for both beginners and experienced users. It features 8 stitch points, 14 programs, and a 4-step automatic buttonhole function, designed to handle various sewing projects with ease.
Importanti istruzioni di sicurezza
Quando si utilizza un elettrodomestico, è necessario seguire sempre le precauzioni di sicurezza di base, tra cui le seguenti:
- Leggere tutte le istruzioni prima di utilizzare questa macchina da cucire.
- Conservare queste istruzioni in un luogo comodo vicino alla macchina.
- Always unplug the sewing machine from the electrical outlet immediately after using and before cleaning, removing covers, lubricating, or making any other user servicing adjustments mentioned in the instruction manual.
- Do not allow children to play with the machine. Close supervision is necessary when the sewing machine is used by or near children.
- Use this product only for its intended use as described in this manual. Use only accessories recommended by the manufacturer.
- Non azionare mai questa macchina da cucire se il cavo o la spina sono danneggiati, se non funziona correttamente, se è caduta, è danneggiata o è caduta in acqua.
- Non far cadere o inserire mai alcun oggetto in nessuna apertura.
- Non utilizzare all'aperto.
- Non operare in luoghi in cui vengono utilizzati prodotti aerosol (spray) o in cui viene somministrato ossigeno.
- Per scollegarlo, portare tutti i comandi in posizione off, quindi rimuovere la spina dalla presa.
- Tenere le dita lontane da tutte le parti in movimento. È necessaria una cura speciale intorno all'ago della macchina per cucire.
- Utilizzare sempre la piastra ago corretta. Una piastra sbagliata può causare la rottura dell'ago.
- Non utilizzare aghi piegati.
- Non tirare o spingere il tessuto durante la cucitura. Ciò potrebbe deviare l'ago e causarne la rottura.
- Indossare occhiali protettivi.
Contenuto della confezione
Upon unpacking your Necchi N82 sewing machine, please ensure all the following items are present:
- Necchi N82 Sewing Machine
- Standard Zigzag Foot
- Piedino per cerniera
- Piedino per asole
- Cacciavite
- Oliatore
- Needles (assorted)
- Guida alla trapunta
- 3 Bobine
- Darning Plate (for feed dog cover)
- 2 Spool Holders (large and small)
- Feltro
- Electric Foot Pedal
- Manuale di istruzioni (questo documento)
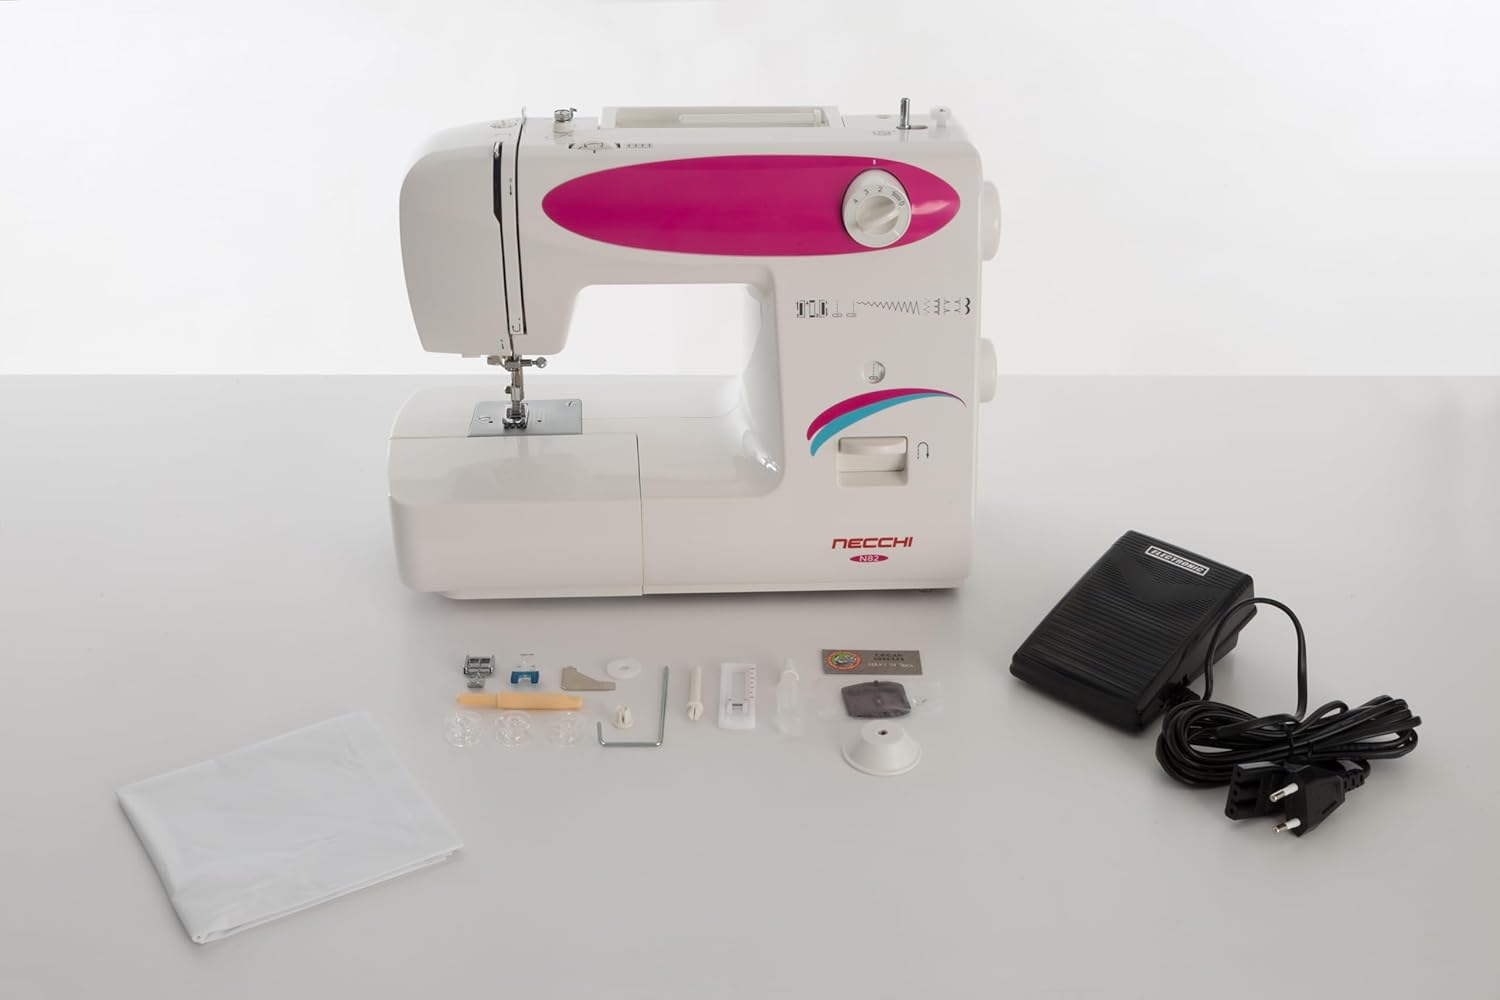
Image: The Necchi N82 sewing machine displayed with its complete set of accessories, including various presser feet, bobbins, needles, and the foot pedal.
Macchina finitaview
Familiarize yourself with the main components of your Necchi N82 sewing machine.

Immagine: Un fronte chiaro view of the Necchi N82 sewing machine, highlighting its general design and controls.

Immagine: Un fronte dettagliato view of the Necchi N82 sewing machine, showing the needle area, presser foot, and stitch selection dial.

Immagine: Lato A view of the Necchi N82 sewing machine, illustrating its profile and power input area.
Componenti chiave:
- Selettore punti: Utilizzato per scegliere i punti desiderati.
- Stitch Length/Width Dial: Adjusts the length and width of stitches.
- Quadrante di tensione: Controlla la tensione del filo superiore.
- Leva per punto indietro: Per rinforzare le cuciture.
- Sollevatore del piedino: Solleva e abbassa il piedino premistoffa.
- Ago Clamp: Mantiene l'ago in posizione.
- Avvolgitore della bobina: Per avvolgere il filo sulle bobine.
- Braccio libero: Consente di cucire elementi cilindrici come maniche e orli dei pantaloni.
- Connettore del pedale: For connecting the electric foot pedal.
- Interruttore di alimentazione: Accende/spegne la macchina.
Impostare
1. Collegamento elettrico
- Assicurarsi che l'interruttore di alimentazione sia in posizione "OFF".
- Connect the foot pedal cord to the machine's foot pedal connector.
- Collegare il cavo di alimentazione a una presa elettrica idonea.
- Turn the power switch to "ON". The sewing light will illuminate.
2. Avvolgimento della bobina
- Place a spool of thread on the spool pin, securing it with a spool holder.
- Far passare il filo attraverso la guida del filo superiore e attorno al disco di tensione dell'avvolgimento della bobina.
- Posizionare una bobina vuota sul perno dell'avvolgitore.
- Wrap the thread clockwise several times around the bobbin.
- Spingere l'alberino avvolgitore della bobina verso destra.
- Press the foot pedal gently to start winding. Stop when the bobbin is full.
- Tagliare il filo e spingere il perno dell'avvolgitore della bobina verso sinistra. Rimuovere la bobina avvolta.
3. Inserimento della bobina
- Aprire la piastra di copertura della bobina.
- Inserire la bobina avvolta nella capsula, assicurandosi che il filo si svolga nella direzione corretta (solitamente in senso antiorario).
- Far passare il filo attraverso la molla di tensione e nella fessura del guidafilo.
- Chiudere la piastra di copertura della bobina.
4. Infilatura del filo superiore
- Sollevare l'alzapiedino.
- Posizionare un rocchetto di filo sul portarocchetto.
- Far passare il filo attraverso il guidafilo superiore.
- Follow the numbered threading path down to the tension discs, up to the take-up lever, and then down to the needle.
- Thread the needle from front to back. Pull about 15 cm (6 inches) of thread through the needle eye.
5. Bringing Up the Bobbin Thread
- Tenere delicatamente il filo superiore con la mano sinistra.
- Turn the handwheel towards you (counter-clockwise) to lower the needle into the needle plate and then raise it again.
- The needle thread will catch the bobbin thread, forming a loop. Pull the loop up with the upper thread.
- Tirare entrambi i fili (superiore e della bobina) sotto il piedino premistoffa e verso la parte posteriore della macchina.
Istruzioni per l'uso
1. Selezione del punto
The Necchi N82 offers 8 stitch points and 14 programs. To select a stitch, turn the Stitch Selector Dial until the desired stitch pattern aligns with the indicator mark. The visual stitch selection window allows you to see the chosen pattern.

Image: The Necchi N82 sewing machine set up on a table with fabric, scissors, and other sewing accessories, demonstrating a typical use scenario.
2. Regolazione della lunghezza e della larghezza del punto
Adjust the stitch length and width using the dedicated dials. Refer to the zigzag scale for precise adjustments, especially for decorative or zigzag stitches.
3. Regolazione della tensione del filo
The tension dial controls the tightness of the upper thread. For balanced stitches, the upper and lower threads should interlock evenly between the fabric layers. Adjust as needed for different fabrics and threads.
4. Automatic Buttonhole Function (4-Step)
- Montare il piedino per asole.
- Select the first step of the buttonhole program on the stitch selector dial.
- Follow the machine's markings or the manual's specific instructions for each of the four steps to create a complete buttonhole.
5. Free Arm Sewing
To use the free arm, slide off the accessory box. This exposes the narrow free arm, perfect for sewing cuffs, sleeves, pant hems, and other small, cylindrical items.

Image: The Necchi N82 sewing machine with its removable accessory box detached, showcasing the free arm feature for sewing tubular items.
6. Cucitura inversa
Press and hold the reverse stitch lever to sew in reverse. This is used to secure the beginning and end of seams, preventing unraveling. Release the lever to resume forward stitching.
7. Adjustable Presser Foot Pressure
The machine features an adjustable presser foot pressure control. This allows you to fine-tune the pressure applied to the fabric, which is crucial when working with very thin or very thick materials to ensure even feeding.
Manutenzione
Regular maintenance ensures the longevity and optimal performance of your Necchi N82 sewing machine. Always unplug the machine before performing any maintenance.
1. Pulizia
- Griffe di trasporto: Remove the needle plate and use the small brush (included) to clean lint and dust from the feed dogs.
- Area della bobina: Remove the bobbin and bobbin case. Clean any lint or thread scraps from this area with the brush.
- Superficie della macchina: Pulire l'esterno della macchina con un panno morbido e asciutto. Non utilizzare prodotti chimici aggressivi o detergenti abrasivi.
2. Oliatura
Your machine comes with an oiler. Apply a small drop of sewing machine oil to the moving metal parts in the bobbin area and other designated oiling points as indicated in a more detailed diagram (if available in a physical manual). Over-oiling can cause stains on fabric.
3. Sostituzione dell'ago
- Spegnere la macchina e staccare la spina.
- Allentare l'ago clamp avvitare con il cacciavite.
- Rimuovere il vecchio ago.
- Inserire un nuovo ago con il lato piatto rivolto verso il retro della macchina, spingendolo verso l'alto il più possibile.
- Stringere l'ago clamp avvitare saldamente.
Risoluzione dei problemi
Questa sezione affronta i problemi più comuni che potresti riscontrare. Per problemi non elencati qui, contatta l'assistenza clienti.
| Problema | Possibile causa | Soluzione |
|---|---|---|
| Punti saltati | Ago sbagliato, ago piegato, infilatura non corretta, misura dell'ago sbagliata per il tessuto. | Sostituire l'ago con uno del tipo/dimensione corretti, infilare nuovamente la macchina correttamente e assicurarsi che l'ago sia inserito completamente. |
| Rottura del filo (superiore) | Incorrect upper thread tension, poor quality thread, needle bent or blunt, improper threading, burr on needle plate. | Regolare la tensione, utilizzare un filo di buona qualità, sostituire l'ago, reinfilare, controllare che non vi siano sbavature. |
| Rottura del filo (bobina) | Bobbin wound unevenly, bobbin inserted incorrectly, lint in bobbin case, incorrect bobbin tension. | Rewind bobbin evenly, re-insert bobbin correctly, clean bobbin case, check bobbin tension. |
| Punti irregolari / Arricciature | Incorrect thread tension, wrong needle size, fabric not feeding smoothly, incorrect presser foot pressure. | Adjust tension, use appropriate needle, ensure fabric is not pulled/pushed, adjust presser foot pressure. |
| La macchina non si avvia | Power cord not plugged in, foot pedal not connected, power switch off, bobbin winder engaged. | Check all connections, turn power on, disengage bobbin winder. |
Specifiche
Technical specifications for the Necchi N82 Automatic Sewing Machine:
| Caratteristica | Dettaglio |
|---|---|
| Marca | Necchi |
| Numero di modello | N82 |
| Colore | Bianco |
| Dimensioni del prodotto (L x P x A) | Dimensioni: 38 x 30 x 17 cm |
| Peso dell'articolo | 6 kg |
| Materiale | Plastica |
| Programmi di cucitura | 14 (including 8 stitch points) |
| Tipo di asola | Automatico in 4 fase |
| Fonte di alimentazione | Elettrico con cavo |
| Spegnimento automatico | NO |
| Codice GTIN | 08031204113885 |
Garanzia e supporto
For warranty information, please refer to the warranty card included with your purchase or contact your retailer.
If you require technical assistance or have questions regarding the operation or maintenance of your Necchi N82 sewing machine, please contact Necchi customer support or your authorized service center.