
1. Introduzione
Thank you for choosing the Hoover WDXA 5117 AH-S Washer Dryer. This appliance is designed to provide efficient and convenient laundry care. To ensure optimal performance and safety, please read this instruction manual carefully before using the appliance and keep it for future reference. This manual contains important information on installation, operation, maintenance, and troubleshooting.
2. Informazioni sulla sicurezza
Sicurezza generale:
- Scollegare sempre l'apparecchio dalla rete elettrica prima di pulirlo o di effettuare qualsiasi intervento di manutenzione.
- Questo apparecchio è destinato esclusivamente all'uso domestico. Non utilizzarlo per scopi commerciali o industriali.
- Non consentire ai bambini o alle persone con ridotte capacità fisiche, sensoriali o mentali di utilizzare l'apparecchio senza supervisione.
- Keep packaging materials (plastic bags, polystyrene, etc.) out of reach of children, as they can be dangerous.
- Ensure the appliance is properly earthed and connected to a suitable power outlet.
- Non toccare l'apparecchio con mani o piedi bagnati.
- Do not pull the power cord to unplug the appliance; always grasp the plug.
Sicurezza dell'installazione:
- Assicurarsi che l'apparecchio sia installato su una superficie solida e piana.
- Non installare l'apparecchio in luoghi esposti a temperature estreme o elevata umidità.
- Check that the water inlet and drain hoses are correctly connected and secured to prevent leaks.
- Remove all transit bolts and packing materials before use. Failure to do so can cause severe damage to the appliance.
Sicurezza operativa:
- Do not overload the appliance. Refer to the maximum load capacity specified in the program table.
- Do not wash or dry items that have been soiled with flammable substances (e.g., cooking oil, petrol).
- Always check pockets for foreign objects (coins, keys, lighters) before loading laundry.
- The door can become very hot during drying cycles. Keep children and pets away from the appliance.
3. Configurazione e installazione
3.1 Disimballaggio
Carefully remove the appliance from its packaging. Remove all internal packing materials, including the polystyrene block and any plastic bags. Retain the packaging for future transport if needed.
Importante: Remove the transit bolts located at the rear of the appliance. These bolts secure the drum during transport and must be removed before operation. Keep the transit bolts for future transport of the machine.
3.2 Posizionamento
Place the appliance on a firm, level floor. Ensure there is adequate space around the machine for ventilation and maintenance. Adjust the feet at the bottom of the appliance to ensure it is perfectly level. A spirit level can be used for accuracy. Proper leveling prevents excessive vibration and noise during operation.
3.3 Collegamento idrico
Ingresso acqua: Connect the supplied water inlet hose to the cold water tap. Ensure the connection is tight to prevent leaks. Do not use old hoses.
Scarico dell'acqua: Position the drain hose into a standpipe or over the edge of a sink. Ensure the drain hose is securely fixed to prevent it from dislodging during the cycle. The height of the drain point should be between 60 cm and 100 cm from the floor.
3.4 Collegamento elettrico
Collegare il cavo di alimentazione a una presa elettrica con messa a terra. Assicurarsi che il volumetage and frequency of your electrical supply match the specifications on the appliance's rating plate. Do not use extension cords or multiple adapters.
3.5 Primo utilizzo
Before washing any laundry, run an empty wash cycle at 60°C with a small amount of detergent to clean the drum and remove any manufacturing residues.
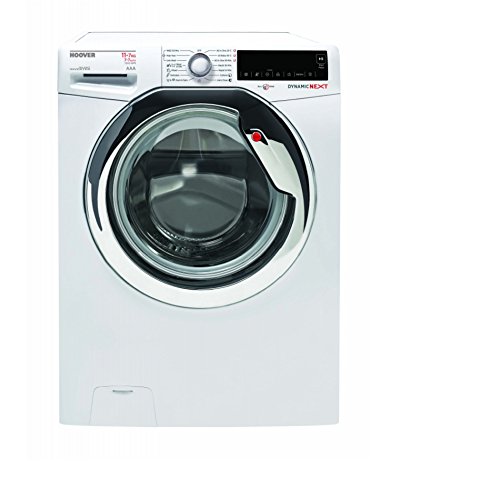
Immagine 1: anteriore view of the Hoover WDXA 5117 AH-S Washer Dryer. This image shows the appliance's control panel, detergent drawer, and loading door, illustrating its compact design and front-load configuration.
4. Istruzioni per l'uso
4.1 Pannello di controllo Sopraview
The control panel typically includes a program selector knob, a digital display, and various option buttons (e.g., Start/Pause, Temperature, Spin Speed, Delay Start, Drying Level).
- Manopola di selezione del programma: Utilizzato per selezionare il programma di lavaggio o asciugatura desiderato.
- Display: Mostra la durata del programma, il tempo rimanente, i codici di errore e le opzioni selezionate.
- Pulsante Avvio/Pausa: Avvia o interrompe un ciclo.
- Pulsanti di opzione: Allow customization of programs (e.g., pre-wash, extra rinse, steam).
4.2 Caricamento della biancheria
Open the door and load items one by one, ensuring they are not tangled. Do not overload the drum. Leave enough space for the laundry to tumble freely. Close the door firmly.
4.3 Aggiunta di detersivo e additivi
Pull out the detergent drawer. Add detergent to the main wash compartment (II) and fabric softener to the softener compartment (flower symbol). If using pre-wash, add detergent to compartment (I). Do not exceed the MAX level indicated in the compartments.
4.4 Selezione di un programma
Turn the program selector knob to choose the desired wash or dry program. The display will show the default duration and temperature for the selected program. You can then adjust options like temperature, spin speed, or drying level using the respective buttons.
Programmi comuni:
- Cotone: Per articoli in cotone resistenti.
- Sintetici: Per tessuti sintetici o misti.
- Delicati: Per capi delicati che richiedono una cura delicata.
- Lana: Programma specifico per capi in lana.
- Lavaggio rapido: Quick cycles for lightly soiled items.
- Lavare e asciugare: Combines washing and drying in one continuous cycle.
- Programmi di asciugatura: Various levels of drying (e.g., Extra Dry, Cupboard Dry, Iron Dry).
4.5 Avvio di un ciclo
Once the program and options are selected, press the Start/Pause button to begin the cycle. The door will lock, and the program will start.
4.6 Fine del ciclo
At the end of the cycle, the display will show "End" or a similar indication. The door will unlock after a short delay. Open the door and remove your laundry. Turn the program selector knob to the "Off" position and unplug the appliance from the power supply.
5. Manutenzione
Regular maintenance ensures the longevity and efficient operation of your appliance. Always disconnect the power supply before performing any maintenance.
5.1 Pulizia del cassetto del detersivo
Pull out the detergent drawer completely. Rinse it under running water to remove any detergent residue. Use a brush if necessary. Reinsert the drawer.
5.2 Pulizia del filtro
The filter collects lint and small objects. It should be cleaned regularly, especially after drying cycles. Locate the filter cover at the bottom front of the appliance. Open the cover, place a shallow container underneath to catch any water, and slowly unscrew the filter. Remove any debris and rinse the filter under running water. Screw it back in firmly and close the cover.
5.3 Pulizia del tamburo
Periodically run a maintenance wash cycle (e.g., a hot wash at 90°C without laundry) using a descaling agent or a specialized washing machine cleaner to prevent limescale buildup and odors.
5.4 Pulizia dell'esterno
Pulire le superfici esterne dell'apparecchio con un panno morbido eamp panno. Non usare detergenti abrasivi o solventi.
5.5 Precauzioni invernali
If the appliance is to be left in an unheated room during winter, drain all water from the hoses and pump to prevent freezing damage. Consult a qualified technician if unsure.
6. Risoluzione Dei Problemi
Prima di contattare il servizio clienti, verifica i seguenti problemi comuni e le relative soluzioni:
| Problema | Possibile causa | Soluzione |
|---|---|---|
| L'apparecchio non si avvia. | No power supply; door not closed; Start/Pause button not pressed. | Check power plug and fuse; ensure door is firmly closed; press Start/Pause button. |
| L'acqua non si riempie. | Rubinetto dell'acqua chiuso; tubo di alimentazione piegato; pressione dell'acqua troppo bassa. | Aprire il rubinetto dell'acqua; raddrizzare il tubo; controllare l'alimentazione idrica. |
| L'acqua non defluisce. | Tubo di scarico piegato o bloccato; filtro bloccato. | Straighten drain hose; clean the filter (see Maintenance section). |
| Vibrazioni/rumore eccessivi. | Transit bolts not removed; appliance not level; uneven load. | Remove transit bolts; adjust feet to level appliance; redistribute laundry. |
| Scarsi risultati di lavaggio. | Sovraccarico; detersivo insufficiente; programma errato. | Reduce load; use correct amount of detergent; select appropriate program. |
| Scarsi risultati di asciugatura. | Overloading; filter blocked; incorrect drying level selected. | Reduce load; clean the filter; select a higher drying level. |
7. Specifiche
The following are key specifications for the Hoover WDXA 5117 AH-S Washer Dryer:
- Marca: Aspirapolvere
- Modello: WDXA 5117 AH-S
- Numero modello: 31006434
- ASIN: B017IT4DWQ
- EAN (International Article Number): 08016361897618
- Tipo: Front-load Washer Dryer
- Velocità di rotazione massima: 1500 giri al minuto
- Colore: Bianco
- Tipo di controllo: GUIDATO
Note: Full technical specifications, including energy consumption and capacity, can be found on the appliance's rating plate or the official Hoover websito.
8. Garanzia e supporto
Your Hoover WDXA 5117 AH-S Washer Dryer comes with a manufacturer's warranty. The terms and conditions of the warranty are detailed in the separate warranty card provided with your appliance. Please retain your proof of purchase for warranty claims.
For technical assistance, spare parts, or to schedule a service appointment, please contact Hoover customer support. Contact details can typically be found on the warranty card, the official Hoover website, or by referring to the "Support Client Spécialisé" information provided at the point of purchase.
When contacting support, please have your appliance's model number (WDXA 5117 AH-S) and serial number ready. The serial number is usually located on a sticker inside the door frame or on the back of the appliance.