1. Introduzione
This manual provides comprehensive instructions for the installation, operation, and maintenance of your ASUS H170 PRO GAMING Motherboard. Designed to support 6th Generation Intel Core Desktop Processors, this motherboard integrates advanced features such as DDR4 memory support, USB 3.1 Type-A/C, and M.2 connectivity, making it suitable for high-performance computing and gaming. It also features Intel Gigabit Ethernet with LANGuard for robust networking and SupremeFX Audio for superior sound.
Si prega di leggere attentamente questo manuale prima di iniziare l'installazione per garantire una corretta configurazione e massimizzare le prestazioni e la longevità del sistema.
2. Impostazione
2.1 Lista di controllo pre-installazione
Before you begin, ensure all necessary components are available and compatible. The retail package of your ASUS H170 PRO GAMING Motherboard should include the following items:
- ASUS H170 PRO GAMING Motherboard (ATX form factor)
- 4 x Serial ATA (SATA) cables
- Piastra posteriore I/O
- Etichette per cavi
- Pacchetto viti M.2
- Supporta DVD con driver e utilità
- Manuale dell'utente (questo documento)
Additionally, ensure you have the following compatible components:
- 6th Generation Intel Core Desktop Processor (LGA1151 socket)
- DDR4 RAM modules (2133 MHz recommended)
- Compatible power supply unit (PSU)
- Storage devices (HDD/SSD)
- Graphics card (if not using integrated graphics)
- Computer case
- Monitor, keyboard, and mouse
2.2 Installazione fisica
Follow these steps carefully to install your motherboard and essential components into your computer case.
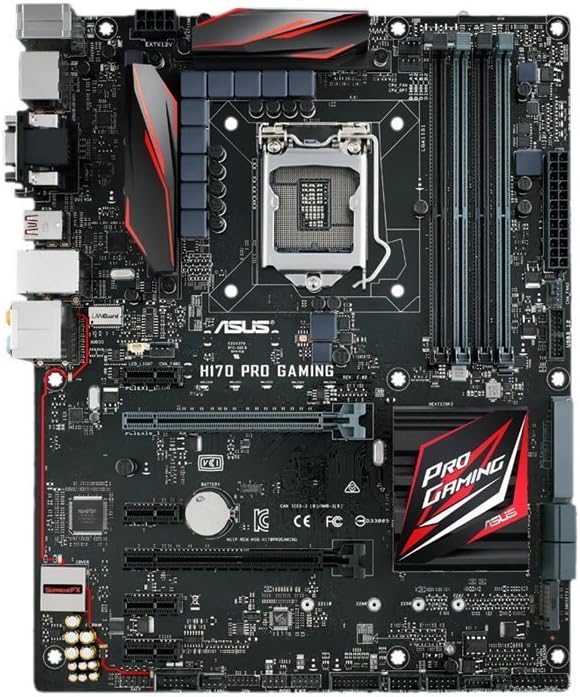
Figura 2.2.1: Dall'alto verso il basso view of the ASUS H170 PRO GAMING Motherboard, showcasing the LGA1151 CPU socket, DDR4 DIMM slots, PCIe slots, and various connectors.
- Preparare il caso: Install the I/O shield into the rear opening of your computer case. Ensure the standoffs inside the case align with the screw holes on the motherboard.
- Installare la scheda madre: Carefully place the motherboard into the case, aligning it with the standoffs and the I/O shield. Secure it with screws.
- Installare la CPU:
- Aprire la leva del socket della CPU e rimuovere il cappuccio protettivo.
- Allineare la CPU con il socket, assicurandosi che il triangolo dorato sulla CPU corrisponda al triangolo sul socket.
- Inserire delicatamente la CPU nel socket. Non forzarla.
- Chiudere la leva per fissare la CPU.
- Applicare la pasta termica e installare il dissipatore della CPU seguendo le istruzioni del produttore.
- Installare i moduli RAM:
- Aprire le clip sugli slot DIMM DDR4.
- Allineare la tacca sul modulo RAM con la chiave nello slot DIMM.
- Press down firmly on both ends of the module until the clips snap into place. For dual-channel operation, refer to the motherboard's silkscreen for recommended slot pairing (e.g., A2/B2).
- Installa dispositivi di archiviazione:
- For SATA drives, connect one end of the SATA cable to a SATA 6Gb/s port on the motherboard and the other end to your HDD/SSD. Connect the SATA power cable from your PSU to the drive.
- For M.2 SSDs, insert the M.2 module into the M.2 slot at an angle, then gently push it down and secure it with the provided M.2 screw.
- Installare schede di espansione (ad esempio, scheda grafica):
- Align the expansion card with the appropriate PCIe slot (e.g., PCIe x16 for graphics cards).
- Premere con decisione finché la scheda non è posizionata correttamente e la clip di fissaggio non si blocca.
- Fissare la scheda alla custodia con una vite.
- Collegare i cavi di alimentazione:
- Collegare il connettore di alimentazione ATX a 24 pin dall'alimentatore alla scheda madre.
- Collegare il connettore di alimentazione della CPU a 8 pin (o 4 pin) alla scheda madre.
- Collegare eventuali cavi di alimentazione aggiuntivi necessari per la scheda grafica o altri componenti.
- Collegare i cavi del pannello frontale: Connect the power button, reset button, HDD LED, power LED, and USB/audio headers from your case to the corresponding pins on the motherboard. Refer to the motherboard manual for exact pin layouts.
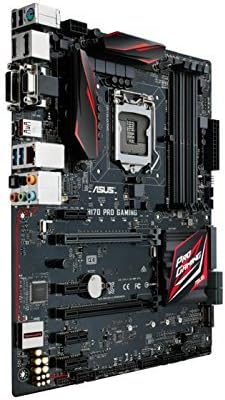
Figura 2.2.2: Angolato view of the ASUS H170 PRO GAMING Motherboard, highlighting the I/O ports and the overall layout within a system.
2.3 Accensione iniziale
After completing all physical connections, double-check all cables and component seating. Connect your monitor, keyboard, and mouse. Power on your system. The system should boot to the BIOS/UEFI interface or attempt to boot from a connected storage device.
3. Utilizzo della scheda madre
3.1 Configurazione BIOS/UEFI
The BIOS (Basic Input/Output System) or UEFI (Unified Extensible Firmware Interface) is the first software that runs when you power on your computer. It initializes hardware components and loads the operating system. To enter the BIOS/UEFI setup utility, press the DEL chiave o F2 tasto durante il processo di autotest all'accensione (POST).
- Ordine di avvio: Configure the boot order to prioritize your operating system installation media (e.g., USB drive, DVD drive) or your primary storage drive.
- Informazioni di sistema: Verify that your CPU, RAM, and storage devices are correctly detected.
- Impostazioni avanzate: Adjust settings related to CPU, memory, storage controllers (SATA mode), and integrated peripherals.
3.2 Installazione del driver
After installing your operating system, it is crucial to install the necessary drivers for your motherboard's components. These drivers enable proper communication between the hardware and the operating system, ensuring optimal performance and stability.
- Driver del chipset: Install Intel H170 chipset drivers first.
- Driver LAN: Install Intel Gigabit Ethernet drivers for network connectivity.
- Driver audio: Install SupremeFX Audio drivers for sound functionality.
- Driver USB: Install USB 3.1 drivers for enhanced USB performance.
- Driver grafici: Install drivers for your dedicated graphics card or Intel integrated graphics.
Drivers can typically be found on the included support DVD or downloaded from the official ASUS support websito.
3.3 Connettività
The H170 PRO GAMING motherboard offers a variety of connectivity options:
- Porte USB: Multiple USB 3.1 Type-A and Type-C ports, along with USB 3.0 and USB 2.0 ports, for connecting peripherals.
- Uscite video: DisplayPort and HDMI for connecting displays (requires compatible Intel CPU with integrated graphics).
- Rete: Intel Gigabit Ethernet port for wired network connection.
- Audio: SupremeFX Audio ports for high-quality sound output and input.
- Magazzinaggio: SATA 6Gb/s ports and M.2 slot for high-speed storage devices.
4. Manutenzione
Regular maintenance helps ensure the longevity and optimal performance of your motherboard and overall system.
4.1 Pulizia
Dust accumulation can lead to overheating and component failure. Periodically clean your computer's interior:
- Power off and unplug your computer before cleaning.
- Utilizzare aria compressa per rimuovere la polvere da ventole, dissipatori di calore e componenti della scheda madre.
- Ensure proper ventilation in your computer case.
4.2 BIOS/UEFI and Driver Updates
Keeping your BIOS/UEFI firmware and drivers updated can improve system stability, performance, and compatibility with new hardware or software.
- Visita il supporto ufficiale ASUS website for the latest BIOS/UEFI versions and drivers for your H170 PRO GAMING motherboard.
- Follow the instructions provided by ASUS for updating BIOS/UEFI firmware carefully, as improper updates can damage the motherboard.
- Regularly check for updated drivers for your chipset, audio, LAN, and other peripherals.
5. Risoluzione Dei Problemi
Questa sezione fornisce soluzioni ai problemi più comuni che potresti riscontrare.
5.1 Problemi comuni e soluzioni
- Nessuna alimentazione/Nessun POST:
- Assicurarsi che tutti i cavi di alimentazione (ATX a 24 pin, CPU a 8 pin) siano collegati saldamente.
- Verificare che l'alimentatore (PSU) funzioni correttamente.
- Reseat RAM modules and expansion cards.
- Clear CMOS (Complementary Metal-Oxide-Semiconductor) by removing the CMOS battery for a few minutes or using the clear CMOS jumper (refer to motherboard manual for location).
- Instabilità/arresti anomali del sistema:
- Check for overheating. Ensure CPU cooler is properly installed and case fans are working.
- Eseguire strumenti di diagnostica della memoria per verificare la presenza di RAM difettosa.
- Aggiornare i driver e il BIOS/UEFI alle versioni più recenti.
- Ensure all components are compatible and properly seated.
- Nessuna visualizzazione:
- Ensure monitor is connected to the correct video output (motherboard or graphics card).
- Reinstallare la scheda grafica.
- Se possibile, provare con un monitor o un cavo diverso.
- Problemi di connettività di rete:
- Verify LAN cable connection.
- Ensure Intel Gigabit Ethernet drivers are installed and up to date.
- Controllare lo stato del router/modem.
- Problemi audio:
- Assicurarsi che gli altoparlanti/le cuffie siano collegati correttamente alle prese audio.
- Install or update SupremeFX Audio drivers.
- Controlla le impostazioni audio del tuo sistema operativo.
5.2 Richiesta di ulteriore assistenza
If you encounter issues not covered in this section, or if the suggested solutions do not resolve your problem, please refer to the official ASUS support resources.
6. Specifiche
Key technical specifications for the ASUS H170 PRO GAMING Motherboard:
| Caratteristica | Specificazione |
|---|---|
| Presa CPU | LGA1151 |
| Processori compatibili | 6th Generation Intel Core Desktop Processors |
| Chipset | Intel H170 |
| Tecnologia della memoria RAM | DDR4 |
| Velocità di memoria | 2133 MHz |
| Porte USB | USB 3.1 Type-A/C, USB 3.0, USB 2.0 |
| Interfacce di archiviazione | SATA 6 Gb/s, M.2 |
| Rete | Intel Gigabit Ethernet with LANGuard |
| Audio | SupremeFX Audio |
| Fattore di forma | ATX |
| Dimensioni del prodotto (LxWxH) | 10.4 x 2.7 x 12.9 pollici |
| Peso dell'articolo | 3 libbre |
7. Garanzia e supporto
7.1 Informazioni sulla garanzia
ASUS products typically come with a limited manufacturer's warranty. The specific terms and duration of the warranty may vary by region and product. Please refer to the warranty card included with your product or visit the official ASUS websito per informazioni dettagliate sulla garanzia e sulle procedure di registrazione. Conservare la prova d'acquisto per eventuali reclami in garanzia.
7.2 Assistenza clienti
For technical assistance, driver downloads, BIOS updates, or further inquiries, please contact ASUS customer support or visit their official support websito:
- ASUS Ufficiale Websito: www.asus.com
- ASUS Support Page: Cercare "ASUS Support" online and navigate to the support section for motherboards.
- ASUS Store on Amazon: Visit the ASUS Store per informazioni e risorse sui prodotti.
When contacting support, have your motherboard's model number (H170 PRO GAMING) and serial number ready.
8. Video ufficiali dei prodotti
No official product videos from the seller were found for this model at this time. For visual guides or demonstrations, please refer to the ASUS official websito o canali autorizzati.