1. Introduzione
Grazie per l'acquistoasing the SINGER monami Delight SP-70P Computer Sewing Machine. This manual provides essential information for the safe and efficient operation, maintenance, and troubleshooting of your new sewing machine. Please read this manual thoroughly before using the machine and keep it in a safe place for future reference.
The monami Delight SP-70P is designed for ease of use, featuring large, intuitive buttons and a wide sewing base, making it suitable for various sewing projects.
2. Istruzioni di sicurezza
Per garantire un funzionamento sicuro, seguire sempre queste precauzioni di sicurezza di base:
- Scollegare sempre la macchina dalla presa elettrica durante la pulizia, la lubrificazione o quando non è in uso.
- Tenere le dita lontane da tutte le parti in movimento. È necessaria una cura speciale intorno all'ago della macchina per cucire.
- Utilizzare la placca ago corretta. Una placca sbagliata può causare la rottura dell'ago.
- Non utilizzare aghi piegati.
- Non tirare o spingere il tessuto durante la cucitura. Ciò potrebbe deviare l'ago e causarne la rottura.
- Indossare occhiali di sicurezza quando si utilizza la macchina.
- Non utilizzare mai la macchina con le aperture di ventilazione bloccate. Mantenere le aperture di ventilazione della macchina per cucire e del pedale libere da accumuli di lanugine, polvere e stracci.
- Questo apparecchio non è destinato all'uso da parte di persone (bambini compresi) con ridotte capacità fisiche, sensoriali o mentali, o prive di esperienza e conoscenza, a meno che non siano supervisionate o abbiano ricevuto istruzioni riguardanti l'uso dell'apparecchio da una persona responsabile della loro sicurezza.
3. Prodotto finitoview
The SINGER monami Delight SP-70P is a versatile computer sewing machine designed for various sewing tasks. It features a user-friendly interface and robust construction.
Caratteristiche principali:
- 12 schemi di punti: Offers a variety of practical stitches for different sewing needs.
- Infila ago automatico: Semplifica il processo di filettatura.
- Automatic Thread Tension: Adjusts tension automatically for various fabric types.
- Trasportatore a 7 punti: Ensures smooth fabric feeding.
- Horizontal Full Rotary Hook: Prevents thread tangles and allows easy bobbin setting.
- Braccio libero: Convenient for sewing cylindrical items like sleeves and pant hems.
- LED a mano Lamp: Provides bright, long-lasting illumination of the sewing area.
- Design silenzioso: Equipped with a small, powerful magnet motor for reduced noise.
Componenti della macchina:
Refer to the image below for a visual guide to the main components of your sewing machine.

Figura 3.1: Fronte view of the SINGER monami Delight SP-70P sewing machine, showcasing il suo design e il pannello di controllo.

Figura 3.2: Oltreview of the SINGER monami Delight SP-70P, highlighting key operational areas and design elements.
4. Impostazione
4.1 Disimballaggio e posizionamento
- Estrarre con cautela la macchina dall'imballaggio.
- Posizionare la macchina su una superficie stabile e piana.
- Ensure there is adequate space around the machine for comfortable operation and fabric handling.
4.2 Collegamento di alimentazione
- Connect the power cord to the machine and then to a 100V (50/60Hz) electrical outlet.
- Turn on the power switch, usually located on the side of the machine. The LED hand lamp dovrebbe illuminarsi.
4.3 Avvolgimento della bobina
The machine features an easy bobbin winding system:
- Posizionare una bobina vuota sul perno dell'avvolgitore.
- Follow the numbered guide on the machine for threading the bobbin winding path.
- Spingere l'alberino avvolgitore della bobina verso destra.
- Press the foot controller or start button to begin winding. The machine will automatically stop when the bobbin is full.
- Cut the thread and return the bobbin winder spindle to the left.
4.4 Infilatura del filo superiore
The New Threading System makes upper threading simple:
- Sollevare la leva del piedino premistoffa.
- Posizionare un rocchetto di filo sul portarocchetto.
- Seguire il percorso di infilatura numerato indicato sulla macchina, assicurandosi che il filo passi attraverso tutte le guide e la leva di avvolgimento.
- Use the automatic needle threader by lowering the lever and engaging it with the needle eye.
- Pull the thread loop through the needle eye.
5. Istruzioni per l'uso
5.1 Selezione del punto
The monami Delight SP-70P offers 12 practical stitch patterns. Use the direct pattern selection buttons on the control panel to choose your desired stitch.

Figure 5.1: Visual representation of the 12 practical stitch patterns available on the SP-70P.
5.2 Cucito di base
- Select your desired stitch pattern.
- Posiziona il tessuto sotto il piedino.
- Abbassare il piedino premistoffa.
- Press the foot controller or start button to begin sewing.
- Use the lock stitch function at the beginning and end of your seam to prevent unraveling.
5.3 Funzionalità avanzate
- Fully Automatic Buttonhole: Select the buttonhole stitch, place your button in the buttonhole foot, and the machine will automatically sew a buttonhole to the correct size.
- One-Touch Slow Button: Press this button during sewing to reduce the speed, which is useful for intricate details, curves, and corners.
- Needle Up/Down: Control the needle's stopping position (up or down) for easy pivoting or continuous sewing.
- Alimentazione a goccia: Lower the feed dog for free-motion sewing, such as quilting or embroidery.
- Leveling Presser Foot Button: Use this button to keep the presser foot level when starting to sew on thick fabrics or multiple layers.
- Regolazione della lunghezza e della larghezza del punto: Adjust the stitch length and width according to your fabric and desired pattern.
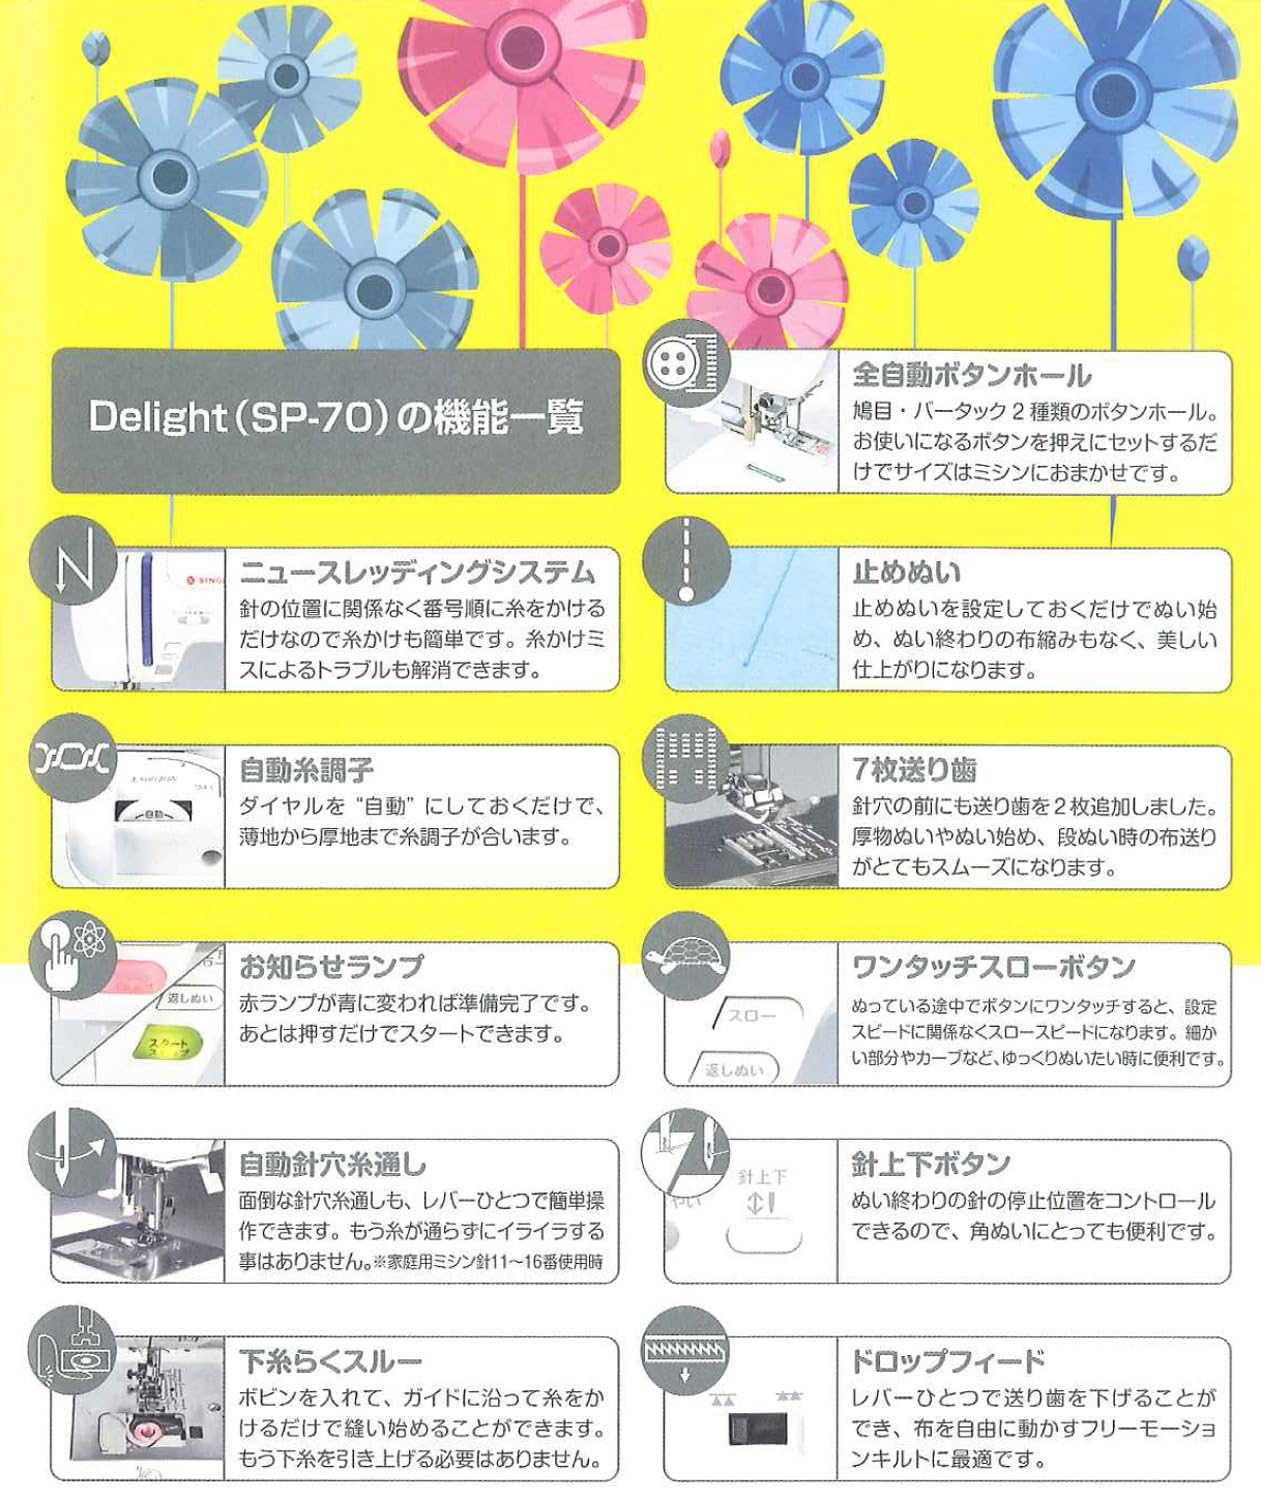
Figure 5.2: Detailed list of functions and features of the SINGER monami Delight SP-70P.

Figura 5.3: Oltreview of additional useful features of the SINGER monami Delight SP-70P.
6. Manutenzione
Una manutenzione regolare garantisce la longevità e le prestazioni ottimali della tua macchina da cucire.
6.1 Pulizia
- Scollegare sempre la macchina prima della pulizia.
- Use the provided brush to remove lint and dust from the bobbin case area and feed dogs.
- Pulire l'esterno della macchina con un panno morbido e asciutto. Non utilizzare prodotti chimici aggressivi o detergenti abrasivi.
6.2 Sostituzione dell'ago
- Replace needles regularly, especially if they become bent or dull, to prevent skipped stitches or fabric damage.
- Use the screwdriver to loosen the needle clamp screw, remove the old needle, and insert a new one with the flat side facing the back.
- Stringere l'ago clamp avvitare saldamente.
7. Risoluzione Dei Problemi
If you encounter issues with your sewing machine, refer to the following common problems and solutions:
| Problema | Possibile causa | Soluzione |
|---|---|---|
| Punti saltati | Ago sbagliato, ago piegato, infilatura non corretta. | Replace needle with correct type/size, re-thread the machine correctly. |
| Rottura del filo | Incorrect threading, thread tension too high, burr on needle plate, poor quality thread. | Reinfilare, regolare la tensione, controllare che non vi siano sbavature, utilizzare filo di buona qualità. |
| Arricciatura del tessuto | Tensione del filo troppo alta, lunghezza del punto errata, piedino premistoffa sbagliato. | Adjust tension, increase stitch length, use appropriate presser foot. |
| La macchina non si avvia | Cavo di alimentazione non collegato, interruttore di alimentazione spento, avvolgitore della bobina inserito. | Controllare il collegamento elettrico, accendere l'interruttore, disinnestare l'avvolgitore della bobina. |
Se il problema persiste dopo aver provato queste soluzioni, contattare l'assistenza clienti.
8. Specifiche
| Caratteristica | Specificazione |
|---|---|
| Numero di modello | SP-70P |
| Produttore | SINGER |
| Dimensioni del corpo (L x P x A) | Dimensioni: 43.9 x 19.5 x 28.7 cm |
| Peso corporeo | 8.2 kg |
| Alimentazione elettrica | 100 V (50/60 Hz) |
| Consumo energetico | 45W |
| Schemi di punti | 12 tipi |
| Colore | Candy Berry Pink |
| Accessori | Soft cover, needle set (No. 11 x 1, No. 14 x 2), bobbins (3 pcs), brush, screwdriver, seam ripper, overcasting foot, zipper foot, buttonhole foot, zigzag foot, spool cap, power cord. |
9. Garanzia e supporto
For warranty information, please refer to the warranty card included with your product or visit the official SINGER websito. Conservare la prova d'acquisto per eventuali reclami in garanzia.
For technical support, spare parts, or service, please contact your local SINGER authorized dealer or customer service center. Contact details can typically be found on the SINGER official websito o nella confezione del prodotto.