1. Importanti misure di sicurezza
Quando si utilizzano apparecchi elettrici, è necessario adottare sempre le seguenti precauzioni di sicurezza di base per ridurre il rischio di incendi, scosse elettriche e/o lesioni alle persone, tra cui:
- Leggere attentamente tutte le istruzioni prima di utilizzare l'apparecchio.
- Non toccare le superfici calde. Utilizzare maniglie o manopole.
- Per proteggersi da incendi, scosse elettriche e lesioni personali, non immergere il cavo, le spine o l'apparecchio in acqua o altri liquidi.
- È necessaria un'attenta supervisione quando un elettrodomestico viene utilizzato da bambini o nelle loro vicinanze.
- Scollegare dalla presa quando non in uso e prima di pulire. Lasciare raffreddare prima di mettere o togliere parti e prima di pulire l'apparecchio.
- Non utilizzare alcun apparecchio con un cavo o una spina danneggiati, o dopo che l'apparecchio non funziona correttamente o è stato danneggiato in qualsiasi modo. Restituire l'apparecchio al centro di assistenza autorizzato più vicino per l'esame, la riparazione o la regolazione.
- L'uso di accessori non consigliati dal produttore dell'apparecchio può causare incendi, scosse elettriche o lesioni personali.
- Non utilizzare all'aperto.
- Non lasciare che il cavo penda dal bordo del tavolo o del bancone o che tocchi superfici calde.
- Non posizionare sopra o vicino a un fornello a gas o elettrico caldo, oppure in un forno caldo.
- Collegare sempre prima la spina all'apparecchio, quindi collegare il cavo alla presa a muro. Per scollegarlo, posizionare un qualsiasi interruttore su "off", quindi rimuovere la spina dalla presa a muro.
- Non utilizzare l'apparecchio per scopi diversi da quelli previsti.
- Evitare il contatto con le parti in movimento.
- Questo apparecchio ha una spina polarizzata (una lama è più larga dell'altra). Per ridurre il rischio di scosse elettriche, questa spina è progettata per adattarsi a una presa polarizzata solo in un modo. Se la spina non si adatta completamente alla presa, inverti la spina. Se ancora non si adatta, contatta un elettricista qualificato. Non tentare di modificare la spina in alcun modo.
2. Prodotto finitoview e componenti
Familiarize yourself with the parts of your De'Longhi Alicia PLUS EMKP 21.B Electric Moka Coffee Maker.

Figura 1: Davanti view of the De'Longhi Alicia PLUS EMKP 21.B Electric Moka Coffee Maker. Shows the transparent upper container, metal base, and digital control panel.

Figura 2: Lato view of the coffee maker, highlighting the handle and the detachable base.
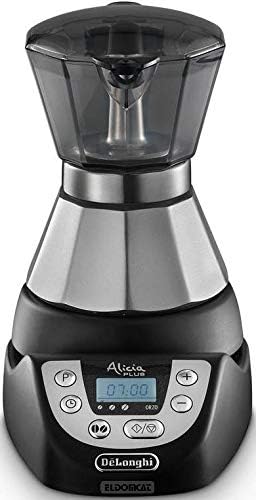
Figura 3: Fronte angolato view, showing the digital display and control buttons more clearly.
Componenti:
- Transparent Upper Container with Lid
- Collezionista di caffè
- Imbuto di filtraggio
- Boiler (Lower Water Chamber)
- Valvola di sicurezza
- Detachable Power Base with 360° Swivel
- Digital Control Panel (Display, Power Button, Timer Button, Aroma Function Button, 1/2 Cup Adapter Button, +/- Buttons)
- 1-2 Cup Adapter (for reducing capacity)
3. Impostazione
Pulizia iniziale:
Before first use, wash all removable parts (upper container, filter funnel, coffee collector) with warm water and mild detergent. Rinse thoroughly and dry. Wipe the exterior of the power base with a damp stoffa.
Primo utilizzo (adescamento):
To prime the unit and remove any manufacturing residues, perform a brewing cycle using only water, without coffee. Discard the water after this cycle.
- Fill the boiler with cold water up to the level of the safety valve.
- Insert the filter funnel (without coffee).
- Screw the upper container onto the boiler securely.
- Place the coffee maker on its power base and plug it in.
- Premere il pulsante di accensione per avviare un ciclo di preparazione.
- Once the cycle is complete, discard the water and rinse the components.
4. Istruzioni per l'uso
Preparazione del caffè:
- Unscrew the upper container from the boiler.
- Fill the boiler with cold water up to the level of the safety valve. Do not overfill.
- Insert the filter funnel into the boiler.
- Fill the filter funnel with ground coffee. Do not press the coffee down. For 1 cup, use the provided 1-2 cup adapter.
- Screw the upper container onto the boiler securely, ensuring a tight seal.
- Place the coffee maker on its power base and plug it into a suitable electrical outlet.
- Premere il pulsante di accensione (P) to begin brewing. The digital display will show the brewing progress.
- The coffee maker will automatically shut off when the coffee is ready. The transparent container allows you to monitor the brewing process.
Using the 1-2 Cup Adapter:
To prepare a single cup of coffee or barley coffee, use the special 1-2 cup adapter. Place the adapter inside the filter funnel before adding the appropriate amount of ground coffee for one serving.
Funzione Aroma:
The Alicia PLUS EMKP 21.B offers an Aroma function to customize your coffee strength. Press the Aroma button (A) to cycle through options: Light, Medium, or Strong. Select your preferred strength before starting the brewing cycle.
Programmable Timer (24-hour):
È possibile programmare la macchina per il caffè in modo che inizi a preparare il caffè a un orario specifico nell'arco di 24 ore.
- Prepare the coffee maker with water and ground coffee as described in "Brewing Coffee".
- Premere il pulsante Timer (T). The display will show the current time or the last programmed time.
- Utilizzare il + E - pulsanti per impostare l'ora di inizio della preparazione desiderata.
- Confirm the setting by pressing the Timer button again or waiting a few seconds. The timer indicator will illuminate.
- La macchina per il caffè inizierà automaticamente a preparare il caffè all'ora programmata.
Funzione di mantenimento del calore:
After brewing, the coffee maker automatically activates a keep warm function, maintaining the coffee's temperature for up to 30 minutes. This function will automatically deactivate after 30 minutes.
5. Manutenzione e pulizia
Una pulizia regolare garantisce prestazioni ottimali e prolunga la durata della macchina per il caffè.
Pulizia giornaliera:
- Scollegare sempre l'apparecchio e lasciarlo raffreddare completamente prima di pulirlo.
- Unscrew the upper container and remove the filter funnel and coffee grounds.
- Wash the upper container, filter funnel, and boiler (lower water chamber) with warm water and a mild detergent. Rinse thoroughly to remove all soap residue.
- Asciugare completamente tutte le parti prima di riassemblarle o riporle.
- Pulire l'esterno della base di alimentazione con un panno morbido eamp panno. Non immergere la base di alimentazione in acqua o altri liquidi.
Decalcificazione:
Over time, mineral deposits (limescale) can build up in the boiler, affecting performance. Descale your coffee maker regularly, depending on water hardness and frequency of use. Use a commercial descaling solution suitable for coffee makers, following the product's instructions. Alternatively, a solution of white vinegar and water (1:1 ratio) can be used. Perform a few rinse cycles with plain water after descaling to remove any residual descaling agent.
6. Risoluzione Dei Problemi
| Problema | Possibile causa | Soluzione |
|---|---|---|
| Il caffè non viene preparato o viene preparato lentamente. |
|
|
| Il caffè ha un sapore debole. |
|
|
| Coffee overflows from the upper container. |
|
|
| L'apparecchio non si accende. |
|
|
7. Specifiche
| Caratteristica | Dettaglio |
|---|---|
| Marca | De'Longhi |
| Numero di modello | EMKP21.B |
| Colore | Nero/Acciaio |
| Dimensioni (L x P x A) | Dimensioni: 18.5 x 12 x 17 cm |
| Capacità | 2 tazze |
| Energia | 550 Watt |
| Materiale | Acciaio inossidabile |
| Spegnimento automatico | SÌ |
| Caratteristiche speciali | Keep Warm Function, 24-hour Programmable Timer, Integrated Digital Display, Aroma Function (Light, Medium, Strong), 1-2 Cup Adapter |
| Peso | 800 grammi |
8. Garanzia e supporto
For warranty information, technical support, or to purchase spare parts, please refer to the official De'Longhi webo contattare il servizio clienti. Conservare la prova d'acquisto per eventuali reclami in garanzia.
You can find more information and contact details on the official De'Longhi websito: www.delonghi.com