Sungale PF1501
Manuale utente della cornice digitale Sungale PF1501 da 14 pollici
Modello: PF1501
1. Introduzione
This manual provides detailed instructions for the setup, operation, and maintenance of your Sungale PF1501 14-Inch Digital Photo Frame. This device is designed to display digital photos, play videos, and play music, offering a versatile way to enjoy your media.
Si prega di leggere attentamente questo manuale prima di utilizzare il prodotto per garantirne il corretto funzionamento e ottimizzare la propria esperienza utente.
2. Contenuto della confezione
Verifica che tutti gli articoli elencati di seguito siano inclusi nel tuo pacchetto:
- Sungale PF1501 14-Inch Digital Photo Frame
- Adattatore di alimentazione CA.
- Telecomando
- Guida rapida
- Limited Warranty Card
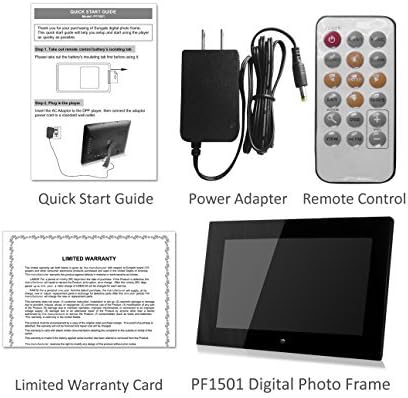
Image 2.1: Included accessories and the digital photo frame.
3. Prodotto finitoview
3.1 Front View

Immagine 3.1: anteriore view of the digital photo frame.
3.2 Posteriore View e porti

Immagine 3.2: posteriore view with labeled ports and controls.
The rear of the frame features various ports and controls for connectivity and operation:
- Tasti funzione: Buttons for navigation and control (Enter, Left, Right, Up, Down, Exit).
- Montabile a parete: Mounting points for wall installation.
- Altoparlante incorporato: Per la riproduzione audio.
- Porta di alimentazione CC 12 V: Collegare qui l'adattatore di alimentazione CA.
- Staffa rimovibile: Stand for desktop placement.
- Pulsante di accensione: To turn the frame on or off.
- Porta host USB: Per collegare unità flash USB.
- Slot per scheda SD/SDHC: For inserting SD or SDHC memory cards.
- Porta dispositivo USB: Per la connessione a un computer.
4. Impostazione
4.1 Accensione iniziale
- Connetti alimentazione: Insert the AC power adapter into the DC 12V Power Port on the back of the frame. Plug the other end into a standard electrical outlet.
- Accensione: Press the Power button located on the back of the frame. The frame will power on and display the initial setup screen or default content.
4.2 Inserimento di schede di memoria o unità USB
The frame supports SD/SDHC cards and USB flash drives (up to 32GB). It also has 4GB of internal memory.
- Per schede SD/SDHC: Gently insert an SD or SDHC card into the SD/SDHC Card Slot until it clicks into place. Ensure the card is inserted in the correct orientation.
- Per unità flash USB: Insert a USB flash drive into the USB Host Port.
The frame should automatically detect the inserted media and begin displaying content or prompt you to select a source.
4.3 Montaggio a parete (opzionale)
The frame can be wall-mounted using the designated mounting points on the rear. Ensure appropriate wall anchors and screws are used for secure installation.
5. Istruzioni per l'uso
The digital photo frame can be operated using the function keys on the back or the included remote control.
5.1 Funzioni del telecomando
The remote control provides convenient access to all features. Point the remote control directly at the frame's sensor.
5.2 Navigazione nel menu
Use the directional buttons (Up, Down, Left, Right) to navigate through menu options. Press the "Enter" button to confirm a selection. The "Exit" button typically returns to the previous screen or the main menu.
5.3 Visualizzazione delle foto
The frame supports JPG and BMP photo file formati.
- Seleziona fonte: From the main menu, select the desired media source (Internal Memory, SD Card, or USB Drive).
- Scegli la modalità Foto: Select "Photo" to enter photo display mode.
- Presentazione: The frame can automatically start a slideshow of all photos on the selected source. You can adjust transition effects and interval times in the settings.
- Single Photo Display: Navigate to a specific photo and press "Enter" to display it individually.
- Zoom and Rotate: Use the remote control or function keys to zoom in/out or rotate displayed photos.
5.4 Riproduzione di video
The frame supports video playback. Note that some users have reported compatibility primarily with .AVI video files.
- Seleziona fonte: From the main menu, select the desired media source.
- Choose Video Mode: Select "Video" to enter video playback mode.
- Select Video: Passare al video desiderato file and press "Enter" to begin playback.
5.5 Riproduzione di musica
The frame can play background music during photo slideshows or as standalone audio.
- Seleziona fonte: From the main menu, select the desired media source.
- Choose Music Mode: Select "Music" to enter music playback mode.
- Seleziona Audio File: Navigate to the desired audio file and press "Enter" to begin playback.
- Musica di sottofondo: In photo settings, you can enable background music to play during slideshows.
5.6 Calendar and Alarm Clock
Access the calendar and alarm clock functions through the main menu. Follow on-screen prompts to set the date, time, and alarm preferences.
6. Manutenzione
6.1 Pulizia dello schermo
- Turn off and unplug the frame before cleaning.
- Use a soft, lint-free cloth, such as a microfiber cloth, to gently wipe the screen.
- Per macchie ostinate, applicare leggermenteampImmergere il panno con acqua o con una soluzione detergente per schermi specificatamente studiata per dispositivi elettronici. Non spruzzare il liquido direttamente sullo schermo.
- Avoid using abrasive cleaners, solvents, or alcohol-based solutions, as these can damage the screen surface.
6.2 Cura generale
- Keep the frame away from direct sunlight, heat sources, and excessive moisture.
- Evitare di far cadere o di sottoporre il telaio a forti urti.
- Do not block the ventilation openings on the back of the frame.
- Unplug the frame during lightning storms or when unused for extended periods.
7. Risoluzione Dei Problemi
If you encounter issues with your digital photo frame, refer to the following common problems and solutions:
| Problema | Possibile causa/soluzione |
|---|---|
| Il telaio non si accende. |
|
| "File not supported" error or media not displaying. |
|
| Il telecomando non funziona. |
|
| Photos are stretched or distorted. |
|
| Slideshow not playing randomly. |
|
8. Specifiche
| Caratteristica | Dettaglio |
|---|---|
| Numero di modello | PF1501 |
| Dimensioni dello schermo | 14 pollici |
| Risoluzione | 1366x768 pixel |
| Memoria interna | 4 GB |
| Supporto di memoria esterna | SD/SDHC Card (up to 32GB), USB Flash Drive (up to 32GB) |
| Formati foto supportati | JPG, BMP |
| Formati video supportati | Primarily AVI (as reported by users) |
| Uscita audio | 2 Channel Stereo Speakers |
| Dimensioni del prodotto | 13.8 x 1 x 9.5 pollici |
| Peso dell'articolo | 2 libbre |
| Colore | Nero |
| Produttore | Soleggiato |
9. Garanzia e supporto
9.1 Garanzia limitata
This product comes with a Limited Warranty. Please refer to the "Limited Warranty Card" included in your package for detailed terms and conditions, including coverage period and claim procedures. Keep your proof of purchase for warranty claims.
9.2 Assistenza clienti
For technical assistance, troubleshooting beyond this manual, or warranty inquiries, please contact Sungale customer support.
- Produttore: Soleggiato
- Websito: Visit the Sungale Store on Amazon (per informazioni generali sul marchio)
- Specific contact information (phone, email) may be found on the warranty card or the official Sungale websito.
Ask a question about this manual
Ask about setup, troubleshooting, compatibility, parts, safety, or missing instructions. Manuals+ will review the question and use this page’s manual context to help answer it.