Introduzione
Thank you for choosing the Rowenta Adagio Thermal Coffee Maker CT 3818. This appliance is designed to brew delicious filter coffee and keep it warm for extended periods thanks to its insulated stainless steel carafe. Please read this manual carefully before using your coffee maker for the first time and keep it for future reference. Proper use and maintenance will ensure optimal performance and longevity of your appliance.
Importanti istruzioni di sicurezza
- Leggere tutte le istruzioni prima dell'uso.
- Non immergere l'apparecchio, il cavo di alimentazione, né collegare l'acqua o altri liquidi.
- Assicurare il volumetage indicato sull'apparecchio corrisponde al volume della rete elettrica localetage prima di effettuare la connessione.
- Always unplug the coffee maker from the power outlet when not in use and before cleaning. Allow it to cool before adding or removing parts, and before cleaning the appliance.
- Do not operate any appliance with a damaged cord or plug, or after the appliance malfunctions or has been damaged in any manner. Contact Rowenta customer service for examination, repair, or adjustment.
- Non lasciare che il cavo penda dal bordo di un tavolo o di un bancone e non tocchi superfici calde.
- Non posizionare la macchina per il caffè sopra o vicino a un fornello a gas o elettrico caldo, oppure in un forno caldo.
- Always ensure the thermal carafe is correctly positioned on the warming plate before brewing.
- The thermal carafe is designed for use with this appliance only. It must not be used on a range top.
- Do not clean the thermal carafe with abrasive cleaners, steel wool pads, or other abrasive materials.
- Questo apparecchio è destinato esclusivamente all'uso domestico.
- Tenere l'apparecchio fuori dalla portata dei bambini.
Prodotto finitoview
Familiarize yourself with the components of your Rowenta Adagio Thermal Coffee Maker.
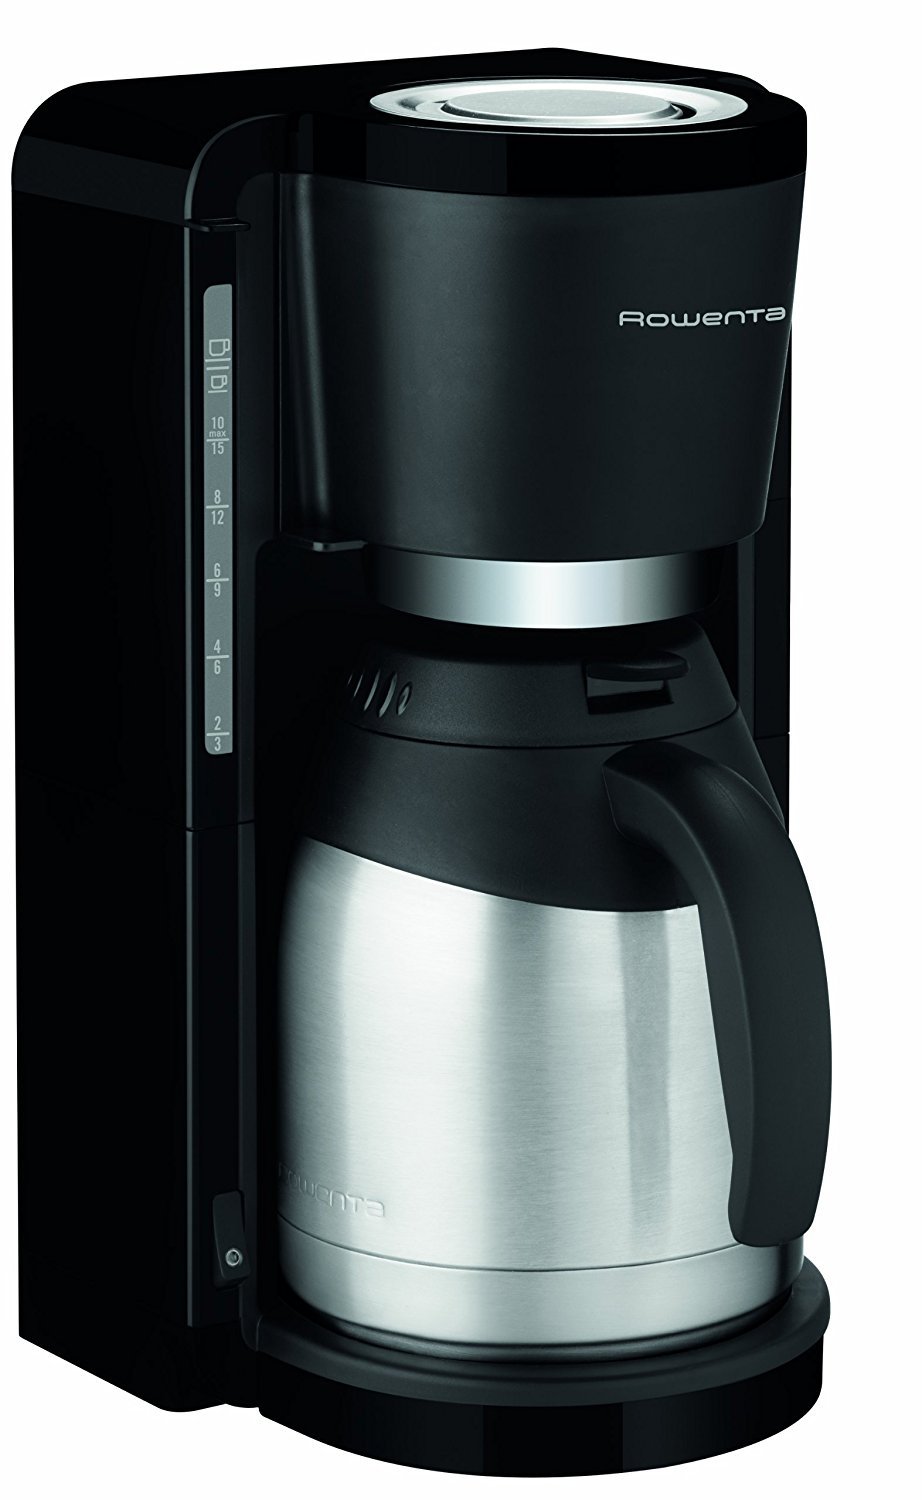

Componenti:
- A. Serbatoio dell'acqua con indicatore del livello dell'acqua
- B. Portafiltro (rimovibile)
- C. Caraffa termica con coperchio
- D. Testa di birra
- E. Interruttore ON/OFF con indicatore luminoso
- F. Cord Storage (underneath the unit)
Impostare
1. Disimballaggio
- Rimuovere con cautela tutto il materiale di imballaggio e le etichette dalla macchina per il caffè.
- Ensure all components listed in the Product Overview sezione sono presenti e non danneggiate.
2. Pulizia al primo utilizzo
Before brewing coffee for the first time, it is recommended to clean the appliance:
- Fill the water reservoir with cold water up to the MAX level.
- Place an empty filter paper (size 1x4 or similar) in the filter holder.
- Place the thermal carafe with its lid closed on the warming plate.
- Press the ON/OFF switch to start a brewing cycle without coffee.
- Once the cycle is complete, discard the water from the carafe and rinse the carafe and filter holder thoroughly.
3. Posizionamento
Place the coffee maker on a flat, stable, heat-resistant surface, away from water sources and heat. Ensure adequate ventilation around the unit.
Istruzioni per l'uso
1. Riempimento del serbatoio dell'acqua
- Aprire il coperchio del serbatoio dell'acqua.
- Fill the reservoir with fresh, cold water using the thermal carafe. The water level indicator on the side of the reservoir shows the number of cups. Do not exceed the MAX fill line.
- Chiudere bene il coperchio del serbatoio.
2. Adding Ground Coffee
- Remove the filter holder from the coffee maker.
- Insert a paper filter (size 1x4 or similar) into the filter holder.
- Add the desired amount of ground coffee into the paper filter. A general guideline is one tablespoon of coffee per cup, but adjust to your preference.
- Place the filter holder back into its position in the coffee maker. Ensure it is seated correctly.
3. Placing the Thermal Carafe
- Ensure the lid is properly closed on the thermal carafe.
- Place the thermal carafe onto the warming plate. The drip-stop system will engage when the carafe is removed and disengage when it is placed back, preventing drips.
4. Starting the Brewing Process
- Collegare il cavo di alimentazione a una presa elettrica idonea.
- Press the ON/OFF switch. The indicator light will illuminate, signifying that the brewing process has started.
- The coffee maker will automatically brew the coffee.
5. Dopo la fermentazione
- Once the brewing cycle is complete, the coffee maker will automatically shut off. The indicator light will turn off.
- The thermal carafe is designed to keep your coffee warm for up to 4 hours.
- To serve, simply pour from the thermal carafe.
- Dopo l'uso, scollegare l'apparecchio dalla presa di corrente.
Pulizia e manutenzione
Una pulizia regolare garantisce prestazioni ottimali e prolunga la durata della macchina per il caffè.
1. Pulizia quotidiana
- Scollegare sempre la macchina per il caffè e lasciarla raffreddare completamente prima di pulirla.
- Remove the used paper filter and discard the coffee grounds.
- Wash the filter holder and the thermal carafe (including its lid) with warm, soapy water. Rinse thoroughly and dry. These parts are generally not dishwasher safe; refer to specific care instructions for the carafe.
- Pulisci l'esterno della caffettiera con un panno damp stoffa. Non utilizzare detergenti abrasivi o spugnette abrasive.
2. Decalcificazione
I depositi minerali presenti nell'acqua possono accumularsi nel tempo, compromettendo le prestazioni. Decalcificare la macchina da caffè regolarmente, a seconda della durezza dell'acqua e della frequenza d'uso (ad esempio, ogni 2-4 mesi).
- Preparare una soluzione decalcificante seguendo le istruzioni del produttore (ad esempio, aceto bianco e acqua oppure un agente decalcificante commerciale).
- Versare la soluzione decalcificante nel serbatoio dell'acqua.
- Posizionare la caraffa termica vuota sulla piastra riscaldante.
- Avviare un ciclo di infusione. Lasciare in infusione metà della soluzione, quindi spegnere la macchina per il caffè e lasciarla riposare per 15-20 minuti per consentire alla soluzione di agire.
- Riaccendere la macchina per il caffè per completare il ciclo di preparazione.
- After the descaling cycle, run at least two full cycles with fresh, cold water to rinse the appliance thoroughly.
Risoluzione dei problemi
Se riscontri problemi con la tua macchina per il caffè, fai riferimento ai seguenti problemi comuni e alle relative soluzioni:
| Problema | Possibile causa | Soluzione |
|---|---|---|
| Il caffè non si prepara. | Appliance not plugged in; ON/OFF switch not pressed; no water in reservoir. | Ensure plug is securely in outlet; press ON/OFF switch; fill water reservoir. |
| Il caffè non è abbastanza caldo. | Appliance needs descaling; carafe lid not properly closed. | Descale the coffee maker; ensure carafe lid is tightly closed to maintain temperature. |
| Perdite d'acqua dall'unità. | Water reservoir overfilled; filter holder not correctly seated; drip-stop mechanism blocked. | Do not exceed MAX fill line; ensure filter holder is firmly in place; clean drip-stop area. |
| Coffee overflows from the filter holder. | Too much coffee grounds; filter paper not correctly placed; coffee grounds too fine; appliance needs descaling. | Reduce coffee quantity; ensure filter paper is properly seated; use medium-ground coffee; descale the appliance. |
Specifiche
- Modello: CT3818
- Marca: Rowenta
- Capacità: 1.25 litri (10-15 tazze)
- Energia: 870 Watt (W) (Note: Original data indicated 870 KW, which is a likely typo. 870W is assumed based on typical coffee maker power consumption.)
- Voltage: 230 Volt
- Materiale: Stainless Steel (carafe), Plastic (housing)
- Colore: Nero/Argento
- Dimensioni (P x L x A): Dimensioni: 26.5 cm x 27 cm x 38.5 cm
- Peso: 2.2 chilogrammi
- Caratteristiche speciali: Water level indicator, Cord storage, Drip-stop system, Automatic shut-off
Garanzia e supporto
This Rowenta appliance is designed for durability and performance. Rowenta offers a commitment to repairability for 2 anni for spare parts availability from the date of purchase.
For any questions, concerns, or to obtain service under warranty, please contact Rowenta customer service. You can find contact information on the official Rowenta websito o tramite il tuo rivenditore.
Conservare la prova d'acquisto per eventuali richieste di garanzia.