1. Introduzione
This manual provides essential information for the safe and effective use of your Brüder Mannesmann 92570 Mini Drill Bit Set. This versatile 80-piece hobby tool kit is designed for various tasks including drilling, milling, separating, and polishing. Please read these instructions thoroughly before operating the tool and retain them for future reference.
2. Istruzioni di sicurezza
Always observe basic safety precautions to reduce the risk of injury or damage. Failure to follow these instructions may result in electric shock, fire, and/or serious injury.
- Sicurezza dell'area di lavoro: Mantenete l'area di lavoro pulita e ben illuminata. Aree disordinate o buie possono favorire incidenti. Non utilizzate utensili elettrici in atmosfere esplosive, ad esempio in presenza di liquidi, gas o polveri infiammabili.
- Sicurezza elettrica: Le spine degli elettroutensili devono essere adatte alla presa. Non modificare mai la spina in alcun modo. Evitare il contatto del corpo con superfici messe a terra. Non esporre gli elettroutensili alla pioggia o all'umidità.
- Sicurezza personale: Indossare sempre protezioni per gli occhi. Utilizzare protezioni acustiche durante l'uso prolungato. Vestirsi in modo adeguato; evitare abiti larghi o gioielli che potrebbero impigliarsi nelle parti in movimento.
- Uso e cura dello strumento: Non forzare l'utensile elettrico. Utilizzare l'utensile elettrico corretto per l'applicazione desiderata. Scollegare la spina dalla presa di corrente prima di effettuare qualsiasi regolazione, sostituire accessori o riporre l'utensile elettrico.
- Manutenzione: Mantieni gli utensili elettrici e gli accessori. Controlla eventuali disallineamenti o inceppamenti delle parti mobili, rotture di parti e qualsiasi altra condizione che possa influire sul funzionamento dell'utensile elettrico.
3. Contenuto della confezione
The Brüder Mannesmann 92570 Mini Drill Bit Set includes the following components:
- Mini Drill (130W)
- Flexible Shaft attachment
- Tabella Clamp / Stand
- Assortment of 80 accessories (various drill bits, grinding stones, sanding bands, cutting discs, polishing wheels, collets, wrenches)
- Custodia di stoccaggio

Figura 3.1: Sopraview of the Brüder Mannesmann 92570 Mini Drill Bit Set, showing the main drill unit, flexible shaft, table clamp, and a selection of the 80 included accessories.

Figura 3.2: The mini drill and its accessories neatly organized within the provided storage case, ready for transport or storage.
4. Prodotto finitoview
The Brüder Mannesmann 92570 is a corded electric mini drill designed for precision tasks. It features a 130W motor and variable speed control, allowing for optimal performance across different materials and applications.
Caratteristiche principali:
- Energia: 130 Watt
- Voltage: 230 Volt
- Velocità: Variable, 8,000 to 30,000 RPM
- Albero flessibile: For detailed work in hard-to-reach areas.
- Tabella Clamp/Stand: For stationary operation and improved control.
5. Impostazione
5.1 Attaching Accessories to the Main Drill
- Assicurarsi che l'utensile sia scollegato dalla fonte di alimentazione.
- Press and hold the spindle lock button on the drill.
- Svitare il dado della pinza.
- Insert the desired accessory shank into the appropriate collet.
- Tighten the collet nut securely using the provided wrench.
5.2 Utilizzo dell'albero flessibile
The flexible shaft allows for greater maneuverability and precision in intricate tasks.
- Unplug the main drill.
- Remove any accessory from the main drill's collet.
- Unscrew the collet nut and remove the collet from the main drill.
- Screw the flexible shaft coupling onto the main drill's spindle.
- Insert the flexible shaft's inner drive cable into the main drill's spindle opening.
- Secure the flexible shaft's handpiece collet nut and insert the desired accessory.

Figura 5.1: The mini drill mounted on its table clamp stand, with the flexible shaft attached for extended reach and detailed work.
5.3 Mounting the Tool on the Stand
La tabella inclusa clamp and stand allow for stable, hands-free operation, particularly useful when using the flexible shaft.
- Secure the table clamp to a sturdy workbench or table.
- Assemble the vertical stand rod into the clamp.
- Hang the mini drill from the top hook of the stand.
6. Istruzioni per l'uso
Before starting, ensure your work area is clear and you are wearing appropriate personal protective equipment.
6.1 Accensione e regolazione della velocità
- Collegare l'utensile a una presa di corrente da 230 V.
- Portare l'interruttore di alimentazione in posizione 'ON'.
- Adjust the rotational speed using the variable speed dial. Start at a lower speed and gradually increase as needed for the material and task.
6.2 Applicazioni comuni
The mini drill is suitable for a variety of precision tasks:
- Perforazione: Use appropriate drill bits for wood, plastic, or soft metals. Apply light, consistent pressure.
- Macinazione: Attach grinding stones for shaping, sharpening, or deburring.
- Incisione: Use engraving bits for detailed work on various surfaces.
- Taglio: Use cutting discs for small cuts in metal, plastic, or wood. Ensure the workpiece is secured.
- Carteggiatura: Attach sanding bands or discs for smoothing surfaces.
- Lucidatura: Use polishing wheels with appropriate compounds for a high-gloss finish.

Figura 6.1: The mini drill being used to create a precise hole in a wooden plank.

Figura 6.2: A close-up of the mini drill performing a drilling operation on a metal surface.

Figura 6.3: The mini drill with a grinding stone attachment, smoothing the edge of a metal piece.

Figura 6.4: An engraving bit attached to the mini drill, used for intricate detailing on a metal lighter.

Figura 6.5: A cutting disc on the mini drill being used to cut a metal bolt secured to a wooden surface.
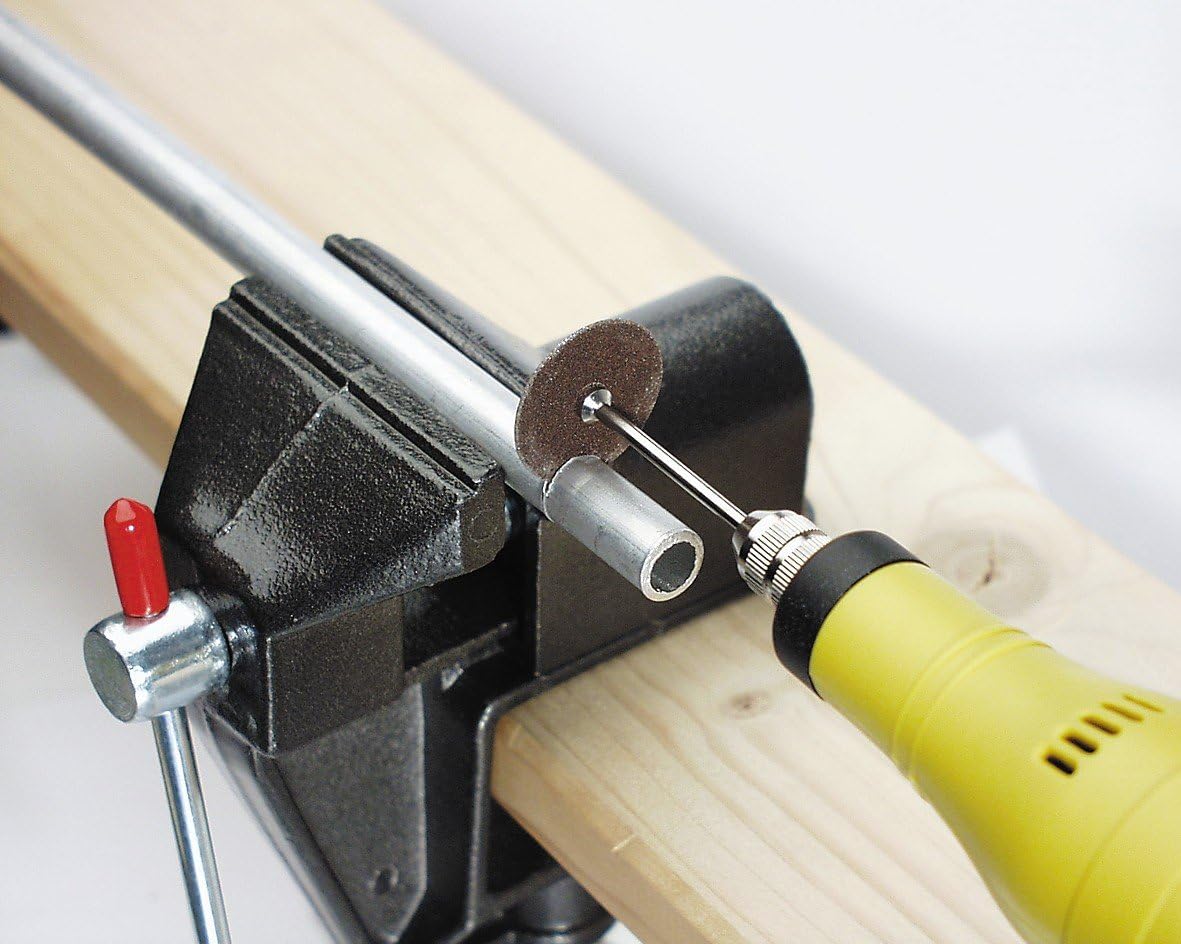
Figura 6.6: The mini drill with a cutting disc, performing a cut on a metal tube held in a vise.

Figura 6.7: A sanding band attachment on the mini drill, used for smoothing a wooden surface.
7. Manutenzione
Una manutenzione regolare garantisce la longevità e le prestazioni ottimali del tuo utensile.
7.1 Pulizia
- Scollegare sempre lo strumento prima della pulizia.
- Wipe the tool housing with a clean, damp stoffa. Non utilizzare prodotti chimici aggressivi o detergenti abrasivi.
- Rimuovere polvere e detriti dalle aperture di ventilazione per evitare il surriscaldamento.
- Clean collets and accessory shanks after each use to ensure proper fit and prevent seizing.
7.2 Conservazione
- Store the tool and all accessories in the provided storage case.
- Keep the tool in a dry, secure location, out of reach of children.
- Evitare di conservare alla luce solare diretta o a temperature estreme.
8. Risoluzione Dei Problemi
If you encounter issues with your mini drill, refer to the following common problems and solutions:
| Problema | Possibile causa | Soluzione |
|---|---|---|
| Lo strumento non si avvia | Nessuna alimentazione; interruttore difettoso | Check power connection and outlet; Contact customer support if switch is faulty. |
| Vibrazione eccessiva | Accessory not properly seated or balanced; Damaged flexible shaft | Ensure accessory is correctly installed and tightened; Replace damaged accessories or flexible shaft. |
| L'utensile si surriscalda | Ventilazione bloccata; Sovraccarico dell'utensile | Pulire le aperture di ventilazione; ridurre la pressione e lasciare raffreddare l'utensile. |
| Prestazioni ridotte | Worn accessories; Incorrect speed setting | Replace worn accessories; Adjust speed to suit the material and task. |
9. Specifiche
| Caratteristica | Dettaglio |
|---|---|
| Numero di modello | Numero di modello: M92571 |
| Potenza in ingresso | 130 Watt |
| Voltage | 230 Volt |
| Velocità di rotazione | 8,000 - 30,000 giri/min (variabile) |
| Fonte di alimentazione | Elettrico con cavo |
| Peso dell'articolo | 3.5 libbre (circa 1.59 kg) |
| Dimensioni del prodotto (L x P x A) | 12.6 x 9.06 x 3.54 pollici (circa 32 x 23 x 9 cm) |
| Usi consigliati | Grinding, Cutting, Sanding, Polishing |
| Codice GTIN | 04003315709299 |
10. Garanzia e supporto
For warranty information and customer support, please refer to the documentation included with your purchase or contact Brüder Mannesmann directly. Spare part availability duration is typically 1 year from the date of purchase.