1. Introduzione
Grazie per l'acquistoasing the JVC XVN330B DVD Video Player. This player is designed to provide high-quality video and audio playback from various disc formats. Key features include Digital Direct Progressive Scan output, 192kHz/24-bit audio D/A converter, 10-bit/54MHz video D/A converter, and multi-format compatibility (DVD-R/RW, DVD+R/RW, CD-R/RW, VCD/SVCD, MP3, and JPEG). This manual provides essential information for the safe and efficient operation of your device.
2. Informazioni sulla sicurezza
- Fonte di energia: Connect the player only to the specified power supply voltage.
- Ventilazione: Assicurare un'adeguata ventilazione attorno all'unità. Non ostruire le aperture di ventilazione.
- Acqua e umidità: Non esporre l'unità a pioggia o umidità. Non posizionare oggetti contenenti liquidi sull'unità.
- Calore: Tenere l'unità lontana da fonti di calore quali radiatori, bocchette di riscaldamento, stufe o altri apparecchi (inclusi amplificatori) che producono calore.
- Manutenzione: Non tentare di riparare questo prodotto da soli. Affidare tutte le operazioni di manutenzione a personale di assistenza qualificato.
- Manipolazione del disco: Handle discs by their edges. Avoid touching the playback surface.
3. Contenuto della confezione
Verificare che tutti gli articoli elencati di seguito siano inclusi nella confezione:
- JVC XVN330B DVD Video Player
- Telecomando (con batterie)
- A/V Cable (Composite)
- Istruzioni per l'uso (questo manuale)
4. Prodotto finitoview
The JVC XVN330B DVD Video Player features a slim design and a black finish.
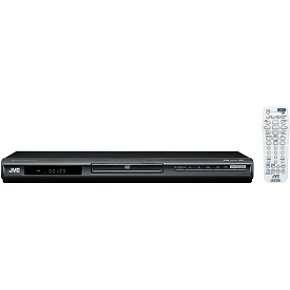
Figura 4.1: Davanti view of the JVC XVN330B DVD Video Player. This image shows the compact, black chassis with the disc tray, power button, and basic playback controls on the front panel.
4.1 Controlli del pannello frontale
- Pulsante di accensione: Accende o spegne il lettore.
- Vassoio del disco: Per l'inserimento di DVD e CD.
- Pulsante Apri/Chiudi: Apre e chiude il vassoio del disco.
- Pulsante Play/Pausa: Avvia o mette in pausa la riproduzione.
- Pulsante di arresto: Interrompe la riproduzione.
- Pulsanti Salta (Avanti/Indietro): Salta tracce o capitoli.
- Display: Mostra le informazioni sulla riproduzione.
4.2 Collegamenti del pannello posteriore
- Uscita video componente (Y, Pb, Pr): For high-quality video connection to compatible TVs.
- Uscita S-Video: For improved video quality over composite.
- Uscita video composita (RCA giallo): Connessione video standard.
- Analog Audio Output (Red/White RCA): For stereo audio connection.
- Uscita audio digitale coassiale: Per la connessione audio digitale a un ricevitore o amppiù vivace.
- Ingresso alimentazione CA: Si collega al cavo di alimentazione.
4.3 telecomando
The included remote control provides full functionality for operating the DVD player from a distance. It includes buttons for power, disc tray open/close, playback controls (play, pause, stop, fast forward, rewind, skip), menu navigation, volume, and special features. Ensure batteries are correctly inserted.
5. Impostazione
5.1 Collegamento a un televisore
Choose one of the following connection methods based on your television's available inputs for the best possible picture quality.
- Component Video Connection (Best Quality):
Connect the Component Video Output (Y, Pb, Pr) jacks on the DVD player to the corresponding Component Video Input jacks on your TV using a component video cable (not included). Ensure colors (green, blue, red) match.
- S-Video Connection (Better Quality):
Connect the S-Video Output jack on the DVD player to the S-Video Input jack on your TV using an S-Video cable (not included).
- Composite Video Connection (Standard Quality):
Connect the Composite Video Output (yellow RCA) jack on the DVD player to the Video Input (yellow RCA) jack on your TV using the supplied A/V cable.
5.2 Collegamento dell'audio
Connect the audio outputs from the DVD player to your TV or an audio receiver/amppiù vivace.
- Connessione audio analogica:
Connect the Analog Audio Output (red and white RCA) jacks on the DVD player to the corresponding Audio Input jacks on your TV or audio receiver using the supplied A/V cable (for stereo sound).
- Coaxial Digital Audio Connection:
For multi-channel surround sound, connect the Coaxial Digital Audio Output jack on the DVD player to a Coaxial Digital Audio Input on your compatible audio receiver/amplifier using a coaxial digital audio cable (not included).
5.3 Collegamento di alimentazione
After all video and audio connections are made, plug the AC power cord into the AC power input on the rear of the DVD player, then plug the other end into a wall outlet.
6. Istruzioni per l'uso
Riproduzione di dischi di base 6.1
- Premere il tasto ENERGIA pulsante per accendere il lettore.
- Premere il tasto APRI/CHIUDI pulsante per aprire il vassoio del disco.
- Place a DVD or CD disc onto the disc tray with the label side facing up.
- Premere il tasto APRI/CHIUDI button again to close the disc tray. The player will automatically begin playback or display the disc menu.
- Use the remote control's navigation buttons and ENTRARE to select options from the disc menu.
- Durante la riproduzione, utilizzare RIPRODUCI/PAUSA, FERMARE, AVANTI VELOCE, RIAVVOLGERE, E SALTARE pulsanti secondo necessità.
6.2 Playing MP3/JPEG Discs
When an MP3 or JPEG disc is inserted, a menu displaying the files and folders will appear.
- Use the navigation buttons on the remote to select the desired file o cartella.
- Premere ENTRARE to open a folder or start playback of a selected file.
- For JPEG slideshows, you can select from 11 visual effects and save an image as a custom startup screen.
6.3 Funzioni speciali
- Scansione progressiva: Provides a smoother, flicker-free picture when connected via component video to a compatible display. Ensure your TV is set to progressive scan mode if applicable.
- PAL Playback on NTSC TV: This player supports playback of PAL-formatted DVDs on NTSC televisions.
- Video Fine Processor: Offers 7 parameters, 2 presets, and 2 manual settings to adjust video output for personalized viewing. Access this feature through the player's setup menu.
- 10-Disc Memory: Allows you to bookmark a specific scene on up to 10 different discs, enabling easy return to that point later.
- Express Play Start: Reduces the time it takes for a disc to begin playing after insertion.
- Track Adjust: Helps ensure noise-free playback of burned discs.
7. Manutenzione
7.1 Pulizia dell'unità
- Pulire la parte esterna dell'unità con un panno morbido e asciutto.
- Non utilizzare detergenti abrasivi, cere o solventi poiché potrebbero danneggiare la finitura.
- Assicurarsi che l'unità sia scollegata prima della pulizia.
7.2 Cura del disco
- Tenere i dischi per i bordi per evitare impronte digitali sulla superficie di riproduzione.
- Pulire i dischi con un panno morbido e privo di lanugine, procedendo delicatamente dal centro verso l'esterno.
- Non utilizzare solventi o detergenti abrasivi sui dischi.
- Conservare i dischi nelle loro custodie per proteggerli da polvere e graffi.
8. Risoluzione Dei Problemi
If you experience problems with your DVD player, refer to the following table for possible solutions.
| Problema | Possibile causa | Soluzione |
|---|---|---|
| Nessun potere | Cavo di alimentazione non collegato saldamente. | Assicurarsi che il cavo di alimentazione sia saldamente collegato al lettore e alla presa a muro. |
| Nessuna immagine | Collegamento video o ingresso TV errato. | Check video cables are securely connected. Select the correct input source on your TV. |
| Nessun suono | Collegamento audio o volume TV/ricevitore non corretti. | Check audio cables. Increase volume on TV/receiver. Ensure correct audio input is selected. |
| Disc does not play / Freezes | Il disco è sporco, graffiato o il formato è incompatibile. | Clean the disc. Try a different disc. Ensure the disc format is supported (DVD, CD, MP3, JPEG). |
| Il telecomando non funziona | Batteries are dead or incorrectly inserted. Obstruction between remote and player. | Replace batteries. Ensure line of sight to the player's remote sensor. |
| Disc tray vibrates | Normal operation for some units, or disc not seated properly. | Ensure the disc is centered in the tray. This can sometimes be a characteristic of the unit's build. |
9. Specifiche
| Caratteristica | Descrizione |
|---|---|
| Nome del modello | XVN330B |
| Marca | JVC |
| Tipo di supporto | DVD, CD, DVD-R/RW, DVD+R/RW, CD-R/RW, VCD/SVCD, MP3, JPEG |
| Caratteristiche speciali | Progressive Scan, Digital Still (JPEG) Slideshow with Music, PAL playback on NTSC TV, Video Fine Processor, 10-Disc Memory, Express Play Start, Track Adjust |
| Convertitore D/A video | 10 bit/54 MHz |
| Convertitore D/A audio | 192 kHz/24 bit |
| Uscita video | Component Video (Y, Pb, Pr), S-Video, Composite Video (RCA) |
| Uscita audio | Analog Stereo (RCA), Coaxial Digital Audio |
| Formato audio supportato | Dolby Digitale (AC-3) |
| Colore | Nero |
| Peso dell'articolo | 5 libbre (circa 2.27 kg) |
| Codice UPC | 046838026287 |
10. Garanzia e supporto
I prodotti JVC sono realizzati secondo elevati standard qualitativi e sono coperti da una garanzia limitata. Per i termini e le condizioni di garanzia specifici, consultare la scheda di garanzia inclusa con il prodotto o visitare il sito ufficiale JVC. websito.
For technical assistance, customer service, or to inquire about repairs, please contact JVC customer support through their official channels. Contact information can typically be found on the JVC websito o nella documentazione fornita con l'acquisto.
Supporto online: www.jvc.com/support (This is a placeholder link, please refer to actual JVC support page)