1. Okwu mmalite
Thank you for choosing the HYPERLITE 8 Foot LED Linear Strip Light Fixture. This manual provides essential information for the safe installation, operation, and maintenance of your new lighting fixture. Please read these instructions thoroughly before installation and retain them for future reference.

Foto 1.1: Ofeview of the HYPERLITE 8 Foot LED Linear Strip Light Fixture.
2. Ozi nchekwa
WARNING: Risk of electric shock. Disconnect power before installation or servicing.
- Onye ọrụ ọkụ eletrik ruru eru kwesịrị ịrụ ọrụ nrụnye ahụ dịka iwu eletriki mba na nke mpaghara si dị.
- Gbaa mbọ hụ na ọkọnọ voltage is compatible with the fixture's requirements (120-277V).
- Do not handle the fixture with wet hands or when standing on wet surfaces.
- Do not modify the fixture in any way. Unauthorized modifications may void the warranty and create safety hazards.
- Gbaa mbọ hụ na njikọ niile echekwara na mkpuchi nke ọma.
- Emebere ihe ndozi a maka naanị ime ụlọ.
3. Ihe ngwugwu
Chọpụta na akụrụngwa niile dị tupu ịmalite nrụnye:
- HYPERLITE 8 Foot LED Linear Strip Light Fixture (Quantity as per pack size)
- Akwụkwọ ntuziaka (akwụkwọ a)
- J-box adapters (x2)
- Safety Ropes (x2)
- Screws (x6 total for mounting)
- Arịlịka (x4)
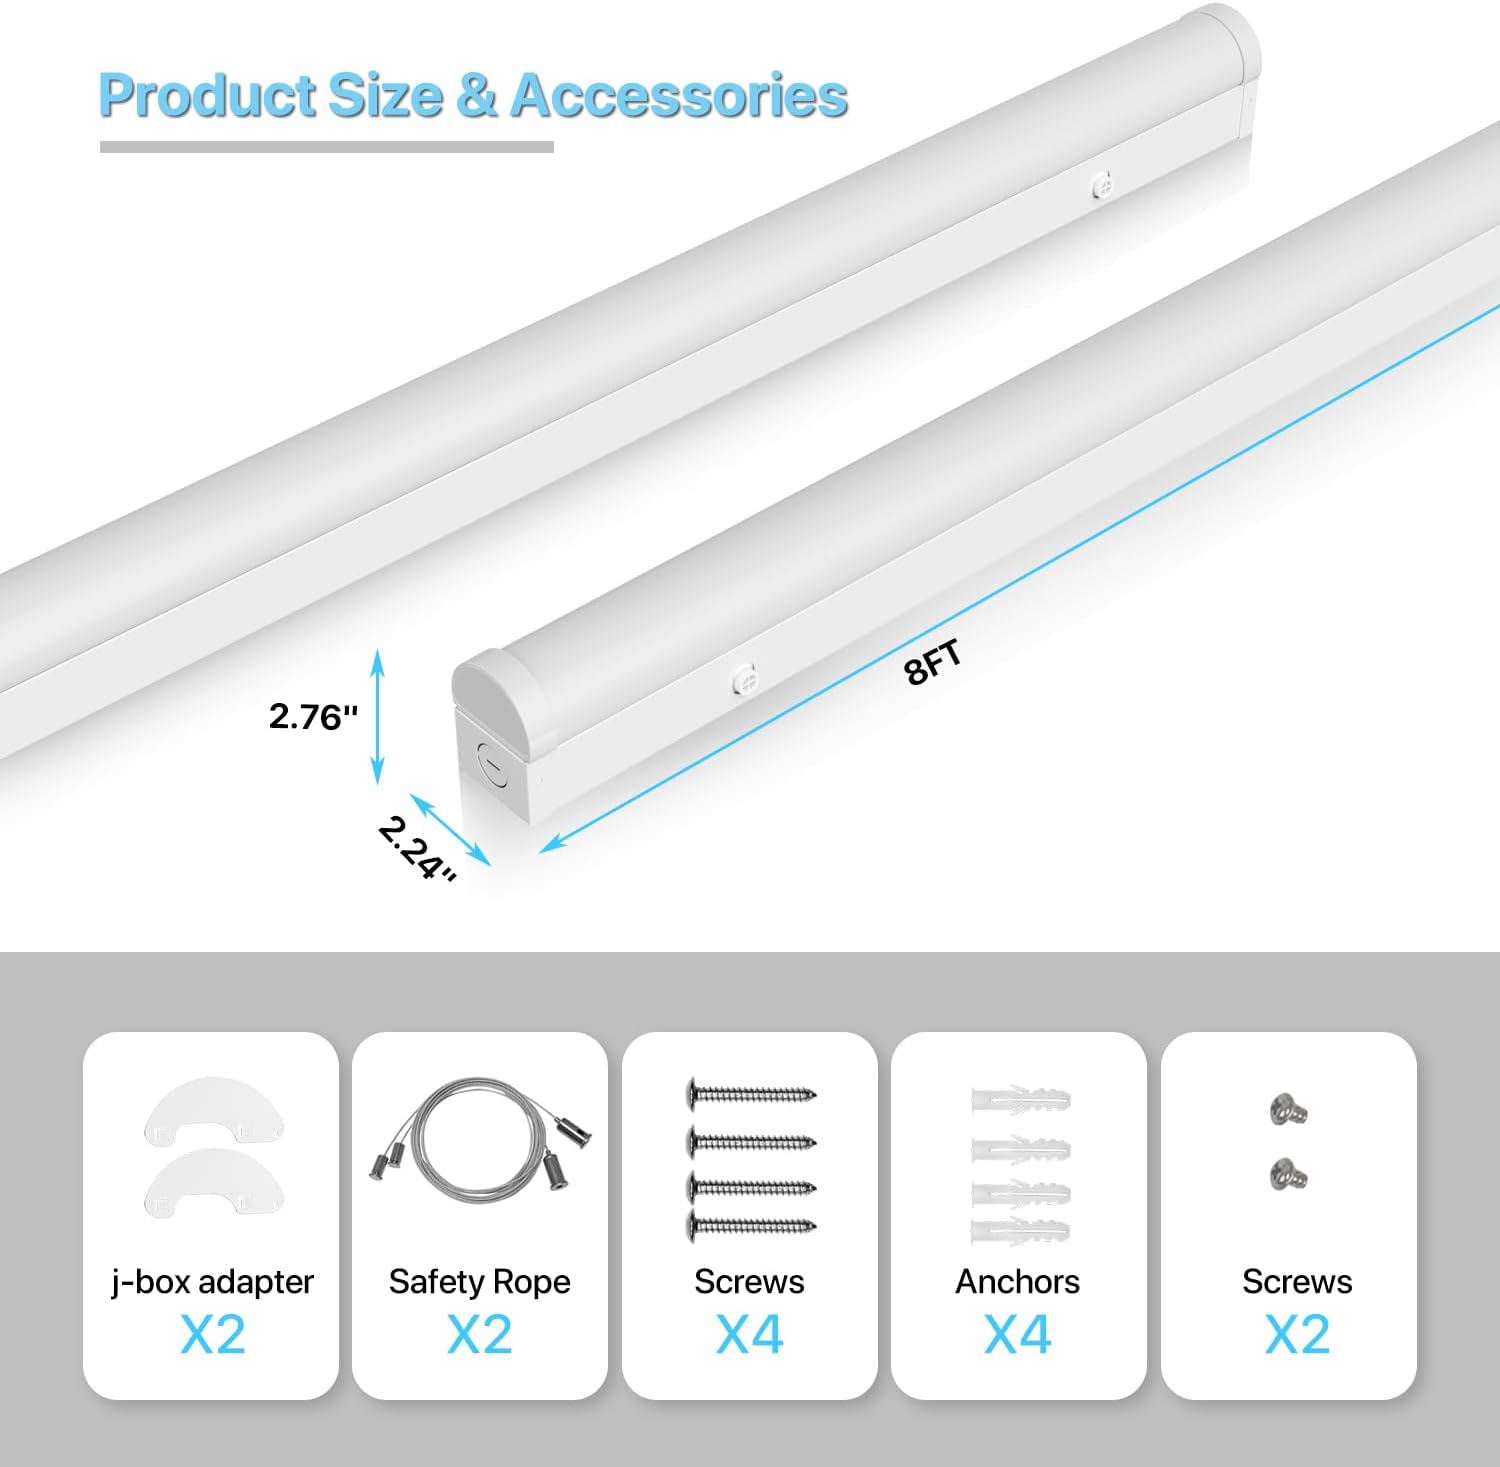
Image 3.1: Included accessories and fixture dimensions.
4. Akụrụngwa Ngwaahịa
- Wat na-agbanwe agbanwetage: Select between 60W, 70W, or 80W to optimize energy consumption and light output.
- Selectable Color Temperature (CCT): Choose from 3500K (Warm White), 4000K (Cool White), or 5000K (Daylight) to suit your environment.
- Ịrụ ọrụ dị elu: Delivers up to 10400 lumens with an efficiency of 130 lumens per watt.
- 1-10V Dimmable: Compatible with 1-10V dimmers for adjustable brightness from 10% to 100%.
- Ogologo ndụ: Rated for 50,000 hours of operation, reducing maintenance and replacement costs.
- Ihe owuwu na-adịgide adịgide: Made from aluminum for robust performance.
- UL kwadoro: Meets high safety and performance standards.
- Nwụnye ọtụtụ: Supports both surface mount and suspended mount methods.
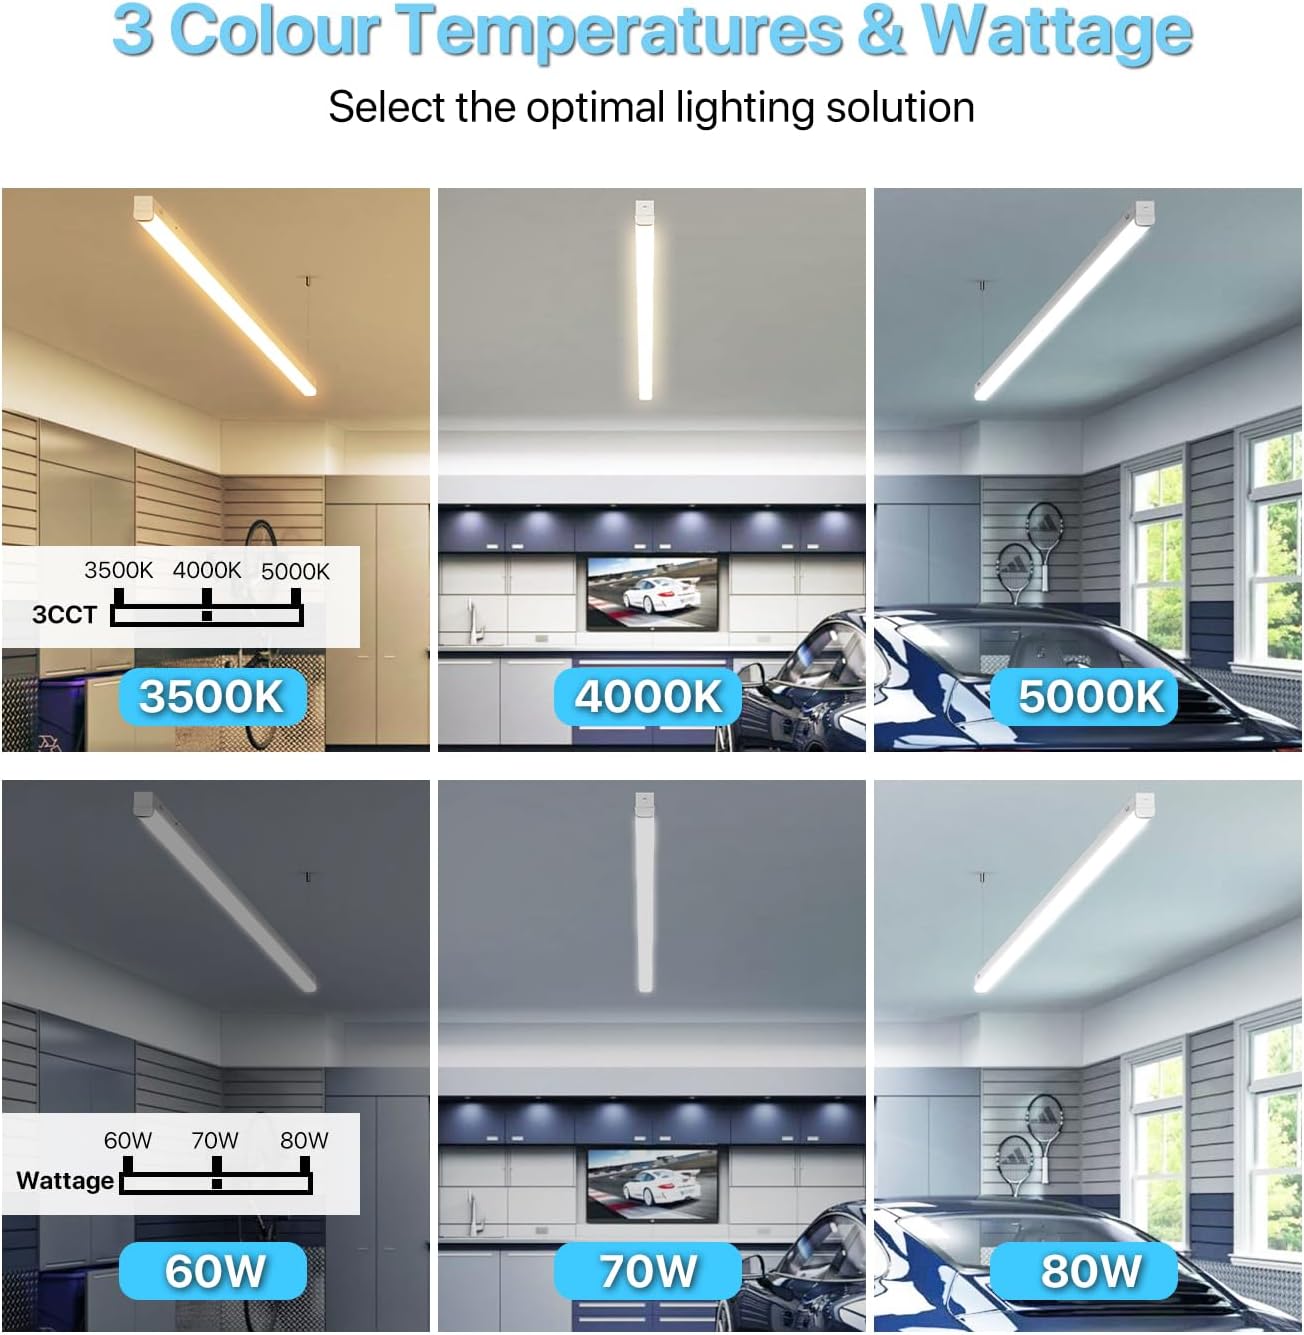
Image 4.1: Visual representation of selectable color temperatures and wattage ntọala.

Image 4.2: Details on the screw-lock mechanism for stable suspension and the unique button/buckle design for easy cover removal.
5. Ntuziaka nwụnye
Before installation, ensure the power supply is turned off at the circuit breaker.
5.1. Ngwunye elu ugwu
- Kwadebe elu ugwu: Identify the desired location for the fixture. Mark the drilling points for the mounting screws.
- Oghere egwu egwu: Drill pilot holes at the marked locations. Insert anchors if mounting into drywall or other soft materials.
- Attach J-box Adapters: Secure the J-box adapters to the ceiling or wall using the provided screws.
- Wepu ihe ndozi ahụ: Connect the fixture's electrical wires to the building's wiring (Live to Live, Neutral to Neutral, Ground to Ground). Ensure all connections are secure and insulated.
- Ugwu ihe ndozi ahụ: Align the fixture with the J-box adapters and secure it in place with the remaining screws.
5.2. Suspended Mount Installation
- Kwadebe elu ugwu: Identify the desired location for the fixture. Mark the drilling points for the suspension hardware.
- Install Suspension Hardware: Secure the ceiling hooks or other suspension hardware (not included, but compatible with safety ropes) into the ceiling structure.
- Tinye eriri nchekwa: Connect the safety ropes to the fixture's designated attachment points. The screw-lock mechanism ensures stable suspension.
- Gbanwee Ogologo: Adjust the length of the safety ropes to achieve the desired hanging height.
- Wepu ihe ndozi ahụ: Connect the fixture's electrical wires to the building's wiring (Live to Live, Neutral to Neutral, Ground to Ground). Ensure all connections are secure and insulated.

Image 5.1: Illustration of the two available installation methods: Surface Mount and Suspended Mount.
6. Ntuziaka ọrụ
The HYPERLITE LED Linear Strip Light Fixture features external switches for adjusting wattage and color temperature (CCT).
6.1. Ịgbanwe Wattage na Agba okpomọkụ
The CCT and wattage switches are located on the fixture's housing. These can be adjusted without disassembling the fixture.
- Chọta Switches: Identify the small toggle switches on the side of the fixture. One switch controls wattage (60W, 70W, 80W) and the other controls CCT (3500K, 4000K, 5000K).
- Select Desired Setting: Use a small tool (e.g., a screwdriver) to slide the switches to your preferred wattage na agba okpomọkụ.
- Ike Na: Restore power to the fixture to see the changes.
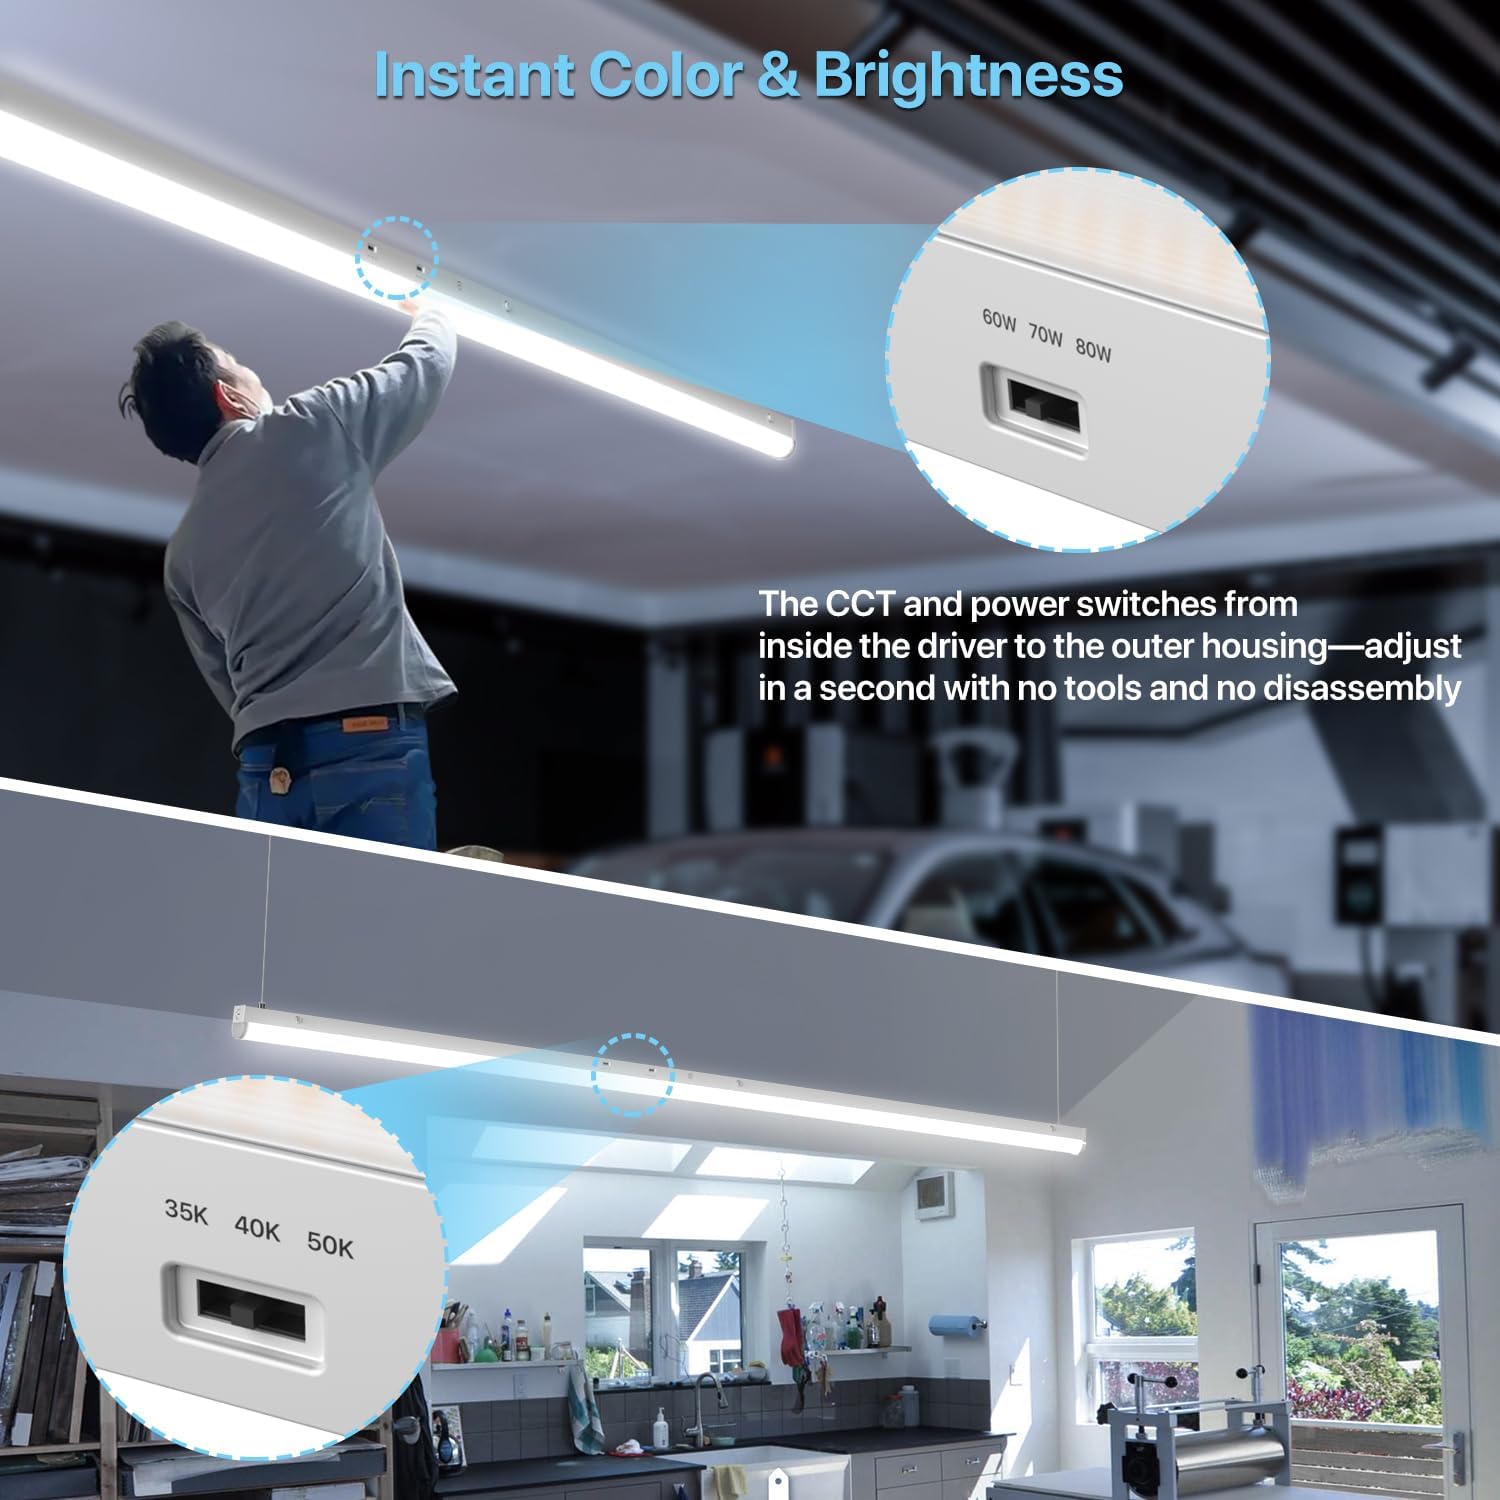
Image 6.1: Location and operation of the CCT and wattage nhọrọ mgbanwe.
6.2. Dimming Function (1-10V)
This fixture supports 1-10V dimming. To utilize this feature, you will need a compatible 1-10V dimmer switch (not included) wired into your electrical system.
- Install 1-10V Dimmer: Have a qualified electrician install a 1-10V dimmer switch according to its instructions and local electrical codes.
- Connect Dimming Wires: Connect the fixture's dimming wires to the corresponding wires from the 1-10V dimmer.
- Gbanwee ihie: Use the 1-10V dimmer to adjust the light output from 10% to 100%.

Image 6.2: Visual demonstration of the 1-10V dimming range from 10% to 100% brightness.
7. Nlekọta
The HYPERLITE LED Linear Strip Light Fixture requires minimal maintenance.
- Nhicha: Hụ na agbanyụrụ ọkụ tupu ị sachaa ya. Jiri ihe dị nro, kpọrọ nkụ, ma ọ bụ obere ihe hichaa ihe nkwụnye ọkụ ahụ.amp cloth. Do not use harsh chemicals, abrasive cleaners, or solvents.
- Nyocha: Periodically inspect the fixture for any signs of damage, loose connections, or wear. If any issues are found, disconnect power and contact a qualified electrician or HYPERLITE support.
- Ọkụ: The LEDs are integrated and not user-replaceable. The long lifespan of the LEDs means replacement should not be necessary under normal operating conditions.
8. Nchọpụta nsogbu
If you encounter issues with your fixture, refer to the following common problems and solutions:
| Nsogbu | Ihe nwere ike ime | Ngwọta |
|---|---|---|
| Fixture anaghị agba ọkụ | Enweghị ọkụ Njikọ waya na-adịghị mma Ihe ndozi adịghị mma | Lelee ihe mgbawa sekit na mgba ọkụ mgbidi. Hụ na njikọ waya niile dị nchebe (hụ na agbanyụrụ ọkụ mbụ). Contact HYPERLITE support if power is confirmed and connections are good. |
| Light output is too dim or too bright | Wat ezighi ezitage ntọala Dimmer setting too low/high | Gbanwee wattage switch on the fixture. Adjust the 1-10V dimmer to the desired brightness level. |
| Okpomọkụ agba adịghị ka a tụrụ anya ya | Ntọala CCT ezighi ezi | Adjust the CCT switch on the fixture to 3500K, 4000K, or 5000K. |
| Ìhè na-egbuke egbuke | dimmer na-ekwekọghị ekwekọ Ngwa ngwa waya Voltagna mgbanwe | Ensure a 1-10V dimmer is used. If not, replace with a compatible dimmer. Check all wiring connections (with power off). Gakwuru onye ọrụ ọkụ eletrik iji lelee otú ọkụ eletrik si dị. |
9. Nkọwapụta
| Njirimara | Nkọwapụta |
|---|---|
| Nọmba nlereanya | HP-SP-BF02 |
| Akụkụ (L x W x H) | 96" x 2.09" x 2.59" |
| Wattage | 60W / 70W / 80W (Selectable) |
| Mmepụta Lumen | Up to 10400 Lumens (at 80W) |
| Ịrụ ọrụ | 130 lm/W |
| Okpomọkụ agba (CCT) | 3500K / 4000K / 5000K (A ga-ahọrọ) |
| Enweghi ike | 1-10V Dimming (10%-100%) |
| Ntinye Voltage | AC AC 120-277V |
| Ogologo ndụ | awa 50,000 |
| Ihe onwunwe | Aluminom |
| Asambodo | Edepụtara UL |
| Ojiji ime ime/n'èzí | Eji ime ụlọ naanị |
| Ibu Ihe (ngwugwu 8) | 49.9 pound |
10. Akwụkwọ ikike na nkwado
10.1. Akwụkwọ ikike Ozi
This HYPERLITE LED Linear Strip Light Fixture is covered by a 5-afọ akwụkwọ ikike from the date of purchase. This warranty covers defects in materials and workmanship under normal use. It does not cover damage caused by improper installation, misuse, abuse, accidents, or unauthorized modifications.
Biko dowe ihe akaebe nke ịzụrụ ihe maka akwụkwọ ikike.
10.2. Nkwado ndị ahịa
For technical assistance, warranty claims, or any questions regarding your HYPERLITE product, please contact our customer support team. Refer to the contact information provided with your purchase or visit the official HYPERLITE websaịtị.
When contacting support, please have your model number (HP-SP-BF02) and purchase date ready.