
1. Introduction and System Overview
This manual provides detailed instructions for the Fuers 8CH 4K PoE Security Camera System. This system includes an 8-channel Network Video Recorder (NVR) with a pre-installed 500GB hard drive and two wired 6MP PoE dual-lens security cameras. The system is designed for 24/7 surveillance, offering features such as smart person detection, two-way audio, and remote access via mobile application or PC client.
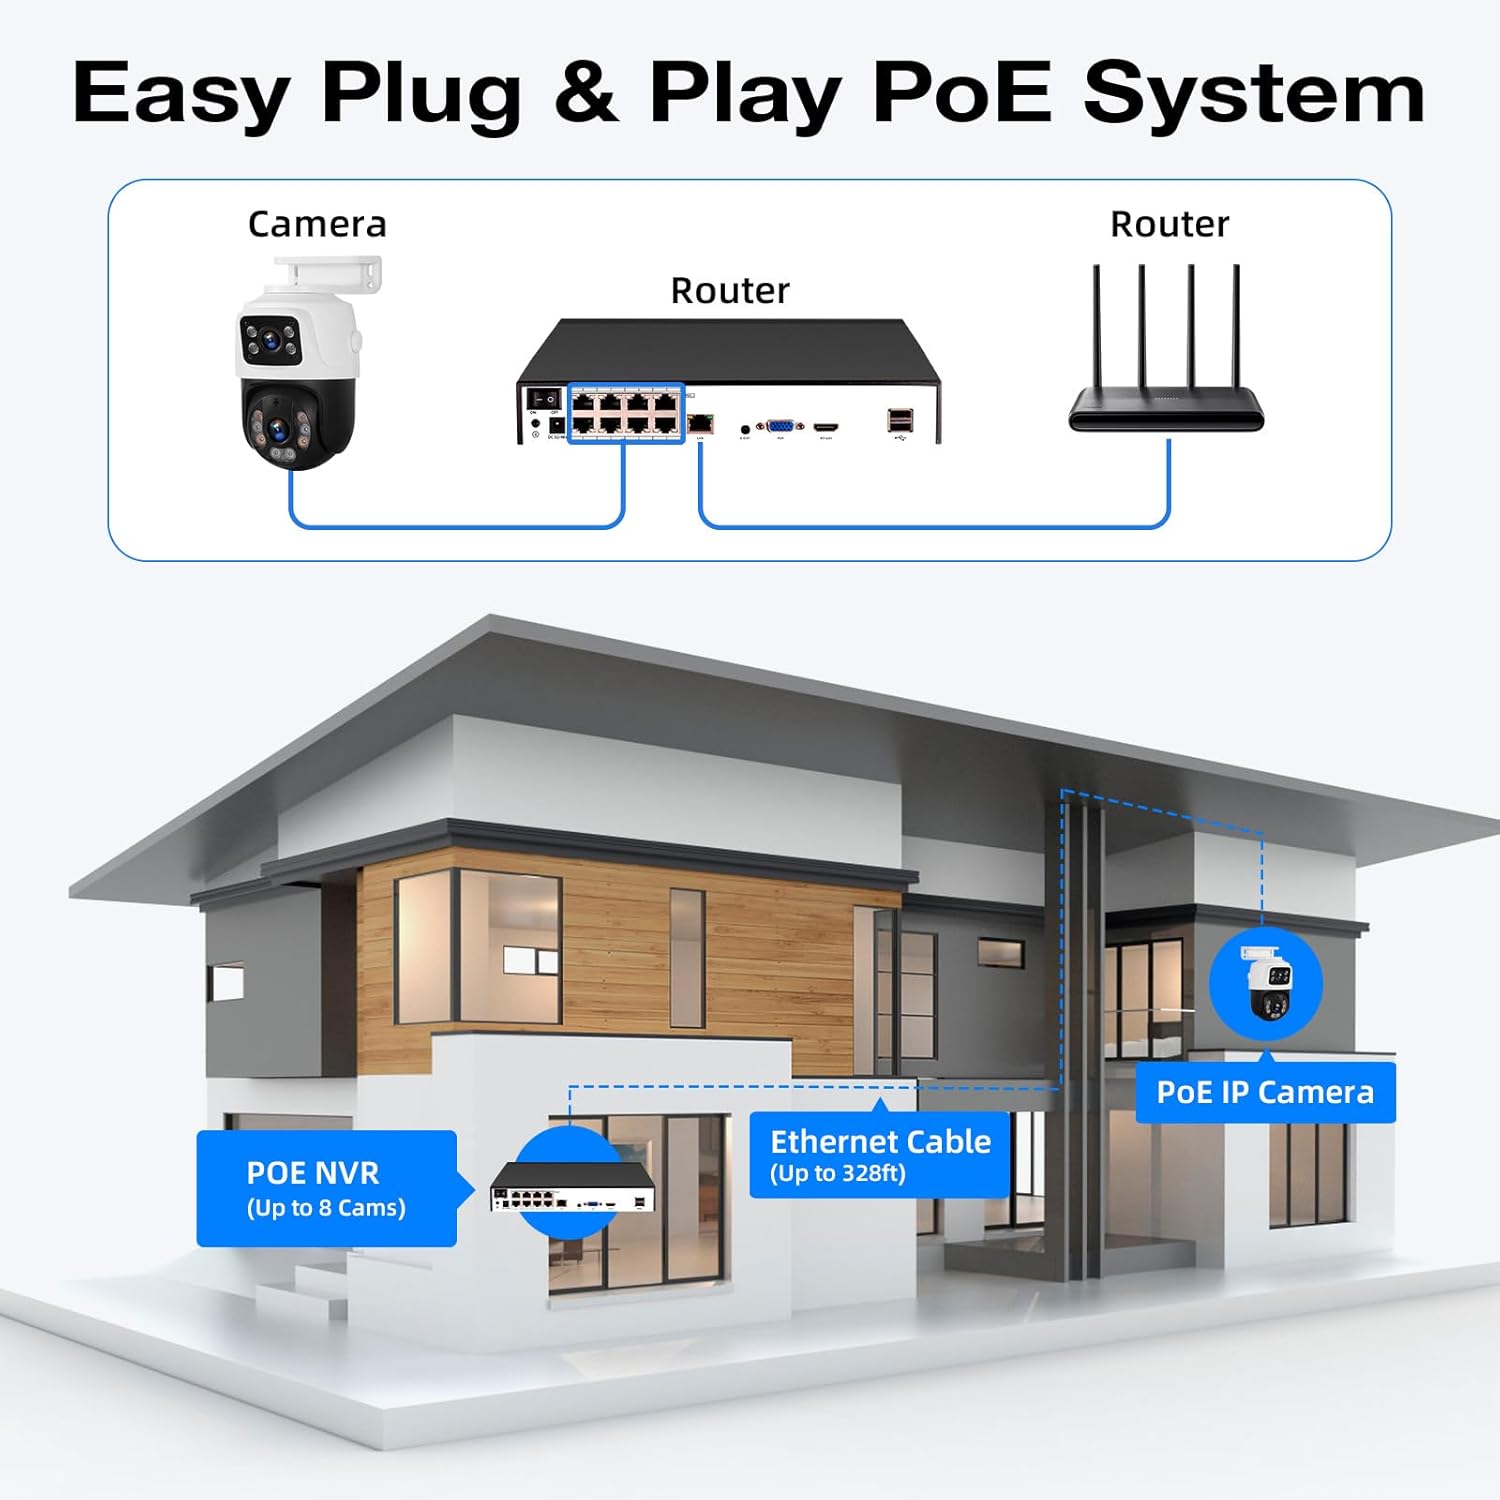
The NVR supports up to 8 cameras, allowing for future expansion with additional Fuers IP cameras. Its Power over Ethernet (PoE) capability simplifies installation by providing both power and data transmission through a single network cable.
2. Kedu ihe dị na Igbe ahụ
Biko chọpụta na agụnyere ihe niile edepụtara n'okpuru na ngwugwu gị:
- 1x 8CH NVR with 500G Hard Drive Pre-installed
- 1x NVR Power Adapter
- 2x 6MP PoE Dual-Lens Cameras
- 2x 18m Network Cable
- 1 x HDMI USB
- 1 x eriri USB
- 2x Mounting Screw Kits
- 1 x Akwụkwọ ntuziaka onye ọrụ (akwụkwọ a)
Ọgụgụ 2.1: Ihe ngwugwu
3. Ngwa sistemu
3.1 Network Video Recorder (NVR)
The NVR is the central unit for recording, storing, and managing video footage from your cameras. It features 8 PoE ports for direct camera connection, eliminating the need for separate power adapters for each camera.

Figure 3.1: NVR Rear Panel Ports
- Ọdụ ụgbọ mmiri PoE (1-8): Connect PoE cameras directly.
- Ọdụ ụgbọ mmiri LAN: Connect to your router for internet access and remote viewing.
- VGA/HDMI Ports: Connect to a monitor for local viewing.
- ọdụ ụgbọ mmiri USB: Connect the included USB mouse for control and for external storage/backup.
- Ntinye ike: Jikọọ ihe nkwụnye ike NVR.
- Mgbanwu ma ọ bụ gbanyụọ: Power control for the NVR.
3.2 6MP PoE Dual-Lens Cameras
The included cameras are 6-megapixel (6MP) dual-lens units, providing high-resolution video. They are designed for outdoor use with IP66 waterproofing and support both ceiling and wall mounting.
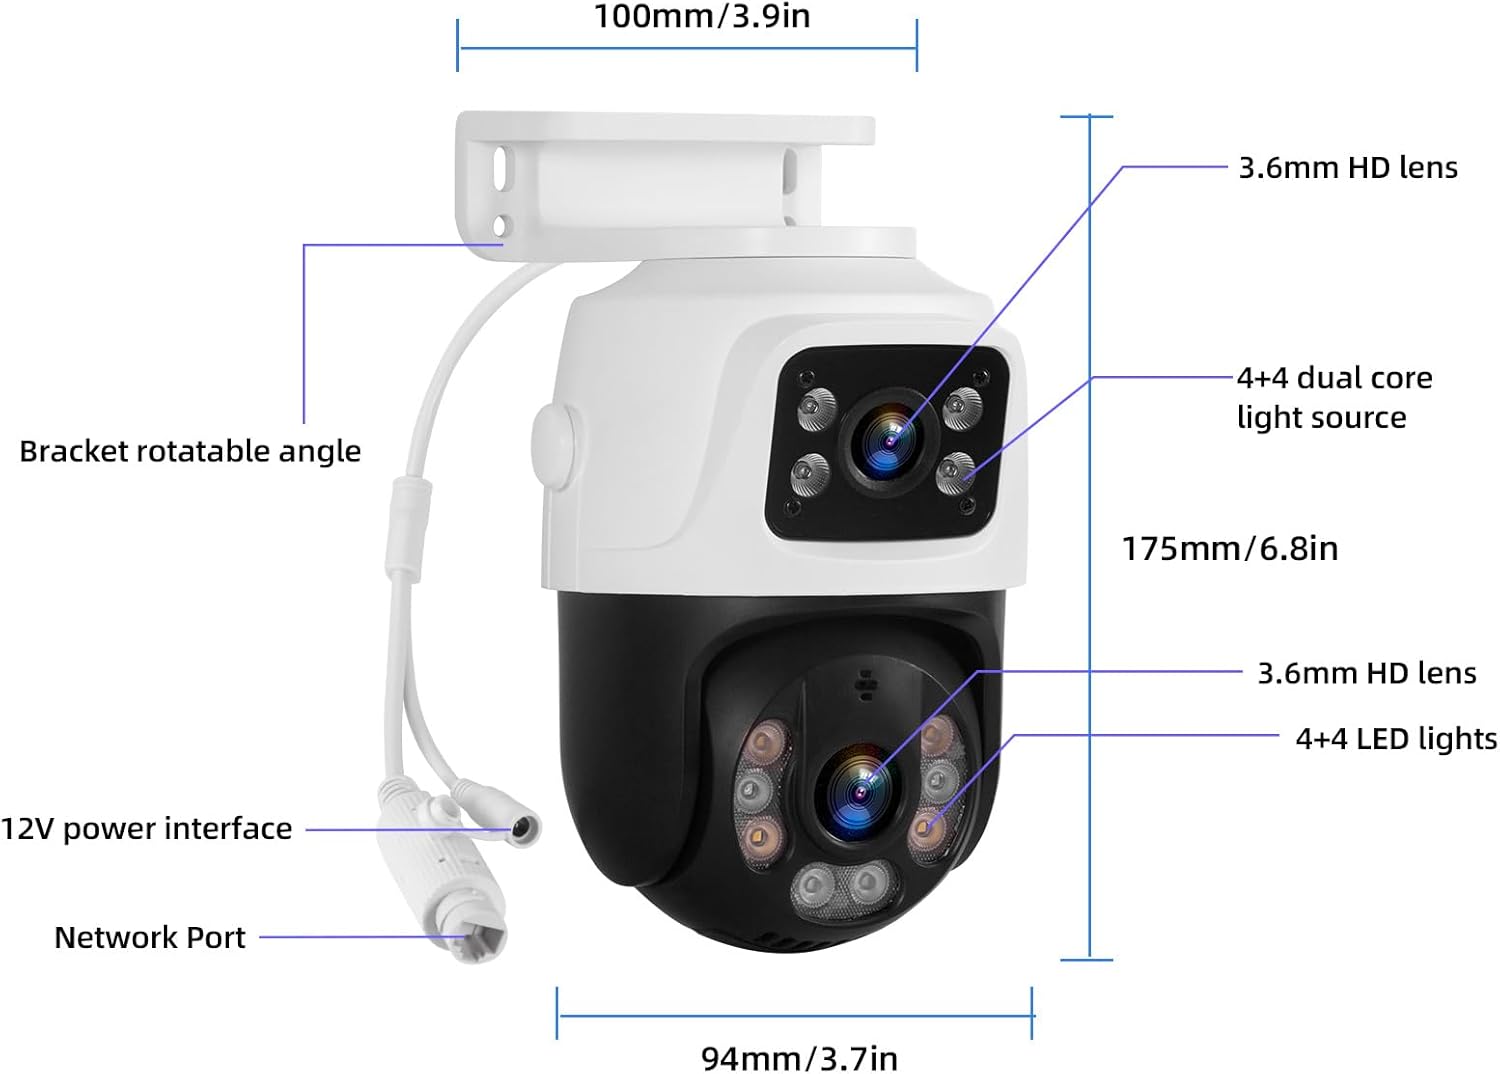
Figure 3.2: Camera Components and Dimensions
- Lensị abụọ: Provide a wider field of view or simultaneous views.
- PoE Connectivity: Receives power and data via a single Ethernet cable.
- Igwe okwu arụnyere n'ime ya: Enables two-way audio communication.
- Ọhụụ abalị: Supports both infrared (black & white) and full-color night vision.
- IP66 mkpuchi ihu igwe: Suitable for outdoor installation in various weather conditions.
4. Ntọala na nwụnye
4.1 Initial NVR Connection
- Connect the USB mouse to a USB port on the NVR.
- Connect your monitor to the NVR using either the VGA or HDMI cable.
- Connect the NVR power adapter to the NVR's DC input and plug it into a power outlet.
- Turn on the NVR using the power switch on the rear panel. The system will boot up and display on the connected monitor.
4.2 Camera Connection (PoE Plug & Play)
The PoE feature allows for a straightforward connection:
- Connect one end of the provided network cable to a PoE port on the NVR.
- Connect the other end of the network cable to the camera's network port.
- Repeat for all cameras. The cameras will automatically power on and connect to the NVR.

Figure 4.1: PoE System Connection Diagram
4.3 Network Connection for Remote Access
Iji mee ka ihe dịpụrụ adịpụ rụọ ọrụ viewing and alerts, connect the NVR to your home network:
- Connect one end of a network cable to the NVR's LAN port.
- Connect the other end of the network cable to an available LAN port on your router.
- Ensure your router has an active internet connection.

Figure 4.2: Remote Access Connection
4.4 Mobile App & PC Client Setup
Download the free 'xmeye pro' app from your device's app store (iOS or Android) or the PC client for Windows/Mac. Follow the in-app instructions to add your device by scanning the QR code displayed on the NVR monitor or manually entering the device ID. This will allow you to view ndu footage, playback recordings, and receive alerts remotely.
4.5 Igwefoto rịgoro
The cameras can be mounted on ceilings or walls. Choose a location that provides the desired viewing angle and is within reach of the network cables. Ensure the mounting surface is stable and secure.

Figure 4.3: Ceiling and Wall Mounting Options
Video 4.1: Step-by-step guide on connecting the NVR, cameras, and setting up the mobile application for live viewing.
5. Ọrụ
5.1 Ndụ View na Playback
Once the system is set up, you can view live camera feeds on your connected monitor, mobile app, or PC client. Use the USB mouse to navigate the NVR interface for playback of recorded footage, system settings, and other functions.
5.2 Smart Person Detection
The cameras are equipped with smart person detection, which accurately identifies human figures and reduces false alarms from other movements. When a person is detected, the system can send instant alerts to your mobile device.
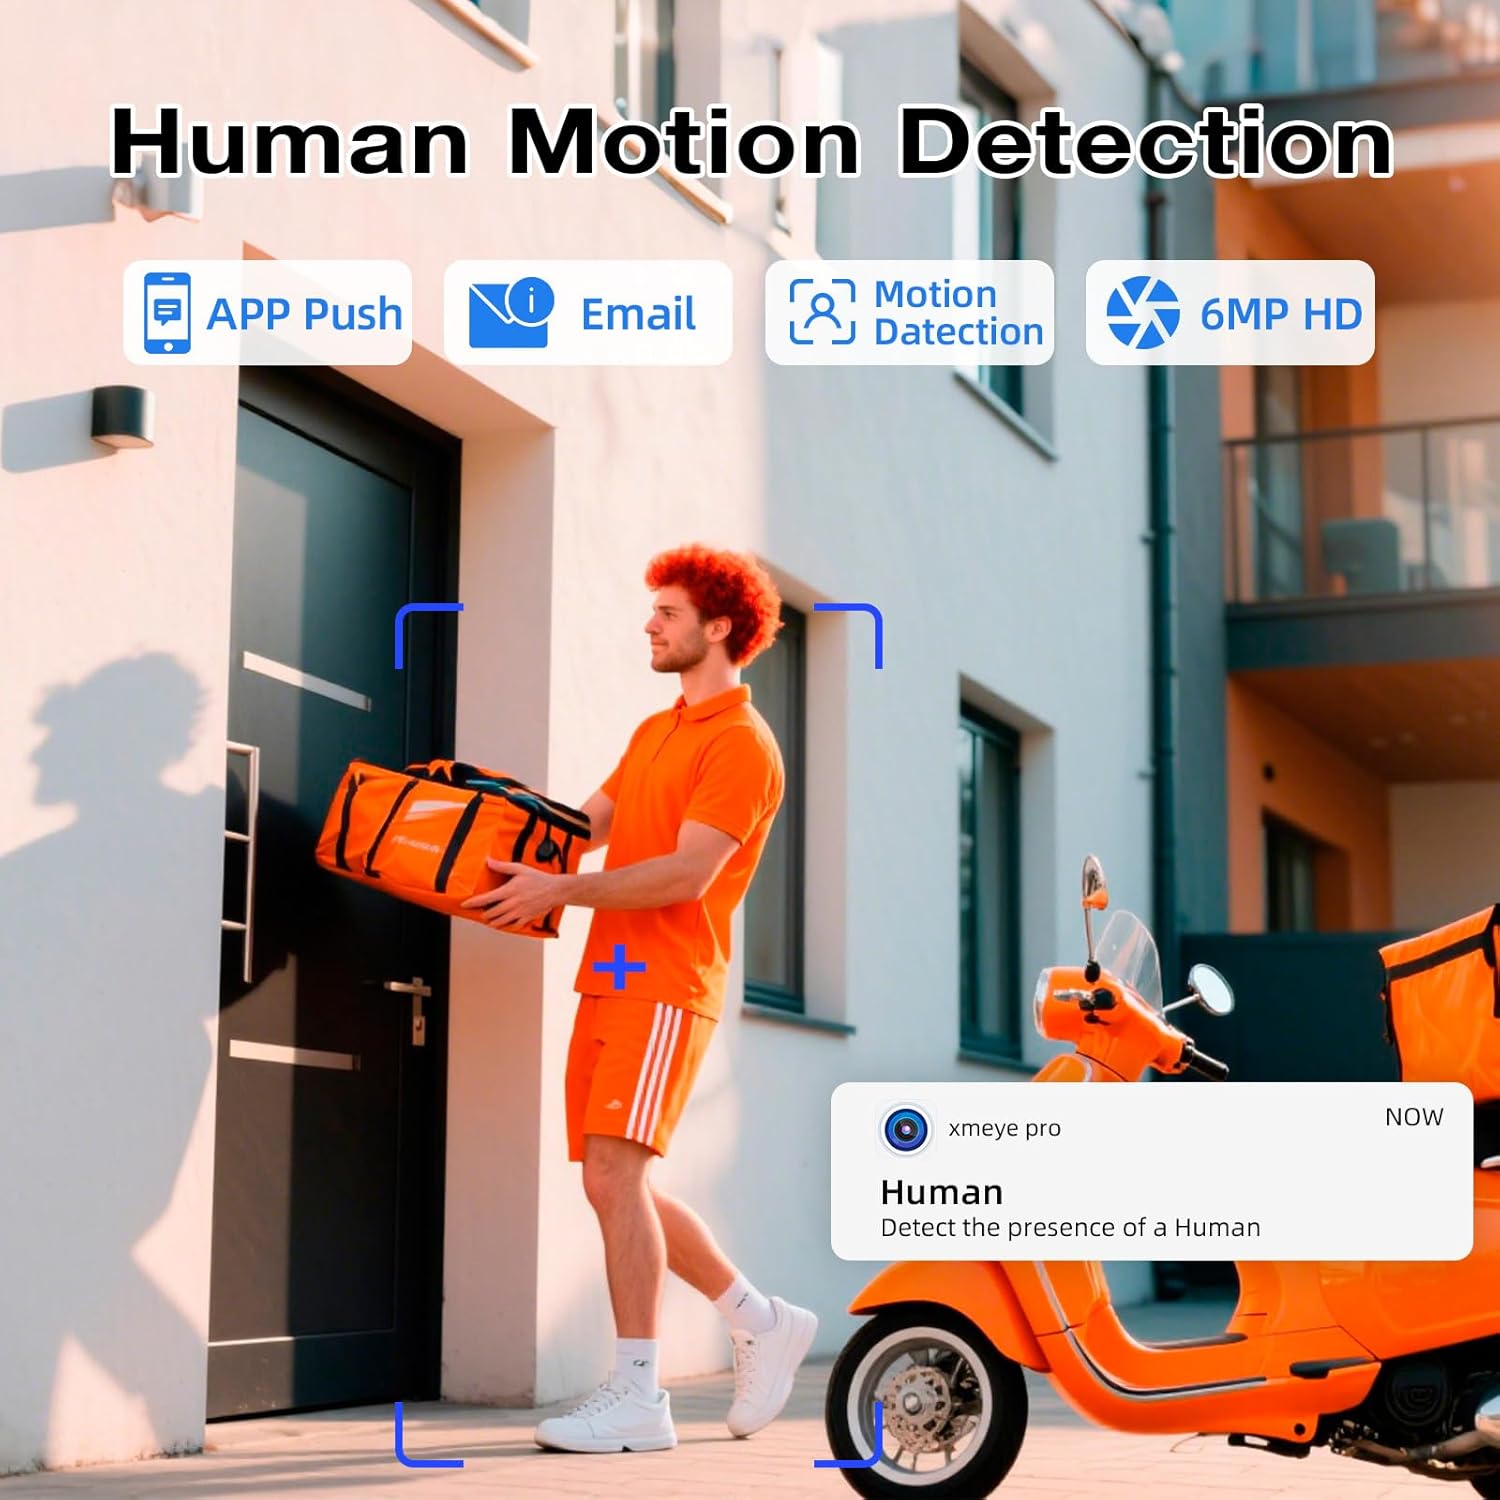
Figure 5.1: Smart Person Detection in Action
5.3 Audio ụzọ abụọ
The built-in microphone and speaker in the cameras allow for two-way audio communication. You can listen to audio from the camera's location and speak through your mobile app or NVR to communicate with individuals near the camera.

Foto nke 5.2: Nkwurịta Okwu Ọdịyo Abụọ
5.4 Ọhụụ abalị
The cameras offer both infrared (IR) night vision for clear black and white images in low light, and full-color night vision when ambient light is available or the camera's light alarm is activated. This ensures comprehensive surveillance around the clock.

Figure 5.3: Infrared vs. Full-Color Night Vision
5.5 Dual Lens & Auto Lock Motion
The dual-lens design allows for broader coverage or specific area focus. Some camera models may feature auto-tracking and auto-lock motion, where the camera automatically follows detected movement within its field of view, ensuring critical events are captured.

Figure 5.4: Dual Lens and Auto Lock Motion
6. Nlekọta
6.1 24/7 Recording and Storage Management
The NVR records continuously to the pre-installed 500GB hard drive. For extended recording capacity, an additional hard drive up to 8TB can be connected via the eSATA port. Regularly check the NVR's storage status to ensure continuous recording.

Figure 6.1: 24/7 Recording and Storage Options

Figure 6.2: Maximize Storage Capacity up to 8TB
6.2 Nhicha
Periodically clean the camera lenses with a soft, dry cloth to ensure clear image quality. For outdoor cameras, remove any accumulated dirt or debris from the housing.
6.3 Mmelite firmware
Lelee onye nrụpụta website or your mobile app for available firmware updates. Keeping your system's firmware updated ensures optimal performance, security, and access to new features.
7. Nchọpụta nsogbu
- Enweghị ngosi vidiyo:
- Check all cable connections (power, HDMI/VGA, network).
- Ensure the NVR and monitor are powered on.
- Verify that cameras are properly connected to PoE ports and their indicator lights are active. - No Remote Access:
- Confirm the NVR is connected to your router and has internet access.
- Check your router's internet connection.
- Ensure the 'xmeye pro' app is correctly configured with your device ID and network settings. - Motion Detection Not Working / False Alarms:
- Adjust the motion detection sensitivity settings in the NVR or app.
- Ensure the detection area is correctly configured, avoiding areas with constant movement (e.g., trees swaying).
- Verify that smart person detection is enabled if you wish to filter out non-human movements. - Ogo onyonyo adịghị mma:
- Clean the camera lens.
- Check for obstructions in the camera's field of view.
- Ensure the camera is securely mounted and not vibrating. - Enweghị ogo ọdịyo / adịghị mma:
- Check audio settings on the NVR and in the app.
- Ensure the camera's microphone is not obstructed.
8. Nkọwapụta
| Njirimara | Nkọwa |
|---|---|
| Ụdị | Ọkụ |
| Nọmba nlereanya | N6708-3 |
| Ọwa NVR | 8-Ọwa |
| Mkpebi igwefoto | 6MP |
| Ụdị igwefoto | Wired PoE Dual-Lens |
| NVR Storage Capacity | 500GB HDD (pre-installed), expandable up to 8TB via eSATA |
| Teknụzụ Njikọta | E tinyere waya (PoE) |
| Atụmatụ pụrụ iche | Smart Person Detection, Two-Way Audio, Color/IR Night Vision, IP66 Weatherproof |
| Product Dimensions (NVR) | 10.08 x 9.45 x 1.73 sentimita (256 x 240 x 44 mm) |
| Ibu Ibu | 8.64 pound |
9. Akwụkwọ ikike na nkwado
For warranty information and technical support, please refer to the documentation provided with your purchase or contact Fuers customer service directly. You can often find support contact details on the manufacturer's official websaịtị.