
TOPMEDA GS201
TOPMEDA Gun Safe with LCD Display User Manual
Brand: TOPMEDA | Model: GS201
1. Okwu mmalite
The TOPMEDA GS201 Gun Safe provides secure storage for handguns and valuables, featuring multiple access methods including advanced biometric fingerprint recognition, a customizable keypad, and traditional key access. Designed for quick and reliable entry, it also includes an LCD display for real-time environmental monitoring and battery status.
Akụkụ ndị bụ isi:
- Advanced Biometric Technology: Utilizes 650 DPI semiconductor fingerprint sensors for fast and secure verification, supporting up to 100 fingerprints.
- Unbreakable Construction: Features a patented anti-pry design with curved sides and internal blocking plates, crafted from thick solid steel capable of bearing up to 2000 pounds.
- Ihe eji eme enyi: Includes LED interior lighting, 360° sponge wrap to prevent scratches, and a silent mode for discreet operation.
- Ngosipụta LCD: Provides real-time internal temperature, humidity, and battery level readings.
- Nnweta ihe mberede: Equipped with an emergency USB-C port for power and backup keys to prevent lockout.
- Nnukwu ike: Accommodates 2 to 4 handguns and other important items like jewelry, passports, and cash.

Figure 1: TOPMEDA GS201 Gun Safe with interior view, displaying multiple handguns and the LCD screen.
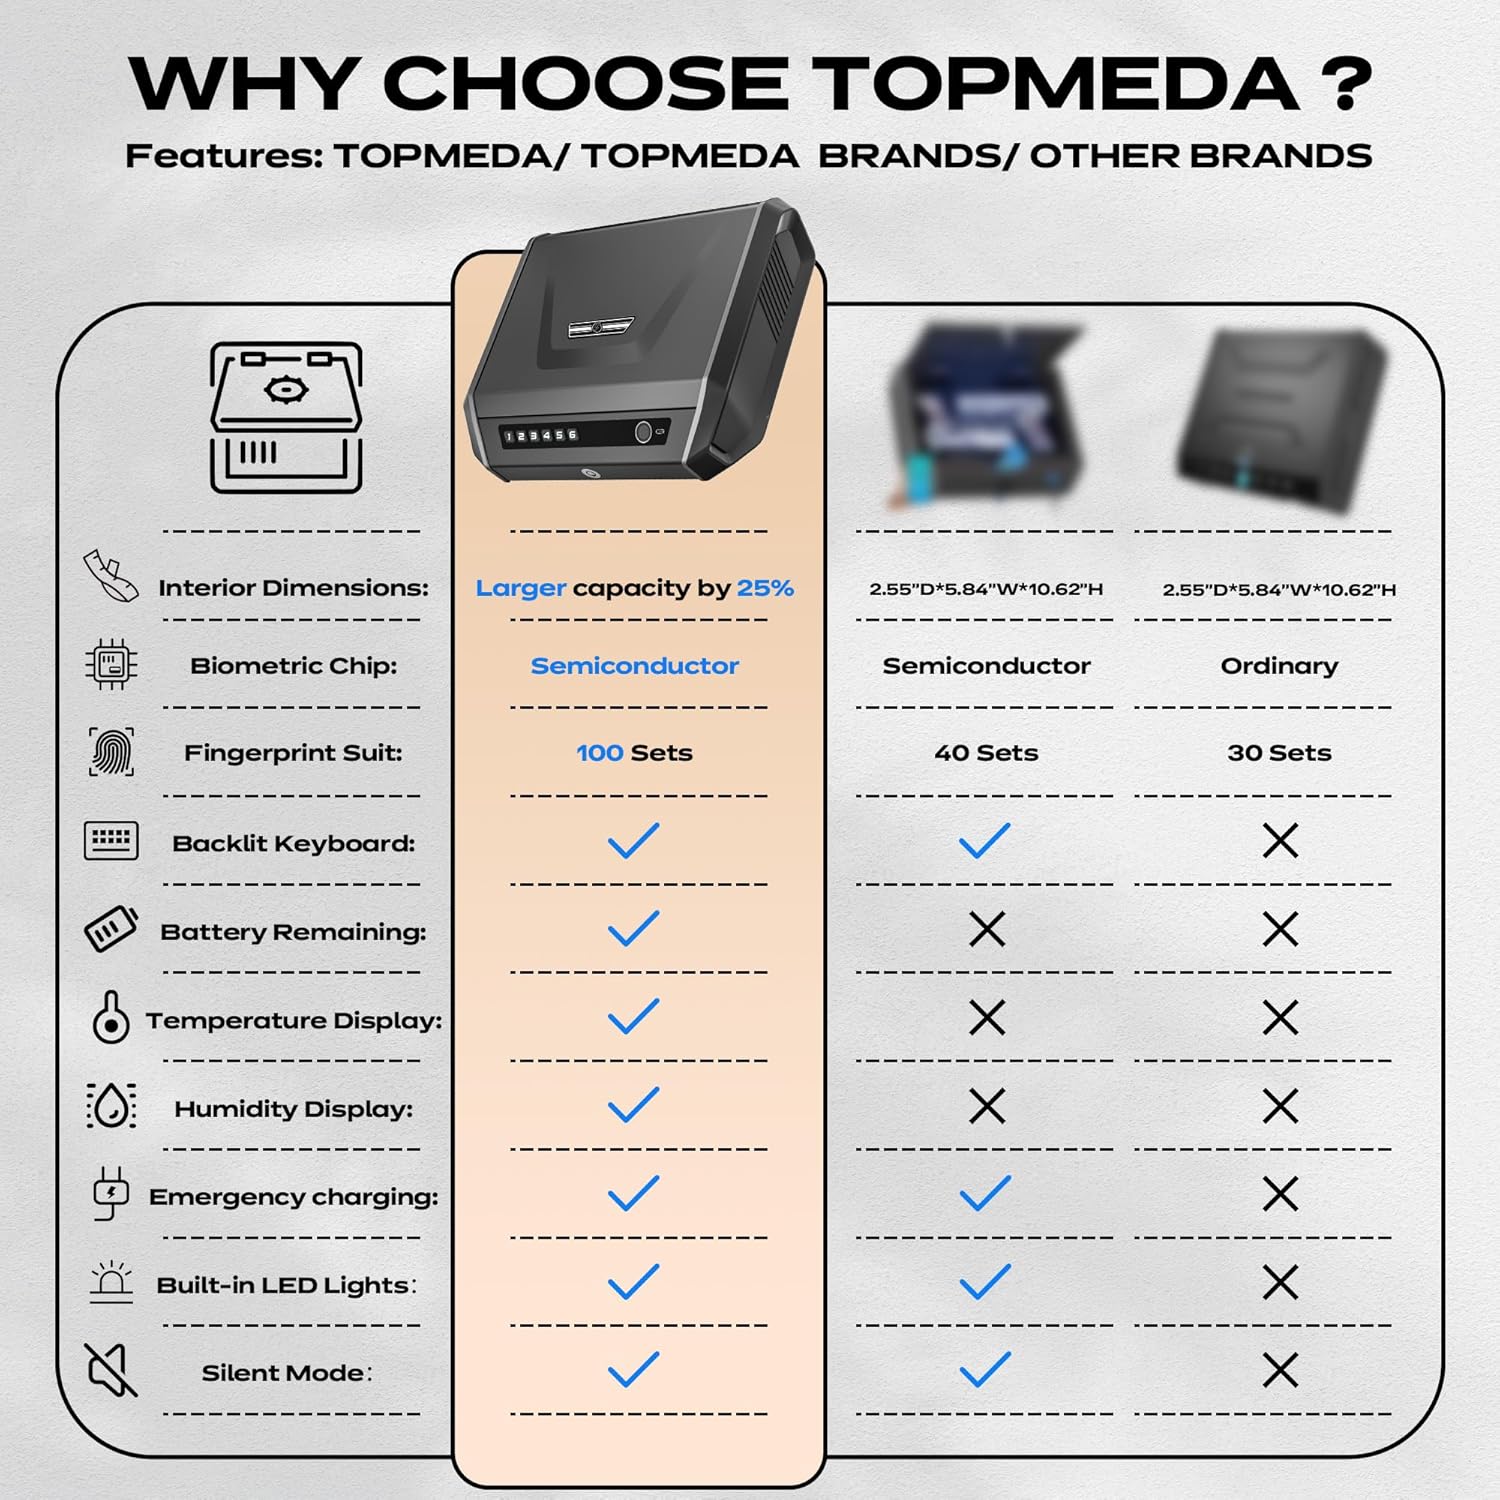
Figure 2: Feature comparison of TOPMEDA GS201 with other brands, emphasizing its advanced capabilities.
Vidiyo nke 1: Ịkpọghe igbe na ịmalitegharịaview of the TOPMEDA Gun Safe, demonstrating its three access methods (fingerprint, keypad, key) and internal features.
2. Gịnị gụnyere
The TOPMEDA GS201 Gun Safe package includes the following components:
- Safe x 1
- Batrị AA x 4
- Sponge x1
- Security cable x 1
- skru x 4
- Igodo x 2
- Akwụkwọ ntuziaka x1

Figure 3: All components included in the TOPMEDA GS201 package.
3. Ntuziaka Nhazi
3.1. Ntinye batrị
The safe requires 4 AA batteries for operation. These batteries are installed inside the safe. If the batteries are depleted, the safe can be powered via the emergency USB-C port or opened with the backup keys.
- Use one of the provided backup keys to open the safe. The keyhole is located on the front panel.
- Locate the battery compartment inside the safe. It may be covered by a lid.
- Carefully open the battery compartment lid. A small tool like a mail opener may be helpful.
- Insert 4 AA batteries, ensuring correct polarity. Note: The battery diagram in some manuals may be incorrect. Ensure the bottom two batteries are inserted with the negative (-) end first, and the top two batteries with the positive (+) end first.
- Mechie mkpuchi nke batrị batrị nke ọma.

Figure 4: Correct battery installation within the safe's internal compartment.
3.2. Setting Passcode and Fingerprints
The safe allows for setting a custom 6-digit passcode and registering multiple fingerprints (up to 100). The reset buttons for these functions are located inside the safe.
- With the safe open, locate the "Password" and "Fingerprint" buttons on the internal panel.
- To set a new passcode: Press the "Password" button. Enter the default code (usually 123456, refer to your specific manual for confirmation). Then, enter your desired new 6-digit passcode and confirm.
- To register fingerprints: Press the "Fingerprint" button. Follow the voice prompts (if silent mode is off) or visual cues on the LCD to scan your finger multiple times from different angles until registration is complete. Repeat for additional fingerprints.

Figure 5: Internal control panel for setting access methods and silent mode.
3.3. Emergency Charging
In case of battery depletion, the safe can be temporarily powered using a USB-C cable (not included) connected to the emergency USB-C port on the front panel. This allows you to open the safe and replace the batteries.

Figure 6: LCD display and emergency USB-C charging feature.
4. Ntuziaka ọrụ
4.1. Ụzọ Nnweta
The TOPMEDA GS201 offers three primary ways to access your safe:
- Mkpọghe mkpịsị aka: Place your registered finger on the biometric sensor for quick access (≤0.1s).
- Keypad Unlock: Enter your programmed 6-digit passcode using the illuminated keypad.
- Mkpọghe igodo: Use one of the provided backup keys in the keyhole on the front panel for manual access.

Figure 7: Various methods for unlocking the safe.

Figure 8: High-speed biometric fingerprint recognition.

Figure 9: Backlit keypad for visibility in low light conditions.

Figure 10: Backup keys for manual access.
4.2. Ọnọdụ jụụ
For discreet operation, especially in bedside or sensitive environments, the safe features a silent mode. This can be toggled on or off using the internal controls (refer to Figure 5).
4.3. LCD Ngosipụta Ozi
The integrated LCD display provides crucial information at a glance:
- Okpomọkụ: Real-time internal temperature in Fahrenheit.
- iru mmiri: Real-time internal humidity percentage.
- Ọkwa batrị: Indicates the current battery charge, prompting timely replacement.
Figure 11: LCD display showing environmental and battery status.
4.4. Capacity and Placement
The safe is designed to accommodate 2 to 4 handguns, depending on their size and attachments, along with other small valuables. Its compact design allows for versatile placement.
- Nightstand: Ideal for quick access beside your bed.
- drawer: Fits neatly into most standard drawers.
- Ụgbọ ala: Can be secured in a car using the provided security cable.
- Oche: Suitable for office or home desk placement.

Figure 12: Interior capacity and examples of handgun storage.

Figure 13: Versatile placement options for the safe.
5. Nlekọta
- Ngbanwe batrị: Monitor the battery level on the LCD display. Replace all four AA batteries when the indicator shows low power to ensure continuous operation. Always keep backup keys accessible.
- Nhicha: Jiri nwayọ hichaa mpụta, damp akwa . Zere ihe nchacha ma ọ bụ ihe mgbaze nke nwere ike imebi ngwụcha ma ọ bụ ngwa eletrọnịkị.
- Nlekọta ime ime: The 360° sponge wrap helps protect contents. Periodically check for debris and ensure the foam is intact.
- Ọnọdụ gburugburu: The LCD display provides temperature and humidity readings. Store the safe in an environment that minimizes extreme fluctuations to protect contents.
6. Nchọpụta nsogbu
6.1. Safe Not Opening
- Lelee batrị: Verify the battery level on the LCD. If low or dead, replace the AA batteries or use the emergency USB-C port for temporary power.
- Incorrect Fingerprint/Passcode: Ensure your finger is clean and placed correctly on the sensor. Double-check the passcode entry. Try re-registering your fingerprint if issues persist.
- Use Backup Key: Always use the physical backup keys as a primary troubleshooting step if electronic access fails.
6.2. Difficulty Setting Up Passcode/Fingerprint
- Follow Manual Closely: Refer to the "Setup Guide" section (3.2) and the included instruction manual for precise steps.
- Tọgharia ọrụ: Use the internal reset buttons for password and fingerprint if you encounter persistent issues during setup.
- Multiple Fingerprint Scans: When registering fingerprints, ensure you scan your finger from various angles and positions to improve recognition accuracy.
6.3. LCD Display Issues
- Enweghị Ngosipụta: Check battery level. If batteries are dead, use the emergency USB-C port.
- Ọgụgụ na-ezighi ezi: Ensure the safe is not exposed to extreme temperatures or humidity that could affect sensor accuracy.
7. Nkọwapụta
| Njirimara | Nkọwa |
|---|---|
| Ụdị | TOPMEDA |
| Aha Nlereanya | GS201 |
| Akụkụ ngwaahịa | 12.6"D x 10.5"W x 3.2"H |
| Ụdị mkpọchi | Mkpọchi koodu biometric, igwe |
| Agba | Nwa |
| Ike | 8.8 Pounds (weight capacity) / 2-4 Pistols (storage capacity) |
| Ihe onwunwe | Alloy Steel |
| Njirimara Pụrụ Iche | Biometric Fingerprint, Combination Lock, Anti-Theft, LCD Display (Temp, Hum, Battery), Silent Mode, LED Interior Light, Emergency USB-C Port |
| Ụdị nkwụnye | Desktop Mount, Wall Mount |
| Ụdị njikwa | Biometric |
| Ibu Ibu | 8.8 pound |
| Oti mkpu | Mgbochi izu ohi |
| Ọkwa Nguzogide mmiri | Ọ bụghị mmiri na-eguzogide |
| Akụkụ Ụlọ | 11.02 Inches (Depth) x 6.7 Inches (Width) x 2.76 Inches (Height) |
8. Akwụkwọ ikike na nkwado
TOPMEDA stands behind its products with a Akwụkwọ ikike ọrụ afọ 1 for all gun safe series. For any questions, technical support, or warranty claims, please contact TOPMEDA customer service through the official TOPMEDA Store on Amazon or via the contact information provided in your product packaging.
Visit the official TOPMEDA Store for more information: TOPMEDA Store
Ask a question about this manual
Ask about setup, troubleshooting, compatibility, parts, safety, or missing instructions. Manuals+ will review the question and use this page’s manual context to help answer it.