Okwu mmalite
This manual provides detailed instructions for the installation, operation, maintenance, and troubleshooting of the HP ProDesk 400 G3 MS-7957 motherboard. Please read this manual thoroughly before proceeding with any installation or operation to ensure proper functionality and safety.
Ozi nchekwa
Na-edebe nchekwa nchekwa ndị a mgbe niile iji gbochie mmebi nke motherboard ma ọ bụ imerụ onwe gị ahụ:
- Gbanyụọ ọkụ eletrik ahụ na mpụta mgbidi tupu ịwụnye ma ọ bụ wepụ ihe ọ bụla dị na ya.
- Wear an anti-static wrist strap or frequently touch a grounded metal object to discharge static electricity before handling the motherboard.
- Jikwaa motherboard ahụ n'akụkụ ya iji zere imetụ ihe ndị dị nro aka.
- Gbaa mbọ hụ na ikuku ikuku dị mma n'ime akpa kọmputa iji gbochie ikpo oke ọkụ.
- Debe motherboard ka ọ ghara iru mmiri na oke okpomọkụ.
Ngwaahịa gafereview
The HP ProDesk 400 G3 MS-7957 is a MicroATX motherboard designed for Intel processors with an LGA 1151 socket. It supports DDR4 RAM and features a B250 chipset, offering a reliable foundation for desktop computing.
Atụmatụ igodo
- Compatible CPU Brand: Intel
- Ụdị oghere: LGA 1151/Socket H4
- Ihe kpatara ụdị: MicroATX
- Njikọ I/O: Ethernet (RJ-45), USB 2.0, USB 3.0, VGA, DisplayPort, HD Audio Jack
Njirimara akụrụngwa
Familiarize yourself with the layout of the motherboard to facilitate proper installation and connection of components.

Ọgụgụ 1: N'akuku view of the HP ProDesk 400 G3 MS-7957 motherboard. This image highlights the CPU socket (LGA 1151), four DDR4 RAM slots, PCIe slots, and various headers for front panel connections and storage devices.
Ntọala na nwụnye
Tupu Ị Malite
- Hụ na ihe mkpuchi kọmputa gị dabara na ihe nhazi MicroATX.
- Gather all necessary components: CPU, RAM, CPU cooler, power supply, storage devices, and graphics card (if not using integrated graphics).
- Prepare your workspace by ensuring it is clean, well-lit, and static-free.
Nwụnye motherboard
- Install the CPU into the LGA 1151 socket. Carefully align the CPU with the socket's notch and gently lower it into place. Close the retention arm.
- Tinye ihe mkpuchi okpomọkụ na CPU ahụ wee tinye ihe mkpuchi CPU dịka ntuziaka nke onye nrụpụta ya si dị.
- Install the DDR4 RAM modules into the designated slots. Ensure they are fully seated until the clips lock into place.
- Mount the motherboard into the computer case using the appropriate standoffs and screws.
- Jikọọ isi 24-pin ATX ike njikọ na 4-pin ma ọ bụ 8-pin CPU njikọ ike site na ike gị na motherboard.
- Install any expansion cards (e.g., graphics card) into the PCIe slots.

Onyonyo 2: N'akuku elu gbadata view of the HP ProDesk 400 G3 MS-7957 motherboard. This perspective provides a clear view of the processor socket, memory slots, and the layout of the various internal connectors and components.
Njikọ Peripherals
- Connect SATA storage devices (HDDs/SSDs) to the SATA ports on the motherboard.
- Connect front panel headers (power button, reset button, USB ports, audio jacks) to their respective pins on the motherboard. Refer to your case manual for specific pin assignments.
- Connect external peripherals such as monitor, keyboard, mouse, and Ethernet cable to the rear I/O panel.
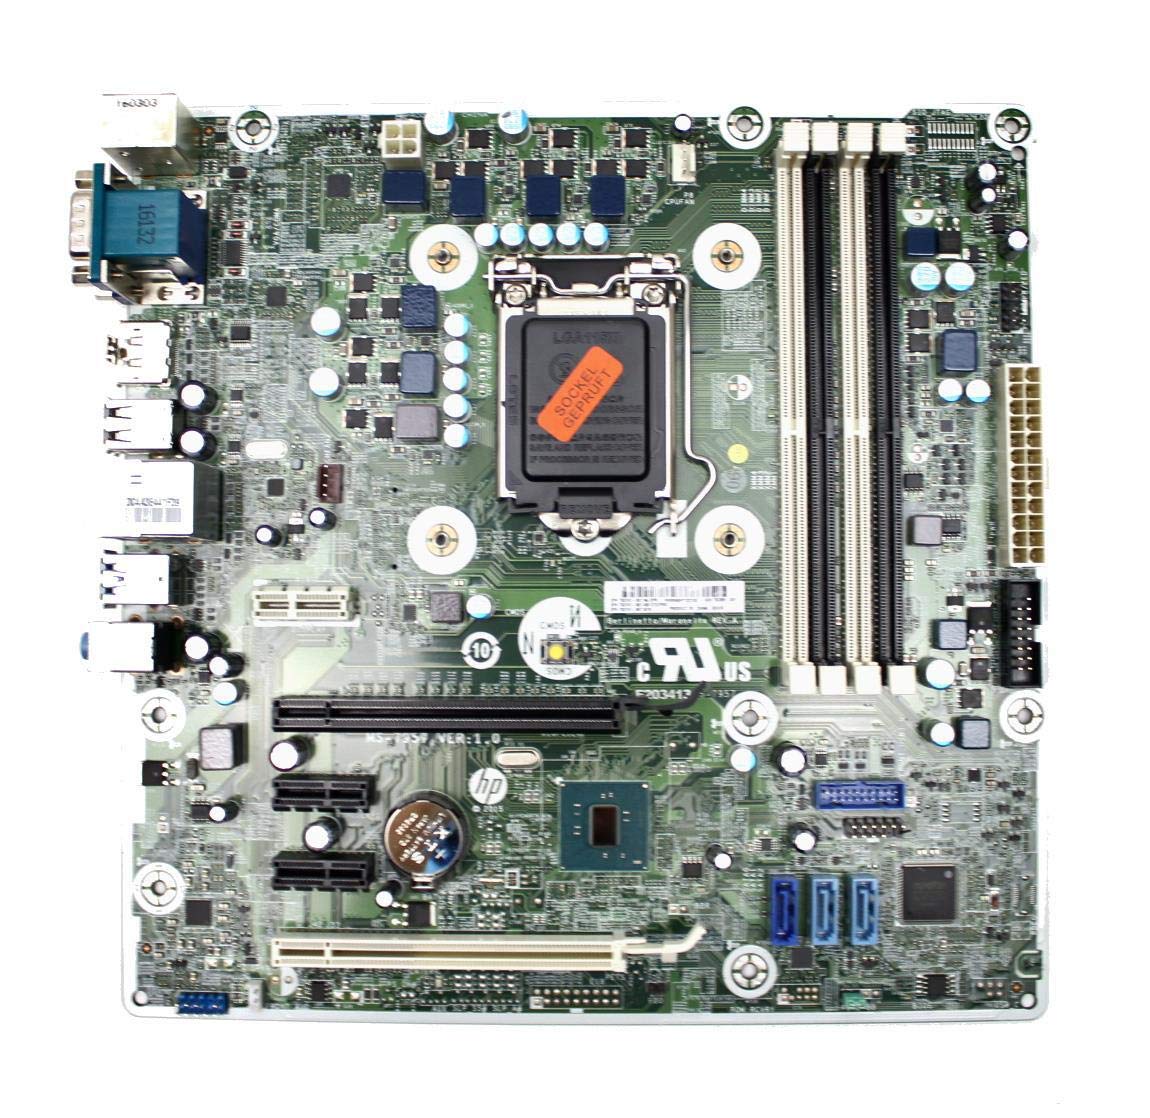
Figure 3: Rear I/O panel of the HP ProDesk 400 G3 MS-7957 motherboard. This image displays the available external connectivity options, including PS/2 ports, serial port, VGA, DisplayPort, USB 2.0, USB 3.0, Ethernet (RJ-45), and HD audio jacks.
Ntuziaka ọrụ
Ike mbụ Gbanye
After all components are installed and connected, connect the power cable to the power supply and press the power button on your computer case. The system should initiate the boot process.
Nhazi BIOS/UEFI
Iji nweta ngwa ntọala BIOS/UEFI, pịa igodo ahọpụtara (nke a na-akpọ "Ntọala BIOS/UEFI"). Del, F2, F10, ma ọ bụ F12) during the initial boot sequence. Here you can configure boot order, system time, and other hardware settings.
Nwụnye ọkwọ ụgbọala
After installing your operating system, it is crucial to install the latest drivers for your motherboard's chipset, integrated graphics, audio, and network adapter. These drivers can typically be found on the HP support website or the chipset manufacturer's websaịtị.
Nlekọta
- Nhicha: Jiri ikuku emechiri emechi hichaa uzuzu sitere na motherboard na ihe ndị dị na ya mgbe niile. Hụ na sistemụ ahụ agbanyụrụ ma gbanyụọ ya tupu ị sachaa ya.
- Mmelite BIOS/UEFI: Periodically check for BIOS/UEFI updates from HP's official support website. Updates can improve stability, compatibility, and performance. Follow update instructions carefully to avoid system damage.
- Mmelite ọkwọ ụgbọala: Keep all system drivers updated to ensure optimal performance and compatibility with new software and hardware.
Nchọpụta nsogbu
Akụkụ a na-enye azịza maka nsogbu nkịtị ị nwere ike ihu:
- Enweghị ike: Check all power connections, including the 24-pin ATX and CPU power cables. Ensure the power supply is switched on and the wall outlet is functional.
- Enweghị Ngosipụta: Verify that your monitor is connected to the correct video output (VGA or DisplayPort) and is powered on. Reseat the graphics card (if applicable) and RAM modules.
- Akwụsịghị / Mkpọka Sistemu: This could be due to overheating, faulty RAM, or outdated drivers. Check CPU and GPU temperatures, run memory diagnostic tools, and update drivers.
- Achọpụtaghị ihe dị n'akụkụ: Ensure the peripheral is properly connected. Try a different port or update the relevant drivers.
- BIOS/UEFI Issues: If you encounter issues after changing BIOS settings, try resetting the CMOS by removing the CMOS battery for a few minutes or using the clear CMOS jumper (refer to motherboard diagram for location).
Nkọwapụta
| Njirimara | Nkọwapụta |
|---|---|
| Ụdị | HP |
| Socket CPU | LGA 1151 |
| Ngwa dakọtara | Kọmputa kọmputa |
| Teknụzụ RAM | DDR4 |
| Ndị nhazi dakọtara | Intel Core i3-6xxx, Intel Core i5-6xxx, Intel Core i7-6xxx, Intel Core i3-7xxx, Intel Core i5-7xxx, Intel Core i7-7xxx, Intel Core i3-8xxx, Intel Core i5-8xxx, Intel Core i7-8xxx |
| Ụdị Chipset | Intel B250 |
| Platform | Windows |
| Aha Nlereanya | MS-7957 |
| Ụdị CPU | Core i3 (Note: Supports i3, i5, i7 as listed above) |
| Ụdị njikọ ike isi | 24 ntụtụ |
| Interface kaadị eserese | PCI Express |
| Available Memory Slots | 4 |
| Total SATA Ports | 6 |
| Mgbakọta ọdụ ụgbọ mmiri USB | 2Note: Refers to internal headers, rear I/O has more) |
| Mgbakọta ọdụ ụgbọ mmiri Ethernet | 1 |
| Total PCIe Ports | 3 |
| Onye nrụpụta | Computer Store Berlin (Reseller/Supplier) |
| Nọmba akụkụ | 4061435962741 |
| ASIN | B08CS13PTQ |
Akwụkwọ ikike na nkwado
Ngwaahịa a na-abịa na a 1-afọ akwụkwọ ikike site na ụbọchị ịzụrụ. Akwụkwọ ikike a na-ekpuchi ntụpọ dị na ngwa na arụ ọrụ n'okpuru ojiji nkịtị.
For technical support, warranty claims, or further assistance, please contact your point of purchase or refer to the official HP support resources for the ProDesk 400 G3 series.