Perkenalan
This manual provides detailed instructions for the installation, operation, and maintenance of your Sensky 3-in-1 PIR Motion Sensor Switch. This device integrates occupancy, vacancy, and manual ON/OFF modes, offering flexible lighting control. Designed for ease of use and installation, it features a 2-wire connection, eliminating the need for a neutral wire in most standard setups.

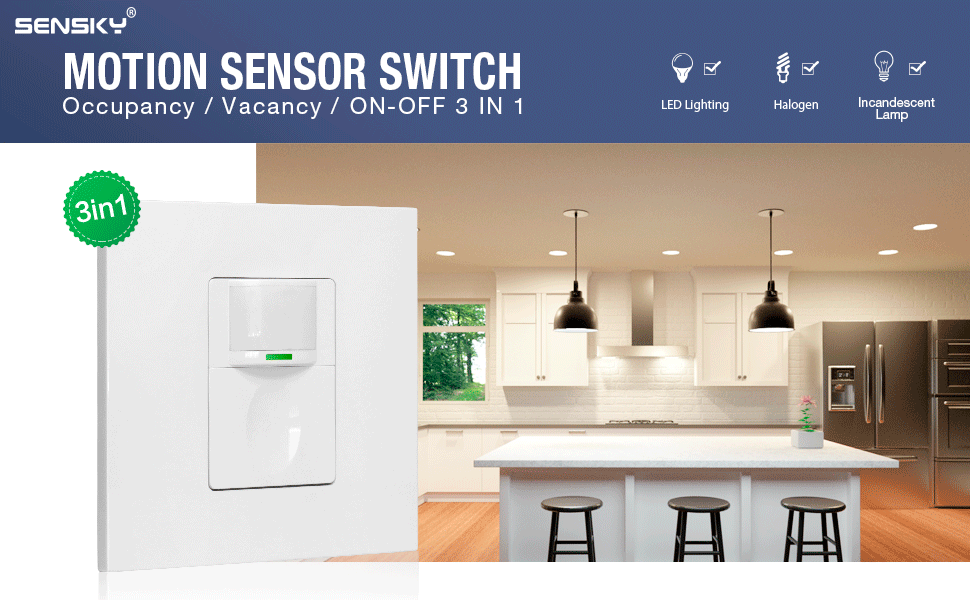
Image: The Sensky 3-in-1 PIR Motion Sensor Switch, a white square unit with a motion sensor lens and a large button, shown installed on a wall.
Informasi Keselamatan
PERINGATAN: Risk of electric shock. Improper installation can lead to serious injury or death. Always turn off power at the circuit breaker before installing or servicing this device. Installation should be performed by a qualified electrician or in accordance with local electrical codes.
- Pastikan aliran listrik telah dimatikan di pemutus sirkuit sebelum pemasangan.
- Do not use with loads exceeding the specified maximum wattage.
- Perangkat ini dirancang untuk penggunaan di dalam ruangan saja.
- Jauhkan dari air dan kelembaban.
- Do not attempt to repair or modify the device. Contact customer support for assistance.
Produk Selesaiview dan Fitur
The Sensky 3-in-1 PIR Motion Sensor Switch is designed to provide convenient and energy-efficient lighting control. Its key features include:
- 3-in-1 Technology: Supports Occupancy, Vacancy, and Manual ON/OFF modes.
- Deteksi Gerakan PIR: Infrared sensor detects human movement within a range of 6-9 meters and an angle of less than 150 degrees.
- Tidak Membutuhkan Kabel Netral: Compatible with 2-wire electrical systems, simplifying installation.
- Penyesuaian Mudah: Time delay, sensitivity, and ambient light settings are adjustable via front buttons, eliminating the need for disassembly.
- Rentang Daya Lebar: Supports LED/Fluorescent/Ballast loads up to 1000W and Incandescent/Halogen loads up to 2200W.
- Fireproof PC Material: Constructed from flame-retardant PC for enhanced safety.
Gambar: Sebuah overview of the motion sensor switch highlighting its features: motion sensor, 7-10m detection range, 15s-30min time delay, 15/25/35 Lux ambient light settings, 3-in-1 modes (Occupancy, Vacancy, ON-OFF), and fire-resistant materials.
Instalasi
Before beginning installation, ensure you have the necessary tools (screwdriver, wire strippers) and understand basic electrical wiring principles. Always prioritize safety.
1. Matikan Daya
Locate the circuit breaker controlling the light switch you intend to replace. Turn off the power completely to avoid electric shock. Verify power is off using a voltage penguji.
2. Remove Existing Switch
Carefully remove the faceplate and mounting screws of the old switch. Disconnect the wires from the old switch, noting which wire was connected to the 'Live' (L) terminal and which to the 'Load' (L1) terminal. If a neutral wire is present, cap it off if not used, or connect it if opting for a 3-wire setup for optimal performance.
3. Prepare the Motion Sensor Switch
The switch cover needs to be removed to access the wiring terminals. Gently pry open the outer frame by hand or with a small tool. Then, press in the tabs on the sides of the central module to remove it from the mounting frame.

Image: A four-panel image showing how to disassemble the switch: pry open the outer frame, press tabs to remove the central module, locate wiring holes, and screw positioning holes.
4. Pengkabelan
Connect the wires from your wall box to the corresponding terminals on the motion sensor switch. This switch is designed to work without a neutral wire (2-wire setup), directly replacing existing switches.
- Connect the Live wire (incoming power) to the 'L' terminal.
- Connect the Load wire (to the light fixture) to the 'L1' terminal.
For optimal performance, especially with certain load types, a 3-wire connection including a neutral wire can be used if available. In such cases, connect the neutral wire to the 'N' terminal if present on your specific model (though this model primarily supports 2-wire).
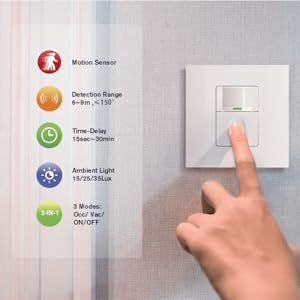
Image: A wiring diagram showing the 'L' terminal connecting to the Live wire and the 'L1' terminal connecting to the Load (light fixture). It indicates 'N' for Neutral, but the primary diagram focuses on 2-wire.

Image: A diagram emphasizing that a neutral wire is not required, showing the switch working with only Live and Load wires.
5. Pasang Sakelar
Carefully push the wired switch module back into the wall box. Secure the mounting frame to the wall box using the provided screws. Reattach the central module and the outer faceplate.
6. Pulihkan Daya
Once the installation is complete and all components are securely in place, restore power at the circuit breaker. The switch should now be operational.
Operasi
The Sensky 3-in-1 PIR Motion Sensor Switch offers versatile control through its various modes. The default settings are often suitable for most applications, but adjustments can be made as needed.
Tombol Overview:
- Tombol Kecil: Located above the main button, used for mode selection and fine adjustments.
- Tombol Besar: The main button, used for manual ON/OFF and primary adjustments.
- Working Indicator LED: A small LED light that indicates the current mode or adjustment status.

Image: A technical drawing of the switch, labeling the 'Detect window', 'Small Button / Working indicator LED', 'Big Button', and 'Wallplate'.
Operating Modes (3-in-1 Technology)
The switch supports three distinct operating modes:
- Occupancy Mode (Auto ON - Auto OFF):
In this mode, the light automatically turns ON when motion is detected and automatically turns OFF after a set time delay once no motion is detected. This is ideal for high-traffic areas where hands-free operation is desired.
- Vacancy Mode (Manual ON - Auto OFF):
The light must be manually turned ON by pressing the button. It will then automatically turn OFF after a set time delay once no motion is detected. This mode is suitable for areas where you prefer to control when the light comes on, but want it to turn off automatically.
- ON/OFF Mode (Manual ON/OFF):
Functions as a standard light switch. The light is manually turned ON and OFF by pressing the button. Motion detection is disabled in this mode, providing full manual control.

Image: A visual guide explaining the three modes: Occupancy (lights turn on and off automatically with motion), Vacancy (lights turn on manually, off automatically with no motion), and ON-OFF (lights turn on and off manually).
How to Adjust VAC and OCC Modes:
Tekan tombol small button and hold for more than 4 seconds. The red indicator will flash to show the current mode:
- 1 Kilatan: Vacancy mode
- 2 Berkedip: Modus hunian
- 3 Berkedip: Occupancy mode without light sensor mode (motion detection active regardless of ambient light)
How to Enter Manual ON/OFF Mode:
- Tekan sebentar small button: The switch will enter ON/OFF mode, allowing manual control.
- Tekan sebentar tombol besar: Can turn ON/OFF the load temporarily. When the time delay expires, the sensor will return to the last operating mode.
Adjustment (Sensitivity, Time-Delay, Light Sensor)
The Sensky motion sensor switch allows for easy adjustment of its operational parameters directly from the front panel, without needing to open the device.

Image: A hand pressing the button on the Sensky motion sensor switch, illustrating the ease of adjustment compared to other models requiring tools.
How to Adjust Time-Delay:
Tekan tombol tombol besar and hold for more than 4 seconds. The red indicator will flash to show the current time-delay setting:
- 1 Kilatan: 15 detik
- 2 Berkedip: 1 menit
- 3 Berkedip: 3 menit
- 4 Berkedip: 5 menit
- 5 Berkedip: 15 menit
- 6 Berkedip: 30 menit
How to Adjust Sensitivity, Light Sensor, and Restore Factory Settings:
Tekan tombol tombol besar Dan small button simultaneously. The red and green indicators will flash at the same time to indicate the setting:
- 1 Kilatan: Sensitivitas rendah
- 2 Berkedip: Sensitivitas tinggi
- 3 Berkedip: Light sensor value 15 Lux
- 4 Berkedip: Light sensor value 25 Lux
- 5 Berkedip: Light sensor value 35 Lux
- 6 Berkedip: Kembalikan ke pengaturan pabrik

Image: A detailed diagram illustrating the button presses and corresponding LED flashes for adjusting vacancy/occupancy modes, time delay, sensitivity, light sensor values, and restoring factory settings.
Pemeliharaan
The Sensky motion sensor switch requires minimal maintenance to ensure long-term performance.
- Pembersihan: Wipe the surface with a soft, dry cloth. Do not use abrasive cleaners, solvents, or excessive moisture, as this can damage the device.
- Inspeksi: Periodically check for any visible damage or loose connections. If any issues are found, turn off power at the circuit breaker and consult a qualified electrician.
- Lingkungan: Ensure the switch is not exposed to extreme temperatures, direct sunlight for prolonged periods, or high humidity, which can affect sensor performance.
Penyelesaian Masalah
If you encounter issues with your Sensky motion sensor switch, refer to the following common problems and solutions:
| Masalah | Kemungkinan Penyebab | Larutan |
|---|---|---|
| Light does not turn ON with motion. | 1. Daya mati. 2. Pengkabelan yang salah. 3. Light sensor setting too high (if in Occupancy mode). 4. Motion sensor blocked or range too far. 5. Mode yang dipilih salah. | 1. Periksa pemutus arus. 2. Verify wiring according to diagram. 3. Adjust light sensor sensitivity (lower Lux value). 4. Clear obstructions, ensure motion is within range. 5. Ensure Occupancy or Vacancy mode is selected. |
| Lampu tetap menyala terus-menerus. | 1. Gerakan konstan di area deteksi. 2. Time delay set too long. 3. Switch is in Manual ON/OFF mode. 4. Faulty unit. | 1. Ensure no continuous motion. Adjust sensor placement. 2. Reduce time delay setting. 3. Switch to Occupancy or Vacancy mode. 4. Hubungi dukungan pelanggan. |
| Light turns ON/OFF erratically. | 1. Interference from heat sources or air currents. 2. Low sensitivity setting. 3. Loose wiring connection. | 1. Relocate switch away from heat vents, windows, or fans. 2. Increase sensitivity setting. 3. Turn off power and check wiring connections. |
| Tidak dapat mengubah pengaturan. | Urutan tombol salah. | Refer to the 'Adjustment' section for correct button presses and hold times. |
If the problem persists after trying these solutions, please contact Sensky customer support.
Spesifikasi
| Fitur | Detil |
|---|---|
| Nomor Model | SK023W0C00000-5A-S |
| Pabrikan | Sensky |
| Dimensi Produk (P x L x T) | Ukuran 8.6x8.6x2.1 cm |
| Berat | 110 gram |
| Sumber Daya | Listrik Kabel |
| Jenis Kabel | 2-wire (no neutral required) |
| Max Load (Fluorescent/Ballast/LED) | 1000W |
| Beban Maksimum (Lampu Pijar/Halogen) | 2200W |
| Jangkauan Deteksi | 6-9 meter |
| Sudut Deteksi | Kurang dari 150 derajat |
| Pengaturan Waktu Tunda | 15s, 1min, 3min, 5min, 15min, 30min |
| Ambient Light Settings | 15 Lux, 25 Lux, 35 Lux |
| Penggunaan yang Direkomendasikan | Home and office monitoring and control, automatic ON/OFF, power management |
| Baterai Diperlukan | TIDAK |
Image: Technical drawings illustrating the dimensions of the Sensky motion sensor switch, including front, side, and rear views dengan pengukuran dalam milimeter.
Garansi dan Dukungan
Sensky provides a Garansi 12 bulan for this product, covering manufacturing defects and malfunctions under normal use. If you encounter any problems during installation or operation, or require technical assistance, please do not hesitate to contact Sensky customer support.
Our customer service team is available to provide prompt support and assistance.
- Periode Garansi: 12 Bulan
- Mendukung: Tersedia layanan pelanggan 24 jam.
Please refer to the product packaging or the official Sensky websitus untuk rincian kontak spesifik.