PowMr ML2440
Panduan Pengguna Pengontrol Pengisian Tenaga Surya MPPT PowMr 40A
Model: ML2440
1. Pendahuluan
This manual provides essential information for the safe and efficient operation of your PowMr 40A MPPT Solar Charge Controller, model ML2440. Please read this manual thoroughly before installation and use to ensure optimal performance and longevity of the product.
2. Petunjuk Keselamatan
- Pastikan semua kabel tersambung dan diamankan dengan benar untuk mencegah korsleting atau kerusakan.
- Always connect the battery to the charge controller first, then the solar panels, and finally the load. Disconnect in the reverse order.
- Do not attempt to repair or modify the controller yourself. Contact qualified personnel for service.
- Pasang pengontrol di area yang berventilasi baik, jauhkan dari bahan yang mudah terbakar dan sinar matahari langsung.
- Kenakan alat pelindung diri (APD) yang sesuai saat bekerja dengan sistem kelistrikan.
- Pastikan sistem voltage matches the controller's specifications (12V/24V auto-detection).
3. Produk Lebihview
The PowMr 40A MPPT Solar Charge Controller is designed to efficiently manage power from your solar panels to charge various battery types, including Lithium, Sealed, Gel, and Flooded batteries. It features Maximum Power Point Tracking (MPPT) technology for optimized solar energy harvesting, automatic 12V/24V system voltage detection, and a clear LCD display for monitoring system status.
Gambar 3.1: Depan view of the PowMr 40A MPPT Solar Charge Controller.
This image shows the main unit of the PowMr 40A MPPT Solar Charge Controller, highlighting its compact design and integrated LCD screen.
The controller supports a maximum solar input voltage of 100V and a maximum input power of 1100W for a 24V system (550W for 12V). It also includes temperature compensation for accurate charging across varying environmental conditions.

Gambar 3.2: Temperature compensation feature.
This image illustrates the temperature compensation capability of the controller, ensuring optimal battery charging performance in both hot and cold environments.
4. Instalasi dan Pengkabelan
Proper installation is crucial for the safe and efficient operation of your solar charge controller. Follow these steps carefully.
4.1 Diagram Pengkabelan

Gambar 4.1: Wiring diagram for the PowMr MPPT Solar Charge Controller.
This diagram illustrates the correct connection order for the battery, solar panels, DC load, and optional inverter. A temperature sensor is also shown.
4.2 Langkah Koneksi
- Hubungkan Baterai Terlebih Dahulu: Connect the battery to the charge controller's battery terminals. Ensure correct polarity. The controller will auto-detect 12V or 24V system voltage.
- Hubungkan Panel Surya: Connect the solar panels to the PV input terminals. Ensure correct polarity. The controller will begin charging if sufficient sunlight is available.
- Hubungkan Beban DC (Opsional): Jika menggunakan beban DC langsung dari pengontrol, hubungkan ke terminal beban.
- Connect Inverter (Optional): If using an inverter, connect it to the battery terminals (not directly to the load terminals of the controller).
- Hubungkan Sensor Suhu: For accurate temperature compensation, connect the provided temperature sensor to the designated port on the controller and place the sensor near the battery.
Perintah Pemutusan Sambungan: To disconnect the system, always follow the reverse order: Disconnect load, then solar panels, then battery.
5. Petunjuk Pengoperasian
This section details how to monitor and configure your charge controller using its integrated LCD display and the optional Bluetooth mobile application.
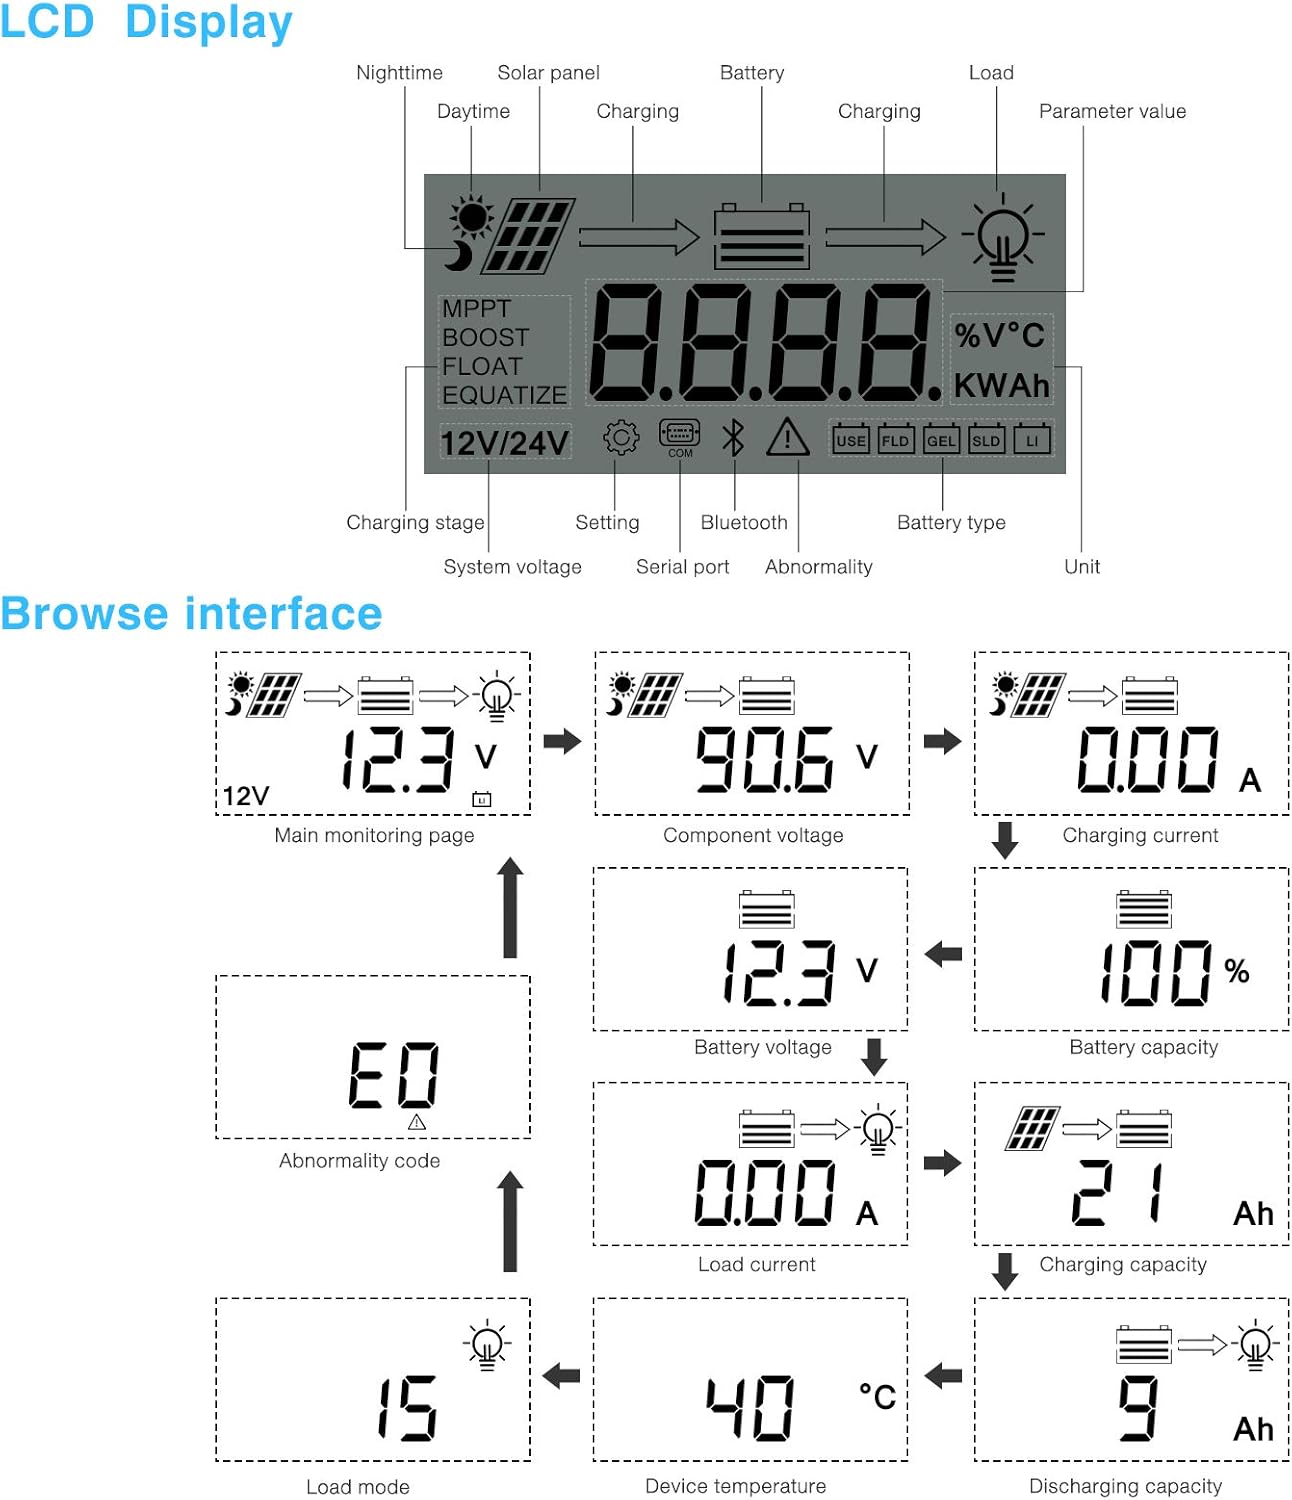
5.1 Layar LCD Berakhirview

Gambar 5.1: LCD Display and Browse Interface.
This image shows the various icons and parameters displayed on the LCD screen, along with the navigation flow through different monitoring pages.
The LCD provides real-time information about your solar system. Key indicators include:
- Pengisian Stage: MPPT, Boost, Float, Equalize.
- Volume Sistemtage: 12V/24V auto-detected.
- Jenis Baterai: Icons for Lithium (Li), Sealed (SLD), Gel (GEL), Flooded (FLD).
- Indikator Status: Solar panel activity, battery charging, load status, abnormality.
- Nilai Parameter: Menampilkan volumetage, current, capacity, temperature, etc.
Use the buttons below the LCD to navigate through different screens to view parameters such as main monitoring page, component voltage, arus pengisian, volume bateraitage, battery capacity, load current, charging capacity, device temperature, discharging capacity, abnormality codes, and load mode.
5.2 Bluetooth Mobile Application
The controller supports an optional Bluetooth module (BT-1) for remote monitoring and parameter adjustment via a mobile application (available for Apple iOS and Android devices). The Bluetooth module connects to the RS232 port on the controller.

Gambar 5.2: Controller with optional Bluetooth module.
This image displays the PowMr MPPT Solar Charge Controller alongside its optional BT-1 Bluetooth communication module and connecting cable.

Gambar 5.3: BT-1 Bluetooth module.
Sebuah detail view of the BT-1 Bluetooth module, which enables wireless communication with the solar charge controller for remote monitoring and settings adjustments.

Gambar 5.4: Bluetooth Mobile Interface Display.
This image shows various screens from the mobile application, including real-time monitoring, data records, energy records, and parameter settings.
The mobile application allows you to:
- Monitor real-time system data (voltage, current, power, temperature).
- View historical data and energy records.
- Adjust various charging parameters and battery settings.
- Kembalikan pengaturan default pabrik.
6. Pemeliharaan
Regular maintenance ensures the longevity and optimal performance of your charge controller.
- Pembersihan: Bersihkan bagian luar pengontrol secara berkala dengan kain kering untuk menghilangkan debu dan kotoran. Pastikan lubang ventilasi bersih.
- Koneksi: Periksa semua sambungan kabel setiap tahun untuk memastikan kekencangan dan tidak ada korosi. Sambungan yang longgar dapat menyebabkan panas berlebih dan kinerja yang buruk.
- Lingkungan: Ensure the installation environment remains within the specified operating temperature range and is free from excessive moisture or dust.
7. Penyelesaian masalah
This section provides guidance for common issues. Refer to the LCD display for abnormality codes.
- Tidak Ada Tampilan/Tidak Ada Daya:
- Periksa sambungan baterai dan pastikan tegangan bateraitage berada dalam jangkauan operasi.
- Verify that the battery fuse (if installed) is intact.
- Tanpa Pengisian:
- Ensure solar panels are connected correctly and receiving sufficient sunlight.
- Periksa volume panel suryatage dan saat ini.
- Verify that the battery is not fully charged or in a protection state.
- Beban Tidak Berfungsi:
- Check load connections and ensure the load current does not exceed the controller's rating.
- Pastikan baterai voltage berada di atas vol rendahtagpengaturan pemutusan (LVD).
- Check for any abnormality codes on the LCD related to load output.
- Abnormality Codes (e.g., "E0"):
- Refer to the specific abnormality code displayed on the LCD. Consult the full product manual or manufacturer's support for detailed explanations and solutions for each code.
8. Spesifikasi
Technical specifications for the PowMr 40A MPPT Solar Charge Controller (Model ML2440).

Gambar 8.1: Product Specifications Table.
This table provides detailed technical parameters for the ML2420, ML2430, and ML2440 models. The ML2440 column is relevant for this 40A controller.
| Parameter | Value (ML2440) |
|---|---|
| Model | ML2440 |
| Volume sistemtage | 12V / 24V Otomatis |
| Kehilangan tanpa beban | 0.7 W hingga 1.2W |
| Volume bateraitage | 9 hingga 35V |
| Maks. tegangan masukan suryatage | 100V (25 °C), 90V (-25 °C) |
| Maks. volume titik dayatagjangkauan | Volume bateraitage +2V hingga 75V |
| Nilai arus pengisian | 40A |
| Arus beban terukur | 20A |
| Maks. kapasitas beban kapasitif | 10000uF |
| Maks. daya input sistem fotovoltaik | 550W/ 12V, 1100W/ 24V |
| Efisiensi konversi | ≤ 98% |
| Efisiensi pelacakan MPPT | > 99% |
| Faktor kompensasi suhu | -3.0mv/ °C/ 2V (default) |
| Suhu operasi | -35°C hingga +45°C |
| Tingkat perlindungan | Tingkat IP32 |
| Berat | 2 kg |
| Metode komunikasi | RS232 |
| Ketinggian | ≤ 3000m |
| Dimensi produk | Ukuran 238*173*72.5mm |
9. Garansi dan Dukungan
For warranty information, please refer to the documentation included with your product packaging or visit the official PowMr website. If you encounter any issues not covered in this manual or require further assistance, please contact PowMr customer support.
PowMr Official Weblokasi: Kunjungi Toko PowMr di Amazon