1. Proizvod je gotovview
The Excelvan Wireless Weather Station (Model AOK-5061A) is designed to provide accurate indoor and outdoor temperature and humidity readings, along with weather forecasts and an alarm clock function. It features a large, colorful LCD display with LED backlight for easy readability.
Ključne karakteristike:
- Mjerenje temperature i vlažnosti u zatvorenom/vanjskom prostoru
- Weather Forecast with 5 Icons (Sunny, Partially Sunny, Cloudy, Rain, Heavy Rain)
- DCF Radio-Controlled Clock with Manual Setting
- Alarm with Snooze Function
- Large Color LCD Display with LED Backlight
- DST (Daylight Saving Time) Automatic Update
- Wireless Outdoor Sensor with up to 50m range

Slika 1: Prednja strana view of the Excelvan Wireless Weather Station main unit, displaying weather forecast, outdoor/indoor temperature and humidity, and time.
2. Vodič za postavljanje
2.1 Sadržaj paketa
Before proceeding with the setup, ensure all items are present in the package:
- 1 x Glavna jedinica meteorološke stanice
- 1 x Bežični daljinski senzor
- 1 x adapter za izmjeničnu struju
- 1 x korisnički priručnik

Figure 2: The complete package contents, including the main weather station unit, wireless remote sensor, power adapter, and user manual.
2.2 Napajanje glavne jedinice
- Ugradnja baterije (opcionalno): Open the battery compartment on the back of the main unit. Insert 3 x 1.5V AA batteries (not included), ensuring correct polarity. The LED backlight will stay on for 5 minutes when powered by batteries.
- AC Power Adapter (Recommended): For continuous backlight, connect the provided AC power adapter (4.5V, 150mA) to the main unit's power input and then plug it into a wall outlet.

Slika 3: Stražnji dio view of the main unit showing the battery compartment with the cover removed, ready for battery insertion.

Slika 4: Stražnji dio view of the main unit with the AC power adapter connected, illustrating the power input port.
2.3 Powering the Wireless Remote Sensor
- Open the battery compartment of the wireless remote sensor.
- Insert 2 x 1.5V AAA batteries (not included), ensuring correct polarity.
- Čvrsto zatvorite odjeljak za baterije.

Figure 5: The wireless remote sensor, showing its display and the battery compartment on the back.
2.4 Postavljanje senzora
- The main unit is intended for indoor use only.
- Place the wireless remote sensor outdoors in a sheltered area, away from direct sunlight and rain, to ensure accurate readings.
- Ensure the sensor is within 50 meters (open space) of the main unit for optimal signal reception.
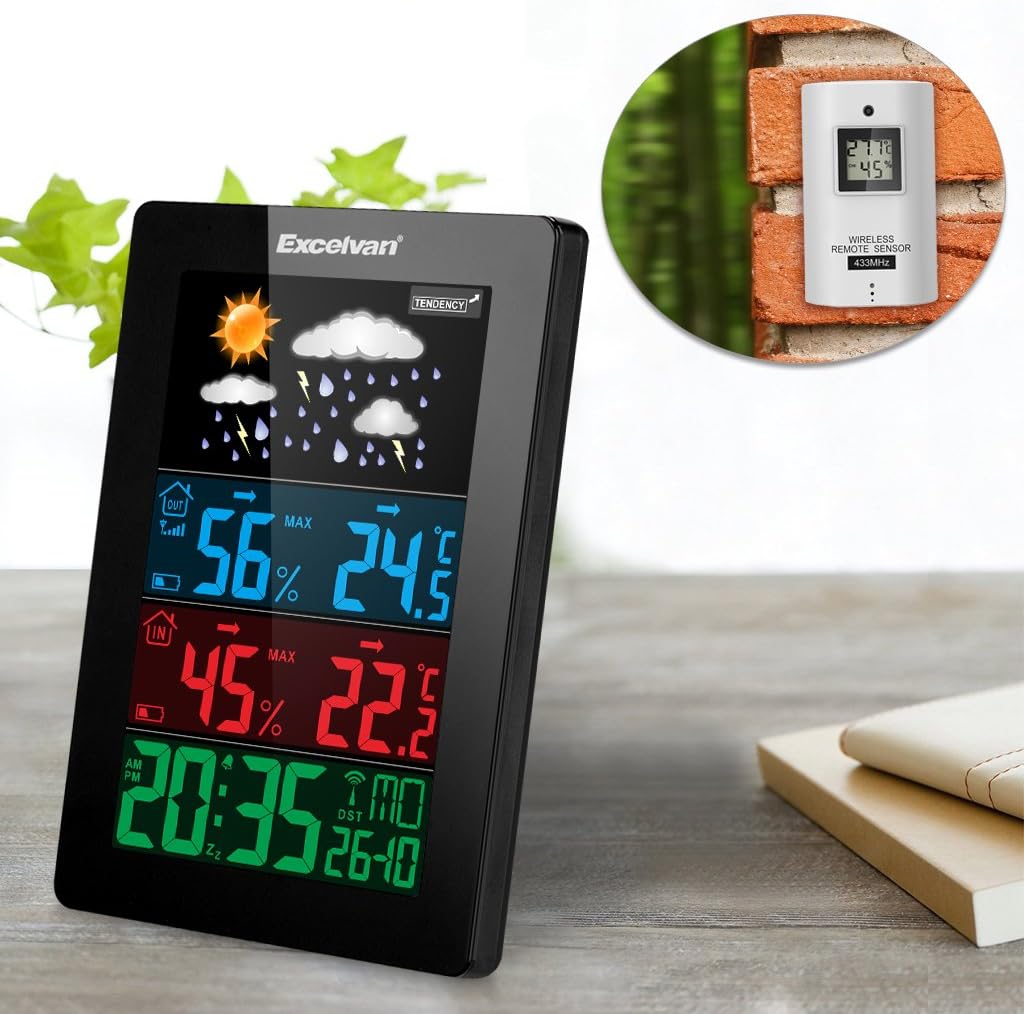
Figure 6: An illustration showing the main weather station unit indoors and the wireless remote sensor mounted on an outdoor wall.

Figure 7: A diagram highlighting the effective wireless transmission distance of 50 meters between the main unit and the remote sensor.
3. Upute za rad
3.1 Početna sinkronizacija
After powering both units, the main unit will automatically attempt to synchronize with the remote sensor and receive the DCF radio-controlled time signal. This process may take a few minutes.
3.2 Prikaz prekoview
The large LCD display shows various information:
- Gornji odjeljak: Weather forecast icons (sunny, cloudy, rainy, etc.) and weather tendency indicator.
- Middle-Top Section (Blue): Outdoor humidity and temperature.
- Middle-Bottom Section (Red): Indoor humidity and temperature.
- Bottom Section (Green): Current time (12/24 hour format), day of the week, and date.
Figure 8: Close-up of the main unit's display, illustrating the different data sections for weather, outdoor/indoor conditions, and time.
3.3 Ručno postavljanje vremena i datuma
While the unit is radio-controlled, manual adjustments can be made:
- Pritisnite tipku NAČIN RADA button to cycle through display modes.
- Držite NAČIN RADA button for a few seconds to enter time setting mode.
- Koristite + i - gumbe za podešavanje vrijednosti.
- Pritisnite NAČIN RADA again to confirm and move to the next setting (e.g., hour, minute, year, month, day, language for day of week).
3.4 Funkcija alarma i odgode
- Pritisnite tipku ALARM gumb za view or set the alarm time.
- Držite ALARM gumb za ulazak u način podešavanja alarma. Koristite + i - prilagoditi se.
- Za aktiviranje/deaktiviranje alarma pritisnite ALARM kratko pritisnite tipku. Ikona alarma će se pojaviti/nestati na zaslonu.
- Kada se oglasi alarm, dodirnite SNOOZE / SVJETLO button on top of the unit to activate the snooze function. The alarm will sound again after a few minutes.
- To stop the alarm completely, press any other button.

Figure 9: Top edge of the main unit, highlighting the "SNOOZE/LIGHT" touch-sensitive button for alarm snooze and backlight activation.
3.5 Odabir jedinice temperature
Pritisnite tipku - gumb za prebacivanje između temperaturnih jedinica Celzijusa (°C) i Fahrenheita (°F).
3.6 Vremenska prognoza
The weather station predicts weather conditions based on atmospheric pressure changes. The icons (sunny, partially sunny, cloudy, rain, heavy rain) indicate the forecast for the next 12-24 hours, not the current weather.
4. Održavanje
- Čišćenje: Obrišite glavnu jedinicu i senzor mekom,amp tkanina. Nemojte koristiti abrazivna sredstva za čišćenje ili otapala.
- Zamjena baterije: Replace batteries in both the main unit and the remote sensor when the low battery indicator appears on the display. Ensure correct polarity.
- Položaj senzora: Periodically check the outdoor sensor's placement to ensure it remains sheltered and within range.
- Skladištenje: Ako uređaj skladištite dulje vrijeme, izvadite sve baterije kako biste spriječili curenje.
5. Rješavanje problema
| Problem | Mogući uzrok | Otopina |
|---|---|---|
| Nema očitanja vanjske temperature/vlažnosti. |
|
|
| Netočan prikaz vremena. |
|
|
| Zaslon je taman ili prazan. |
|
|
6. Specifikacije
| Značajka | Detalj |
|---|---|
| Radio kontrolirani sat | DCF77 |
| Raspon unutarnje temperature | 0 ° C do +50 ° C (32 ° F do 122 ° F) |
| Raspon vanjske temperature | -20 °C do +60 °C (-4 °F do 140 °F) |
| Točnost mjerenja temperature | ±2 °C |
| Indoor/Outdoor Humidity Range | 20-90 % RH |
| Rješenje vlažnosti | 1 % |
| Wireless Sensor Frequency | 433 MHz |
| Domet bežičnog signala | Do 50 metara (otvoreni prostor) |
| Probe Cable Length (for external probe, if applicable) | 1 m |
| Waterproof Level of Sensor | IPX3 |
| Main Station Power | 3 x 1.5V AA batteries (not included) or 4.5V, 150mA AC adapter (included) |
| Remote Sensor Power | 2 x 1.5 V AAA baterije (nisu uključene) |
| Main Station Dimensions | 148 × 110 × 30 mm |
| Main Station Weight (without batteries) | 242 g |
| Dimenzije daljinskog senzora | 60 × 100 × 20 mm |
| Remote Sensor Weight (without batteries) | 50 g |
| Day of Week Languages | German, English, Italian, French, Dutch, Spanish, Danish |
7. Jamstvo i podrška
For warranty information or technical support, please refer to the documentation provided with your purchase or contact Excelvan customer service through their official webweb mjestu ili vašeg prodavača.
Napomena: Ovaj priručnik služi samo u informativne svrhe. Specifikacije se mogu promijeniti bez prethodne najave.