CENMING FAN28R FAN-HD
Universal Ceiling Fan Remote Control and Receiver Kit Instruction Manual
Model: FAN28R FAN-HD
1. Ynlieding
This manual provides comprehensive instructions for the installation, operation, and maintenance of your CENMING Universal Ceiling Fan Remote Control and Receiver Kit. This kit is designed to provide convenient control over your ceiling fan's speed and light functions.

Image: The remote control and receiver unit, showing the compact design of the receiver and the intuitive button layout of the remote.
2. Produktfunksjes
- Universele kompatibiliteit: Works with most 110/120V 3-speed AC ceiling fans, including popular brands like Hampton Bay, Hunter, and Harbor Breeze.
- 3-snelheden fankontrôle: Offers HI/MED/LO speed settings and an OFF function for precise fan control.
- Light Dimmer Function: The LIGHT/DIMMER button controls brightness (On/Off/Dimming) for halogen and incandescent lamps. It also supports On/Off for some dimmable LED lights. Note: Most LED and all CFL lights are not dimmable and will only support On/Off.
- Powerful Receiver: Features a rated power of 240W, allowing for more light bulbs and extended receiver life. Uses 2 upgraded relays for improved dimming compared to thyristor-based receivers.
- Kompakt ûntwerp: The upgraded receiver is smaller for easier installation.

Image: A hand holding the remote control, with a ceiling fan in the background, illustrating the light and fan speed control features.
3. Kompatibiliteit
This kit is designed for use with 110V/120V 3-speed AC ceiling fans. It is compatible with most downrod style fans. Please note the following regarding light bulb compatibility:
- Halogen & Incandescent Lamps: Fully compatible with On/Off and dimming functions.
- Dimbare LED Lamps: Compatible with On/Off and some dimming functions.
- Most LED and all CFL Lamps: Only support On/Off function; dimming is not supported.
This remote control kit does not include a reverse button. If your fan has a reverse function, it must be controlled via a physical switch on the fan motor housing.

Image: A visual guide indicating compatibility with downrod ceiling fans and various light bulb types (incandescent, some LED, not CFL).
4. Safety Warskôgings
WARSKOGING: HIGH VOLTAGE!
- Always disconnect power by removing the fuse or switching off the circuit breaker before installation or maintenance.
- Net brûke mei solid state fans.
- Elektryske bedrading moat foldwaan oan alle pleatslike en nasjonale easken foar elektryske koade.
- Supply for the fan must be 110/120 volt, 60Hz.
- Maksimum fan motor amps: 1.0.
- Maximum light watts: 240 (incandescent only).
- It net folgjen fan dizze ynstruksjes kin liede ta serieuze ferwûnings of dea.

Image: A diagram illustrating the installation steps, prominently featuring a warning about high voltage en feiligens foarsoarchsmaatregels.
5. Ynstallaasje en opset
5.1. Setting the Codes
To ensure proper communication between the remote control (transmitter) and the receiver, you must set the same codes on both devices. The factory setting is typically all switches in the 'up' position, but it is recommended to choose a different combination to avoid interference with other remote-controlled devices.
- Iepenje de batterij fak fan 'e ôfstân kontrôle.
- Locate the DIP switches inside the remote control.
- Locate the DIP switches on the receiver unit.
- Set the switches on both the remote and the receiver to an identical pattern.

Ofbylding: In detaillearre view of the DIP switches on both the remote control and the receiver, highlighting the importance of matching their settings.
5.2. Ynstallaasje fan ûntfanger yn Ceiling Fan
Follow these steps to install the receiver into your ceiling fan. Refer to the wiring diagram for correct connections.
- Foardat jo begjinne: Soargje derfoar dat de stroom by de stroomûnderbrekker ôfsletten is.
- If your ceiling fan has a pull chain switch, set the fan speed to maximum and turn the fan light ON using the pull chains before installing the receiver. This allows the remote control to function properly.
- Connect the receiver wires to the fan and household wiring according to the provided diagram. Use the included wire nuts for secure connections.
- Carefully tuck the receiver into the fan canopy.
- Secure the fan canopy.
- Weromsette macht by de circuit breaker.
Image: A clear wiring diagram showing how to connect the receiver to the ceiling fan and household electrical system.
6. Bedriuwsinstruksjes
The remote control operates on a 9V battery (not included). Insert the battery into the remote control's battery compartment, observing polarity.
- LIGHT / DIMMER: Press to turn the light On/Off. Press and hold to dim or brighten compatible lights.
- HOI: Sets fan speed to High.
- MED: Sets fan speed to Medium.
- LO: Sets fan speed to Low.
- FAN OFF: Draait de fan út.
Image: A diagram illustrating the remote control's layout and the functions of each button for fan and light operation.
7. Underhâld
To ensure optimal performance and longevity of your remote control kit, follow these simple maintenance guidelines:
- Reiniging: Wipe the remote control and receiver with a soft, dry cloth. Do not use abrasive cleaners or solvents.
- Batterij ferfanging: Replace the 9V battery in the remote control when its performance diminishes or the indicator light no longer illuminates.
- Opslach: If storing the remote for an extended period, remove the battery to prevent leakage.
8. Probleemoplossing
If you experience issues with your remote control kit, try the following troubleshooting steps:
| Probleem | Mooglike oarsaak | Oplossing |
|---|---|---|
| Fan or light does not respond to remote. |
|
|
| Ljocht dimt net. |
|
|
| Ynterferinsje fan oare apparaten. | DIP switch code conflicts with nearby remote devices. | Change the DIP switch settings on both the remote and receiver to a new, unique combination. |
9. Spesifikaasjes
- Model Oantal: FAN28R FAN-HD
- Produkt Ofmjittings: 6.1 x 5 x 1.5 inch
- Item Gewicht: 8.8 oz
- Power Supply (Remote): 1 x 9V batterij (net ynbegrepen)
- Rated Power (Receiver): 240W
- Max Fan Motor Amps: 1.0
- Max Light Watts: 240W (incandescent only)
- Kompatibele apparaten: 110V 3-Speed AC Ceiling Fan
- Kleur: Wyt
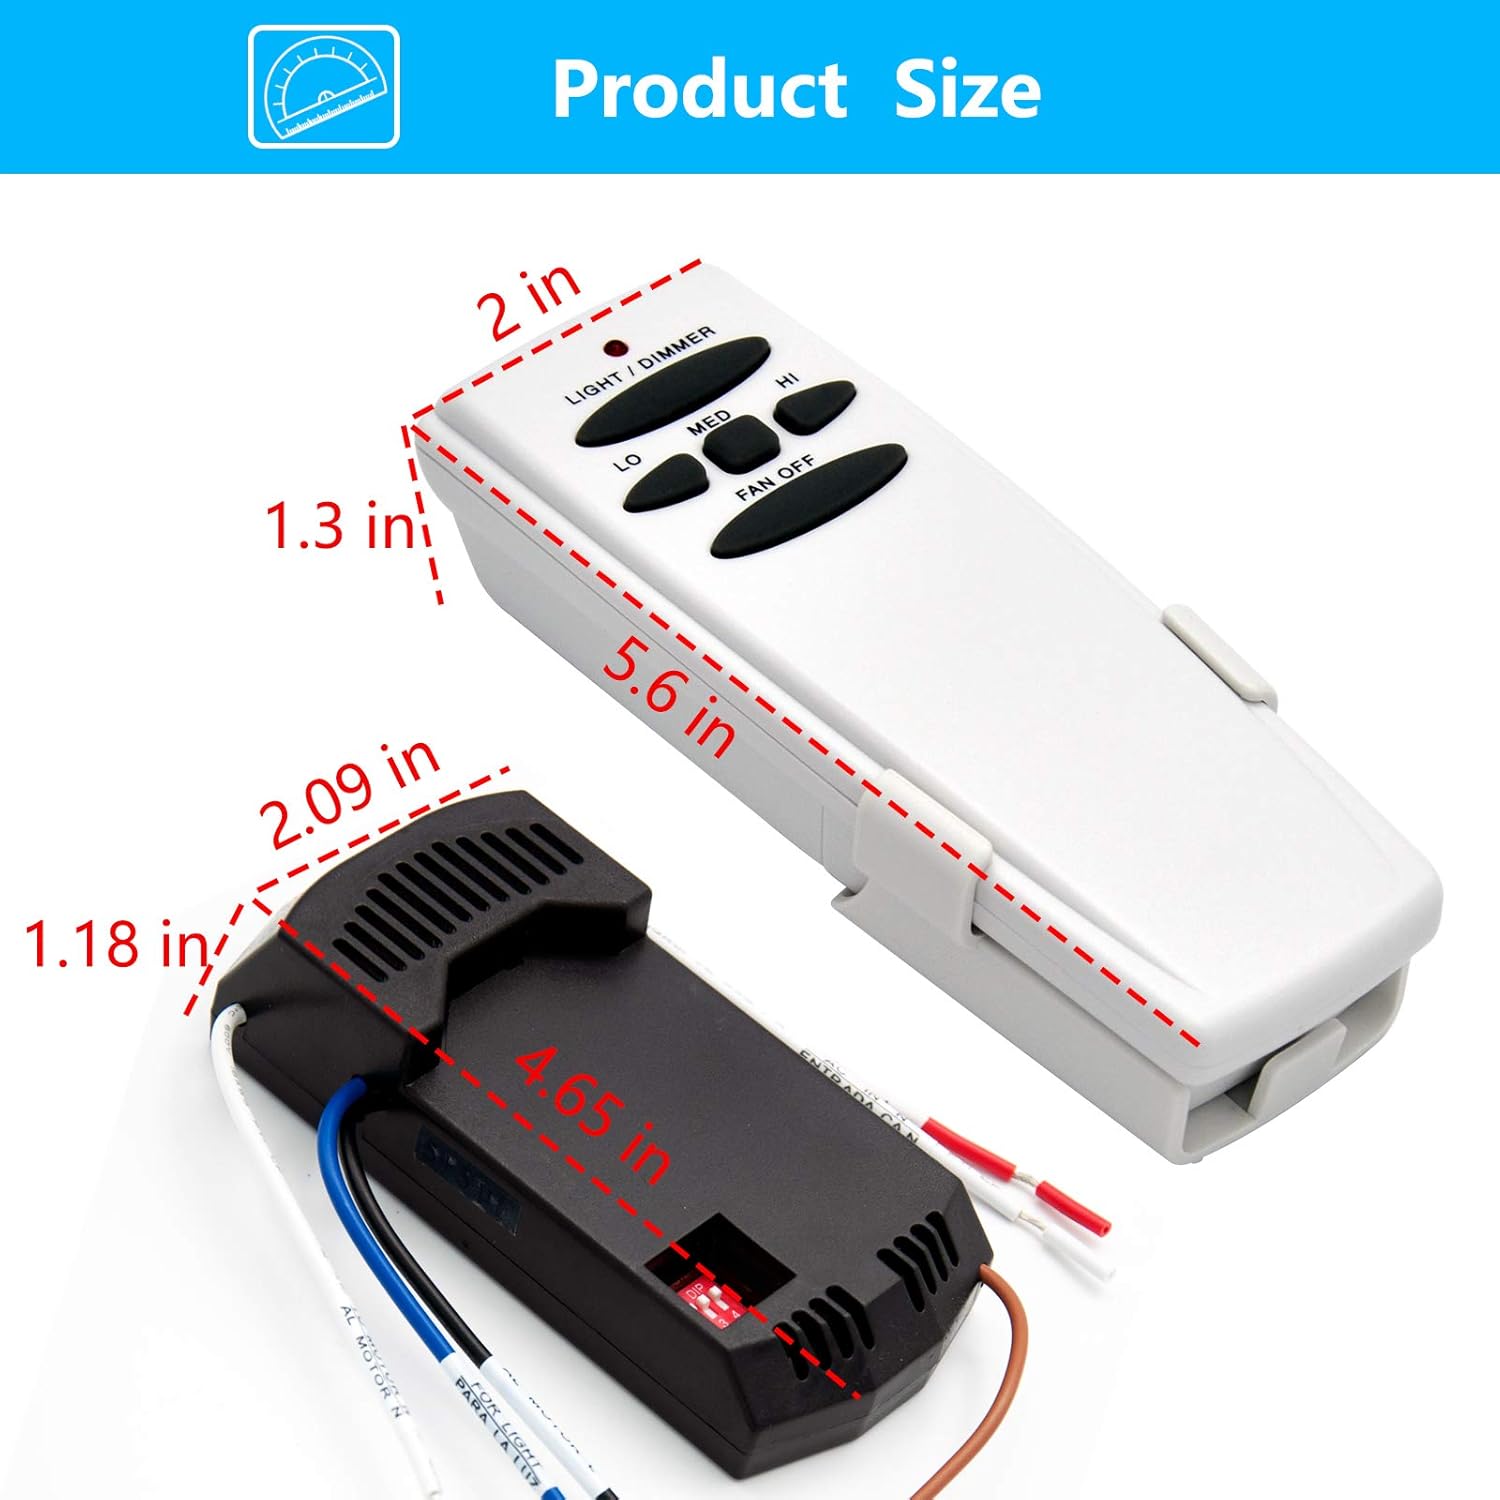
Image: A diagram illustrating the physical dimensions of both the remote control and the receiver unit.
10. Package Ynhâld
The CENMING Universal Ceiling Fan Remote Control and Receiver Kit includes the following items:
- 1 x Remote Control
- 1 x Remote Holder
- 1 x ûntfanger
- 6 x Wire Nuts
- 2 x Schroeven
- 1 x brûkershantlieding (dit dokumint)

Image: A visual representation of all items included in the product packaging, such as the remote, receiver, holder, wire nuts, and screws.
11. Garânsje en stipe
CENMING is committed to product quality and customer satisfaction. While specific warranty details are not provided in this manual, we encourage you to contact us directly for any support needs or inquiries regarding your product.
Foar help, besykje asjebleaft de CENMING Store on Amazon or refer to your purchase documentation for contact information.