1. Consignes de sécurité
Please read all instructions carefully before installation and use. Failure to follow these instructions may result in damage to the product or other components.
- Assurez-vous que votre ordinateur est éteint et débranché de la prise murale avant l'installation.
- Manipulez les composants avec précaution pour éviter tout dommage.
- Tenir hors de portée des enfants.
- Ne tentez pas de modifier le refroidisseur ou ses composants.
- Use only the provided mounting hardware.
2. Contenu du colis
Vérifiez que tous les éléments sont présents dans votre colis :
- Ocypus Gamma A40 BK CPU Air Cooler (Heatsink and Fan assembly)
- Outil de montage
- Mounting hardware for Intel LGA 115X/1200/1700/1851
- Mounting hardware for AMD AM4/AM5
- Thermal paste packet

Image: Included accessories for the Ocypus Gamma A40 BK CPU Air Cooler, showing various mounting brackets, screws, and a thermal paste packet.
3. Spécifications
| Modèle | Ocypus Gamma A40 BK |
| Dimensions du produit (L x l x H) | 105 mm x 93 mm x 133 mm (4.13 po L x 3.66 po l x 5.24 po H) |
| Méthode de refroidissement | Air |
| Caloducs | 4 x Φ6mm Copper Direct Touch |
| Taille du ventilateur | 100 mm |
| Vitesse du ventilateur | 600-2400 ±10% RPM (PWM controlled) |
| Capacité de débit d'air | 41 piXNUMX/min |
| Pression atmosphérique | 2.2mm H2O |
| Niveau de bruit | ≤29.5 dB(A) |
| Type de connecteur d'alimentation | 3-Pin (PWM) |
| Voltage | 12 volts (CC) |
| Quoitage | 1.2 watts |
| Support TDP | Jusqu'à 200 W |
| Prises compatibles | Intel LGA 115X/1200/1700/1851, AMD AM4/AM5 |
| Matériel | Aluminium, cuivre, plastique |
| Poids de l'article | 13.7 onces |
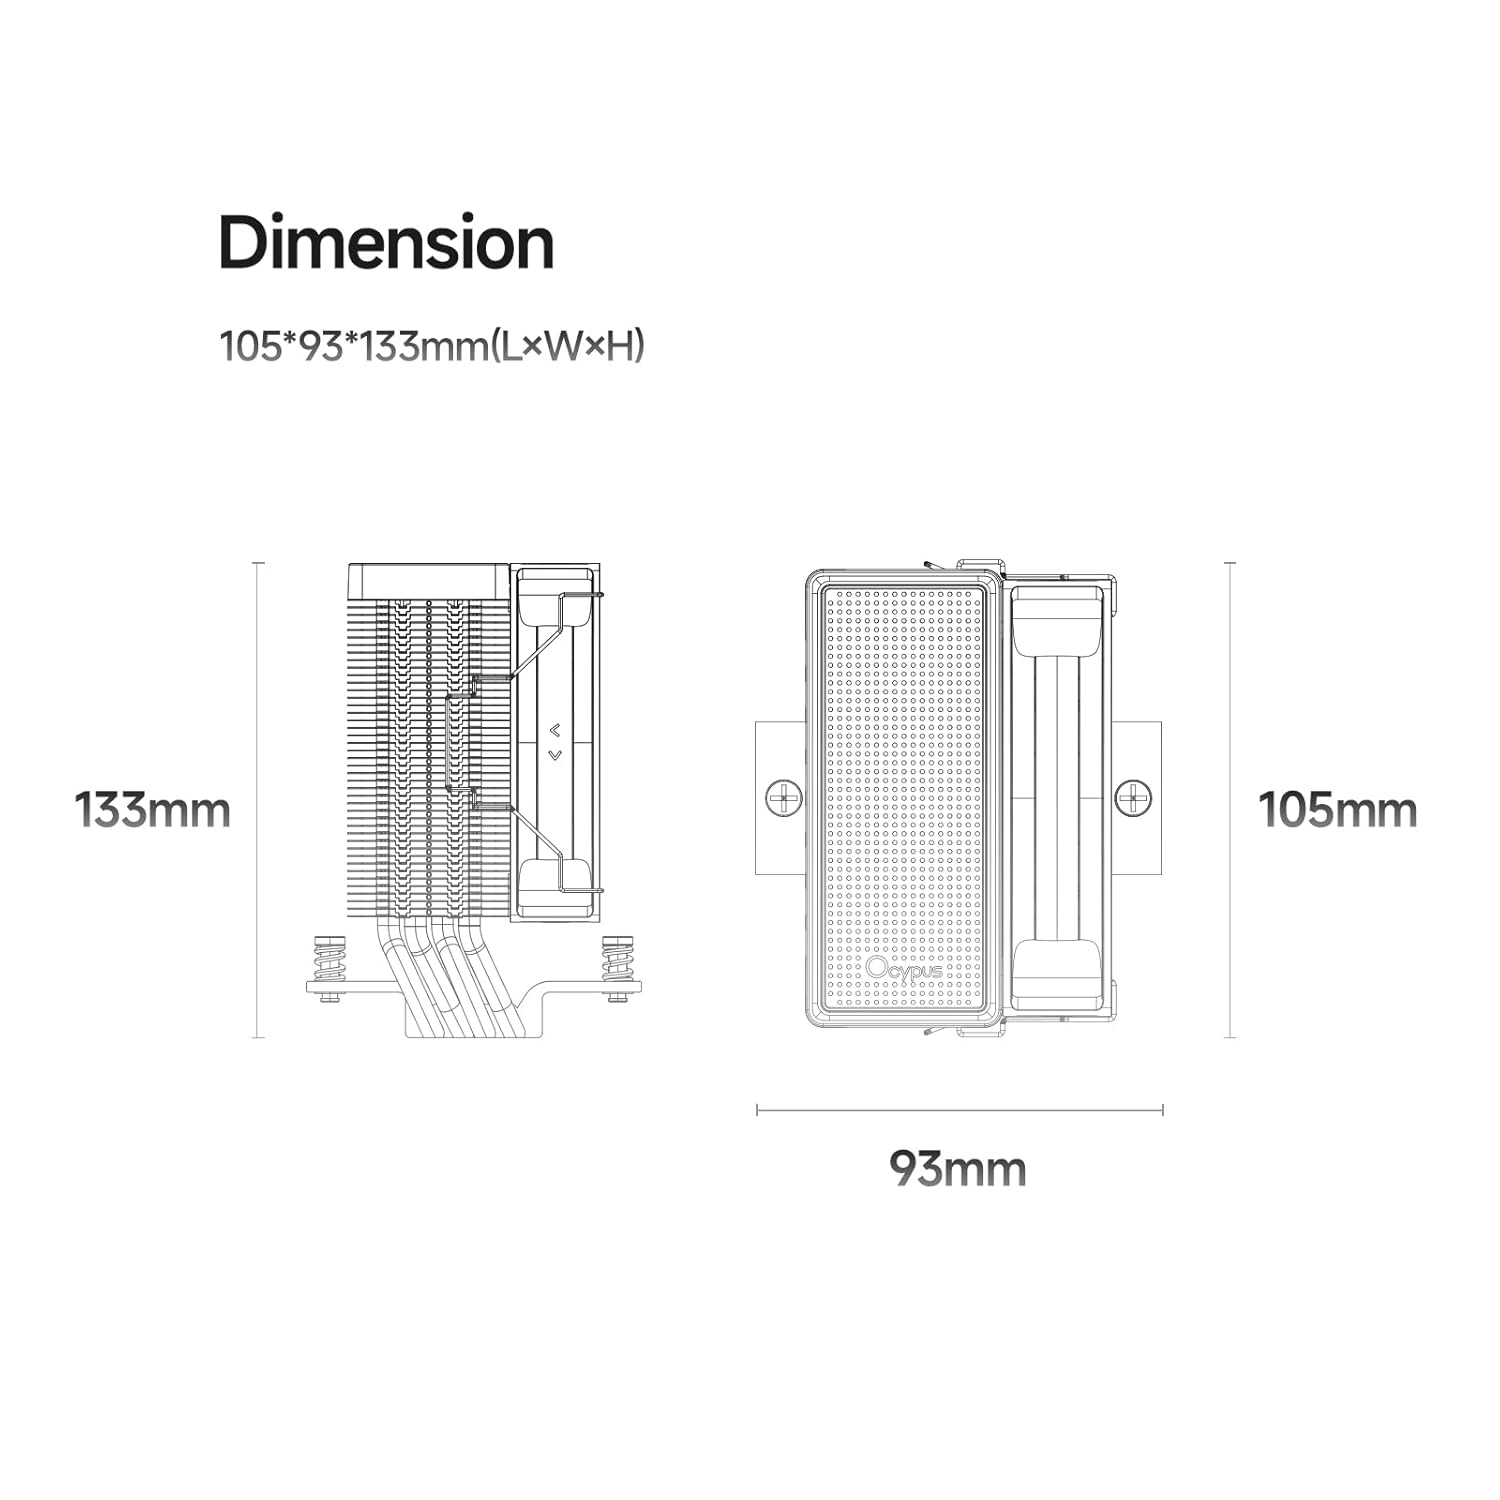
Image: Detailed dimension diagram of the Ocypus Gamma A40 BK CPU Air Cooler, showing its height of 133mm, length of 105mm, and width of 93mm.

Image : Gros plan view of the CPU cooler's base, highlighting the four Φ6mm copper direct touch heat pipes, indicating a TDP support of up to 200W.

Image: Diagram illustrating the specifications of the 100mm high-performance, low-noise fan, including 41 CFM air flow, 2.2mm H2O air pressure, ≤29.5 dB(A) noise, 600-2400 ±10% PWM speed, and a 4-pin connector.
4. Guide d'installation
This section provides general installation steps. Refer to your motherboard manual for specific details regarding CPU socket preparation.
4.1 Préparez votre système
- Éteignez votre ordinateur et débranchez-le de la prise électrique.
- Ouvrez le boîtier de votre ordinateur pour accéder à la carte mère et au socket du processeur.
- Retirez tout système de refroidissement du processeur existant. Nettoyez soigneusement la surface du processeur à l'aide d'alcool isopropylique afin d'éliminer toute trace de pâte thermique.
4.2 Appliquer la pâte thermique
Apply a small amount of thermal paste (pea-sized dot or a thin line) to the center of your CPU's Integrated Heat Spreader (IHS). The pressure from the cooler will spread it evenly.
4.3 Installer le matériel de montage
Select the appropriate mounting brackets for your CPU socket (Intel or AMD).

Image: Illustration of the CPU cooler being installed onto a motherboard, demonstrating the ease of installation with all-metal mounting hardware.
For Intel LGA 115X/1200/1700/1851:
- Fixez la plaque arrière Intel à l'arrière de la carte mère en alignant les trous avec le socket du processeur.
- Secure the Intel mounting standoffs through the motherboard from the front.
- Place the Intel mounting brackets onto the standoffs and secure them with the provided screws.
Pour AMD AM4/AM5 :
- Remove the existing plastic retention modules from the motherboard, but keep the original backplate.
- Attach the AMD mounting standoffs to the original backplate.
- Place the AMD mounting brackets onto the standoffs and secure them with the provided screws.
4.4 Installez le refroidisseur
- Carefully place the heatsink assembly onto the CPU, ensuring the heat pipes make direct contact with the thermal paste.
- Align the cooler's mounting holes with the brackets.
- Using the provided mounting tool, alternately tighten the screws in a diagonal pattern until the cooler is firmly seated. Do not overtighten.
- Connectez le câble du ventilateur PWM à 3 broches à l'en-tête CPU_FAN de votre carte mère.
Vidéo : Un overview of the Ocypus Gamma A40 Series CPU Air Cooler, demonstrating its design and features. This video provides a visual guide to the product's components and aesthetics.
Video: A detailed look at the Ocypus Gamma A40 Series CPU Air Cooler, showcasing its construction, heat pipe design, and fan. This video helps users understand the physical aspects of the cooler.
5. Mode d'emploi
Once installed, the Ocypus Gamma A40 BK CPU Air Cooler operates automatically based on your motherboard's fan control settings.
- Contrôle automatique du ventilateur : The 3-pin PWM fan will adjust its speed (600-2400 RPM) according to the CPU temperature, as managed by your motherboard's BIOS/UEFI settings. This ensures optimal cooling performance while minimizing noise.
- Surveillance: You can monitor CPU temperatures and fan speeds using motherboard utility software or within the BIOS/UEFI.
- Démarrage initial: During the first few hours of operation, the thermal paste will "cure" and achieve its full thermal conductivity. Monitor temperatures during this period.

Image: The Ocypus Gamma A40 BK CPU Air Cooler installed inside a computer case, demonstrating its compact fit and appearance.
6. Entretien
Un entretien régulier garantit des performances optimales et une longue durée de vie à votre refroidisseur de processeur.
- Nettoyage de la poussière : Periodically (every 3-6 months, depending on environment) clean dust from the heatsink fins and fan blades using compressed air. Ensure the fan is held stationary during cleaning to prevent over-spinning.
- Inspection des ventilateurs : Vérifiez que le ventilateur ne présente aucun signe d'usure, aucun bruit inhabituel ni aucune obstruction.
- Réapplication de la pâte thermique : If you remove the cooler for any reason, it is recommended to clean off the old thermal paste from both the CPU and the cooler base and apply new thermal paste before reinstallation.
7. Dépannage
| Problème | Cause possible | Solution |
|---|---|---|
| Températures élevées du processeur |
|
|
| Le ventilateur ne tourne pas |
|
|
| Bruit de ventilateur inhabituel |
|
|
8. Garantie et assistance
Ocypus products are designed and manufactured to the highest quality standards. For warranty information and technical support, please refer to the official Ocypus webconsultez le site ou contactez directement leur service client.
Conservez votre preuve d'achat pour les réclamations au titre de la garantie.
Fabricant: Ocypus
Website: Ocypus Store on Amazon (pour des informations générales sur le produit)