Introduction
Thank you for choosing the HOMVILLA Digital Alarm Clock, Model 8813. This alarm clock features a large, colorful LED display, adjustable volume and brightness, dual alarms, and a convenient USB charging port. This manual provides detailed instructions for setup, operation, maintenance, and troubleshooting to ensure optimal performance and a seamless user experience.

Surview of the HOMVILLA Digital Alarm Clock's key features, including adjustable dimmer, volume, snooze, dual alarms, 12/24-hour format, 8 alarm melodies, memory function, USB charging, DST, and a large display.
Installation
1. Déballage et préparation initiale
- Retirez délicatement le réveil de son emballage.
- Peel off any protective film from the LED display.
2. Connexion électrique
The HOMVILLA Digital Alarm Clock is powered by a corded electric connection. A USB cable and power adapter are included for your convenience.
- Connect the USB cable to the DC Port on the back of the alarm clock.
- Plug the USB cable into the provided power adapter.
- Insert the power adapter into a standard electrical outlet. The display will illuminate.
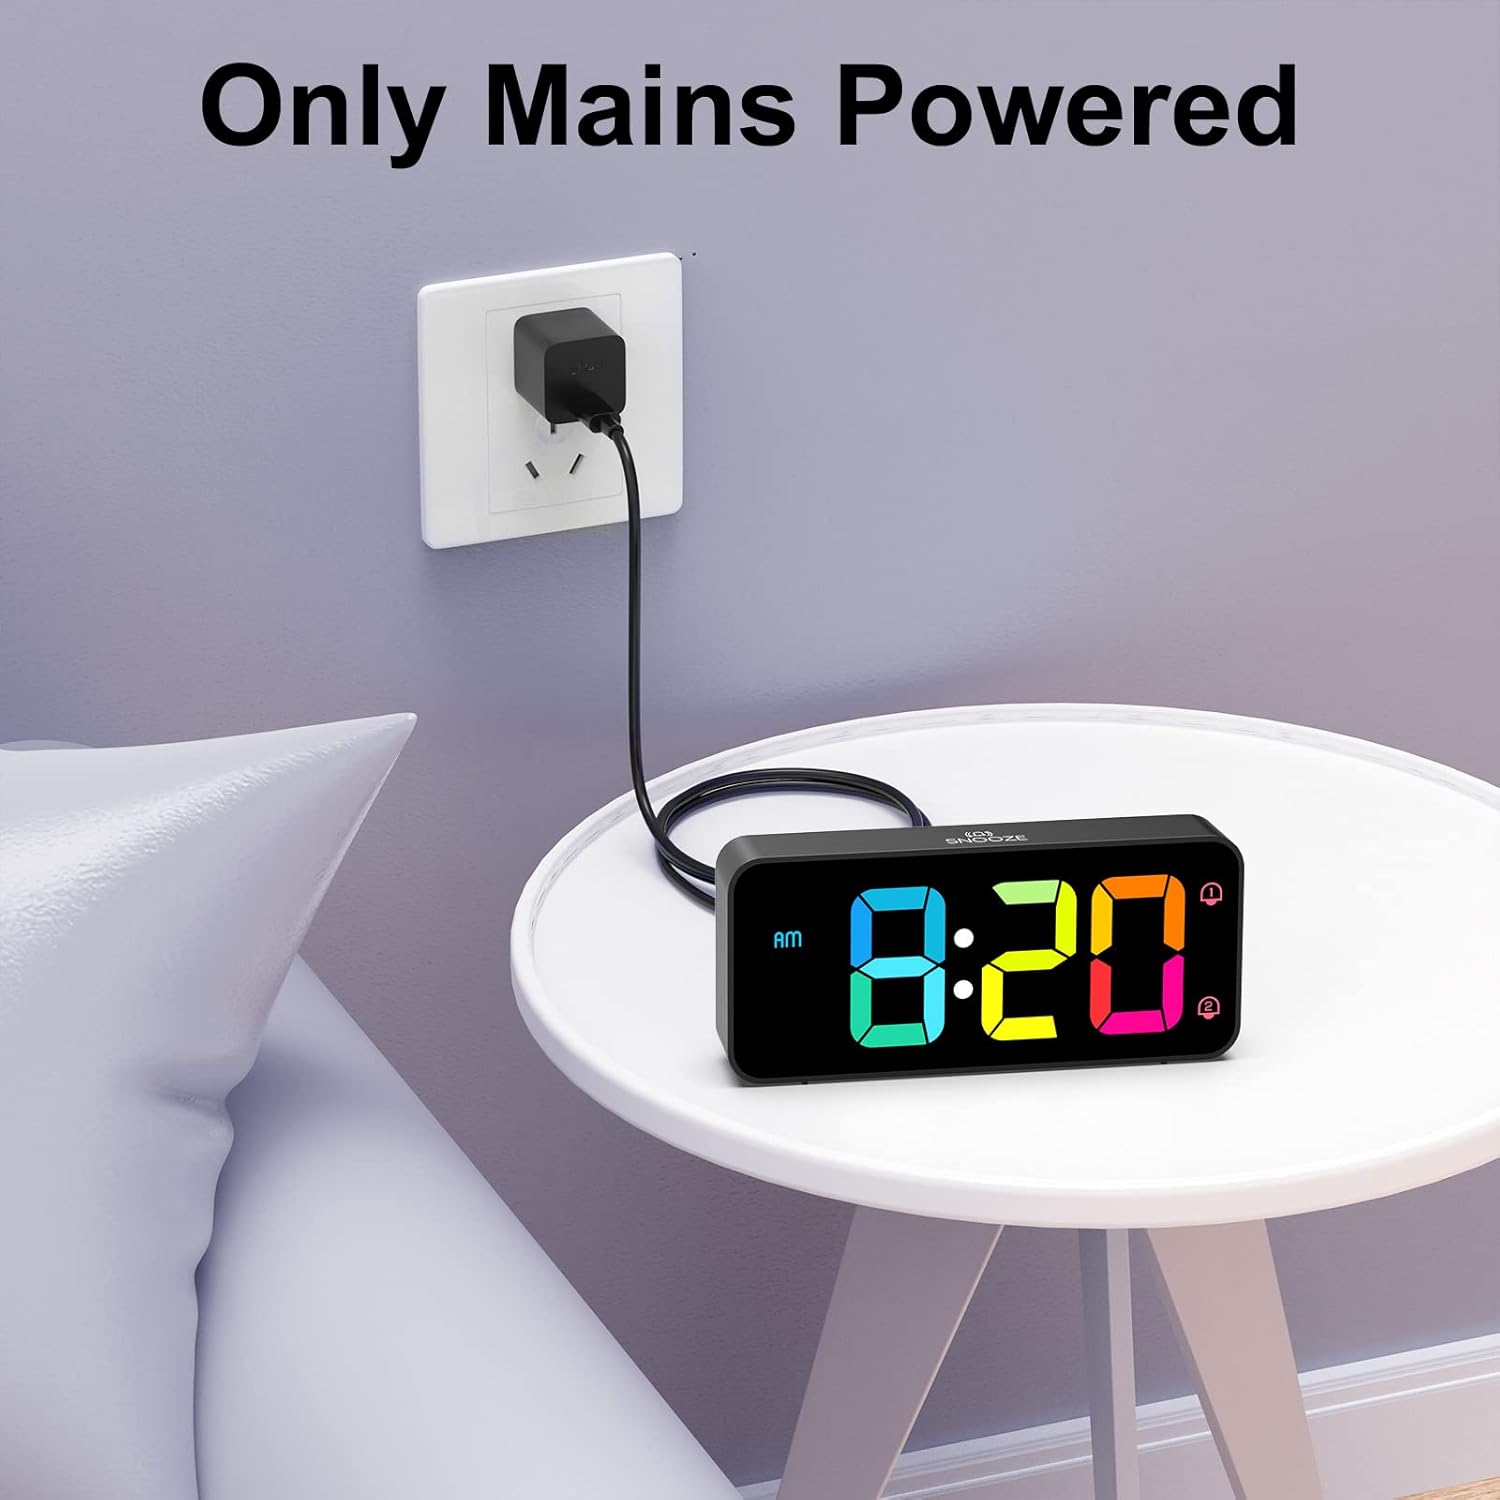
The alarm clock requires continuous mains power for operation. Connect the USB cable to the clock and the adapter to a wall outlet.
3. Battery Backup (Memory Function)
While the clock requires mains power to operate, you can install backup batteries to retain time and alarm settings during a power outage.
- Repérez le compartiment à piles sous le réveil.
- Insérez 2 piles AAA (non incluses), en veillant à respecter la polarité (+/-).
- Fermez le compartiment à piles.
Note: The backup batteries only support the memory function; the display will not be active without mains power.

Installing 2 AAA batteries enables the memory function, preserving your time and alarm settings during power interruptions.
Opération
Familiarize yourself with the control buttons and wheels located on the back and top of the alarm clock.

Détaillé view of the alarm clock's controls, including the volume wheel, dimmer wheel, time setting buttons, alarm setting buttons, and the snooze button.
1. Réglage de l'heure
- Appuyez et maintenez enfoncé le RÉGLAGE DE L'HEURE Appuyez sur le bouton situé à l'arrière de l'horloge. Les chiffres des heures se mettront à clignoter.
- Utilisez le UP et VERS LE BAS buttons to adjust the hour. Pay attention to the AM/PM indicator if using 12-hour format.
- Presse RÉGLAGE DE L'HEURE à nouveau pour passer au réglage à la minute. Utilisez UP et VERS LE BAS pour régler les minutes.
- Presse RÉGLAGE DE L'HEURE Une troisième fois pour confirmer et quitter le mode de réglage de l'heure.
- Pour basculer entre le format 12 heures et le format 24 heures, appuyez brièvement sur la touche UP button during normal time display.
2. Réglage de deux alarmes
L'horloge prend en charge deux alarmes indépendantes (Alarme 1 et Alarme 2).
- Appuyez et maintenez enfoncé le ENSEMBLE D'ALARME bouton. L'icône Alarme 1 et les chiffres des heures clignoteront.
- Utilisez le UP et VERS LE BAS boutons pour régler l'heure souhaitée pour l'alarme 1.
- Presse ENSEMBLE D'ALARME again to set the minutes for Alarm 1. Use UP et VERS LE BAS.
- Presse ENSEMBLE D'ALARME a third time to set Alarm 2. Repeat the hour and minute setting process.
- Presse ENSEMBLE D'ALARME a fourth time to confirm and exit alarm setting mode.
- Pour activer/désactiver une alarme, appuyez brièvement sur le bouton. MARCHE/ARRÊT bouton. L'icône d'alarme correspondante (1 ou 2) apparaîtra/disparaîtra sur l'écran.

The clock supports dual alarms for different schedules and features a convenient snooze function.
3. Réglage du volume de l'alarme
The alarm volume can be adjusted from 90 dB to 120 dB using the volume scroll wheel.
- Localisez le VOLUME scroll wheel on the left side of the back panel.
- Gently slide the wheel up or down to increase or decrease the alarm volume to your preferred level.

Adjust the alarm volume from 90dB to 120dB using the dedicated scroll wheel on the back.
4. Selecting Alarm Melodies
The alarm clock offers eight different melodies.
- While in alarm setting mode (after setting the time for an alarm), press the UP or VERS LE BAS bouton permettant de parcourir les mélodies disponibles.
- Presse ENSEMBLE D'ALARME pour confirmer votre sélection.

Choose from 8 distinct alarm sounds, including classic ringtones, nature sounds, and musical options.
5. Fonction Snooze
Lorsqu'une alarme retentit, appuyez sur le grand bouton. ROUPILLON bouton situé sur le dessus de l'horloge pour couper temporairement l'alarme pendant 5 minutes.
6. Éteindre l'alarme
To turn off a sounding alarm for the day, press any of the five buttons on the back panel (TIME SET, UP, DOWN, ALARM SET, ON/OFF). The alarm will reset for the next day.
7. Réglage de la luminosité de l'écran
The display brightness is continuously adjustable from 5% to 100%.
- Localisez le VARIATEUR scroll wheel on the right side of the back panel.
- Gently slide the wheel up or down to increase or decrease the display brightness to your desired level.
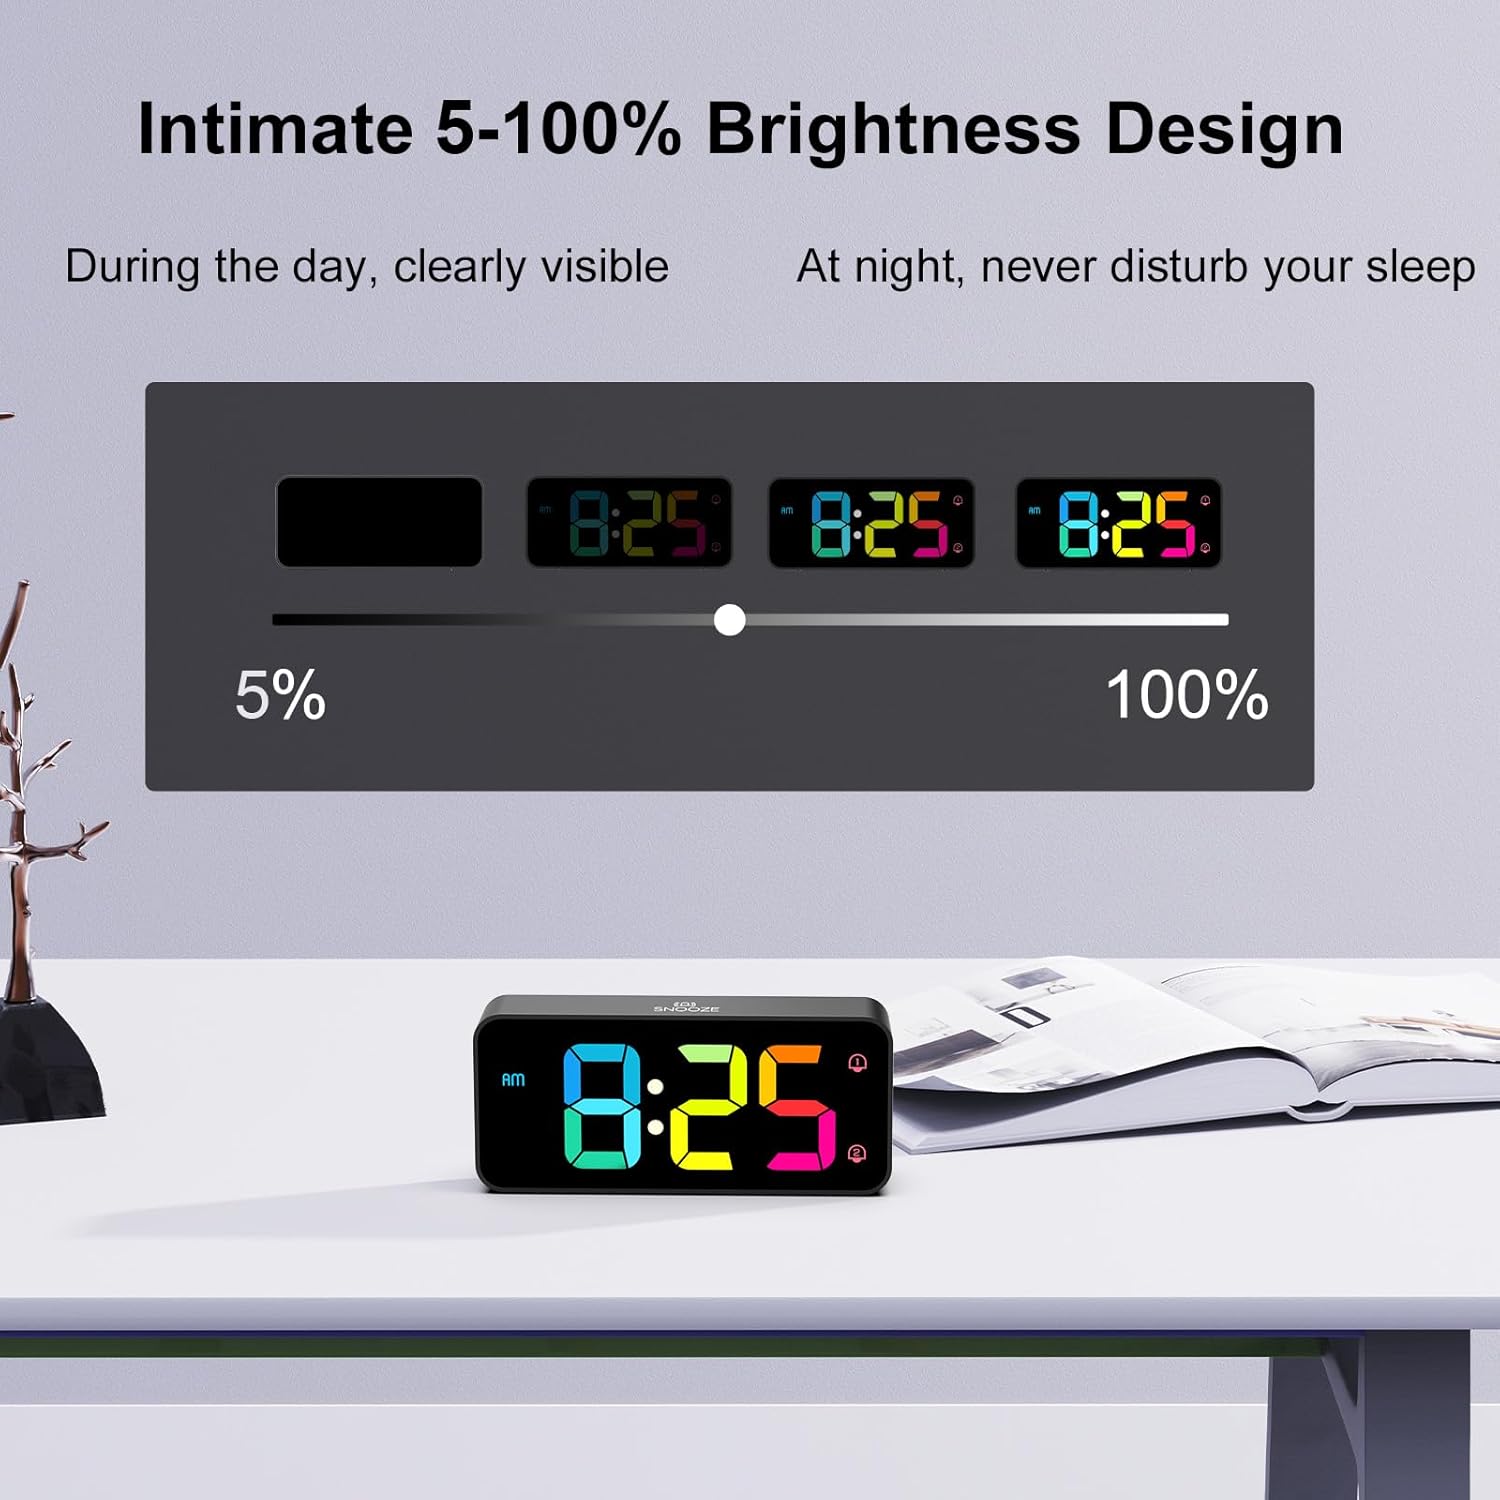
The display brightness can be adjusted from 5% to 100% for comfortable viewdans toutes les conditions d'éclairage.
8. Heure d'été (DST)
To activate or deactivate Daylight Saving Time, briefly press the Heure d'été button on the back panel. The time will adjust by one hour, and the DST indicator will appear/disappear.
9. Port de chargement USB
A USB port is located on the back panel for convenient charging of mobile phones or other small electronic devices.
- Connect your device's USB charging cable to the Port USB on the back of the alarm clock.
- Ensure the alarm clock is connected to mains power for the charging function to work.
Entretien
To ensure the longevity and proper functioning of your HOMVILLA Digital Alarm Clock, follow these simple maintenance guidelines:
- Nettoyage: Gently wipe the display and exterior surfaces with a soft, dry, or slightly damp cloth. Avoid using abrasive cleaners, solvents, or chemical sprays, as these can damage the finish.
- Placement: Placez le réveil sur une surface stable et plane, à l'abri de la lumière directe du soleil, de la chaleur excessive, de l'humidité ou des champs magnétiques puissants.
- Pouvoir: Always ensure the clock is connected to a stable power source. If storing for an extended period, disconnect from power and remove backup batteries.
Dépannage
Si vous rencontrez des problèmes avec votre réveil, veuillez consulter les problèmes et solutions courants suivants :
| Problème | Cause possible | Solution |
|---|---|---|
| L'écran est éteint ou clignote. | No mains power; loose connection; power adapter issue. | Ensure USB cable and adapter are securely connected and plugged into a working outlet. Check if the outlet has power. |
| L'alarme ne sonne pas. | Alarm not activated; volume too low; incorrect alarm time set. | Verify the alarm icon (1 or 2) is displayed. Adjust the volume wheel. Recheck alarm time settings. |
| Réinitialisation de l'heure et des paramètres après une coupure de couranttage. | Aucune batterie de secours installée ou batteries déchargées. | Install 2 new AAA batteries for the memory function. |
| Le port de chargement USB ne fonctionne pas. | Horloge non branchée sur le secteur. | Ensure the alarm clock is powered by the included USB cable and adapter from a wall outlet. |
| Les boutons ne répondent pas. | Problème logiciel temporaire. | Unplug the power adapter, remove backup batteries (if installed), wait 30 seconds, then reconnect power. This performs a soft reset. |
Caractéristiques
| Fonctionnalité | Détail |
|---|---|
| Numéro de modèle | 8813 |
| Dimensions du produit (L x l x H) | 14.4 x 3.81 x 6.3 cm (5.7 x 1.5 x 2.5 pouces) |
| Poids de l'article | 200 gramme |
| Marque | HOMVILLA |
| Couleur | Black - Colorful Display |
| Type d'affichage | LED numérique |
| Caractéristiques spéciales | LED Display, Dual Alarms, Adjustable Brightness (5-100%), Adjustable Volume (90-120dB), Snooze, DST, USB Charging Port |
| Source d'énergie | Électrique filaire (câble USB et adaptateur inclus) |
| Batterie de secours | 2 x AAA (not included, for memory function only) |
| Matériel | Plastique |
| Type de montage | Dessus de table |
| Technologie de connectivité | USB |
Informations sur la garantie
HOMVILLA offers a garantie à vie for this product. For details regarding warranty claims or service, please refer to the contact information provided in the support section.
Soutien
For further assistance, technical support, or warranty inquiries, please contact HOMVILLA customer service through the retailer's platform or the official HOMVILLA webVeuillez vous munir du numéro de modèle de votre produit (8813) et des détails de votre achat lorsque vous contactez l'assistance.