1. Introduction
Thank you for choosing the HITBOX HBC65 65A Plasma Cutter. This dual-voltage (110V/220V) machine is designed for efficient and precise cutting of all conductive metals, including carbon steel, iron, galvanized steel, stainless steel, aluminum, copper, and brass. Featuring a non-HF non-touch pilot arc, CNC readiness, and a 60% duty cycle, the HBC65 offers reliable performance for various cutting applications. This manual provides essential information for safe operation, setup, maintenance, and troubleshooting to ensure optimal use of your plasma cutter.

Image: The HITBOX HBC65 65A Plasma Cutter, a compact and powerful cutting machine.
2. Consignes de sécurité
Operating a plasma cutter involves significant risks. Always prioritize safety to prevent injury or damage to equipment. Read and understand all safety warnings and instructions before operating the machine.
2.1 Précautions générales de sécurité
- Protection des yeux : Always wear appropriate welding helmets with suitable shade levels to protect your eyes from intense light and UV radiation.
- Protection du corps : Wear flame-resistant clothing, gloves, and safety shoes to protect against sparks, molten metal, and electrical shock.
- Ventilation: Ensure adequate ventilation in the work area to remove fumes and gases produced during cutting. Avoid working in confined spaces.
- Sécurité électrique :
- Assurez-vous que la machine est correctement mise à la terre.
- Ne pas utiliser la machine par temps humide ou avec les mains mouillées.
- Inspect power cables and connections for damage before each use.
- Risques d'incendie :
- Tenez les matériaux inflammables éloignés de la zone de coupe.
- Ayez un extincteur à portée de main.
- Be aware of hot metal and sparks that can travel.
- Arrivée d'air: Ensure the air compressor is properly maintained and provides clean, dry air at the recommended pressure.
- Enfants et témoins : Gardez les enfants et le personnel non autorisé à l'écart de la zone de travail.
3. caractéristiques du produit
- High Cutting Capacity: The HITBOX HBC65 is a dual-voltage 110V/220V plasma cutter.
- On 110V: Clean cut up to 5/16" (8 mm), maximum cut up to 19/32" (15 mm).
- On 220V: Clean cut up to 3/8" (10 mm), maximum cut up to 1" (25 mm).
- Non-Touch Pilot Arc, Non-HF Start: This feature allows for easy cutting of rusty, painted, or dirty metal without direct torch contact. The adjustable pilot arc duration (3–15s; recommended 5–10s manual, 3–5s CNC) improves cut starts, extends consumable life, and reduces interference with nearby electronics or CNC systems.

Image: Illustration of the Non-High Frequency feature, highlighting no radiation, low EMI, and extended equipment life.

Image: Pilot Arc Cutting in action, showing clean cuts on 1/2" (12mm) at 110V and 1" (25mm) at 220V.
- Cycle de service de 60 % : Provides reliable and stable cutting performance for extended manual or CNC cutting applications.
- Smart Protection & Cooling: Built-in digital air monitoring alerts when air pressure is too high and automatically stops cutting with a warning if air pressure drops below 30 PSI to protect consumables. The intelligent fan activates only during cutting or when the internal temperature reaches 40°C (104°F), reducing noise and extending component lifespan.
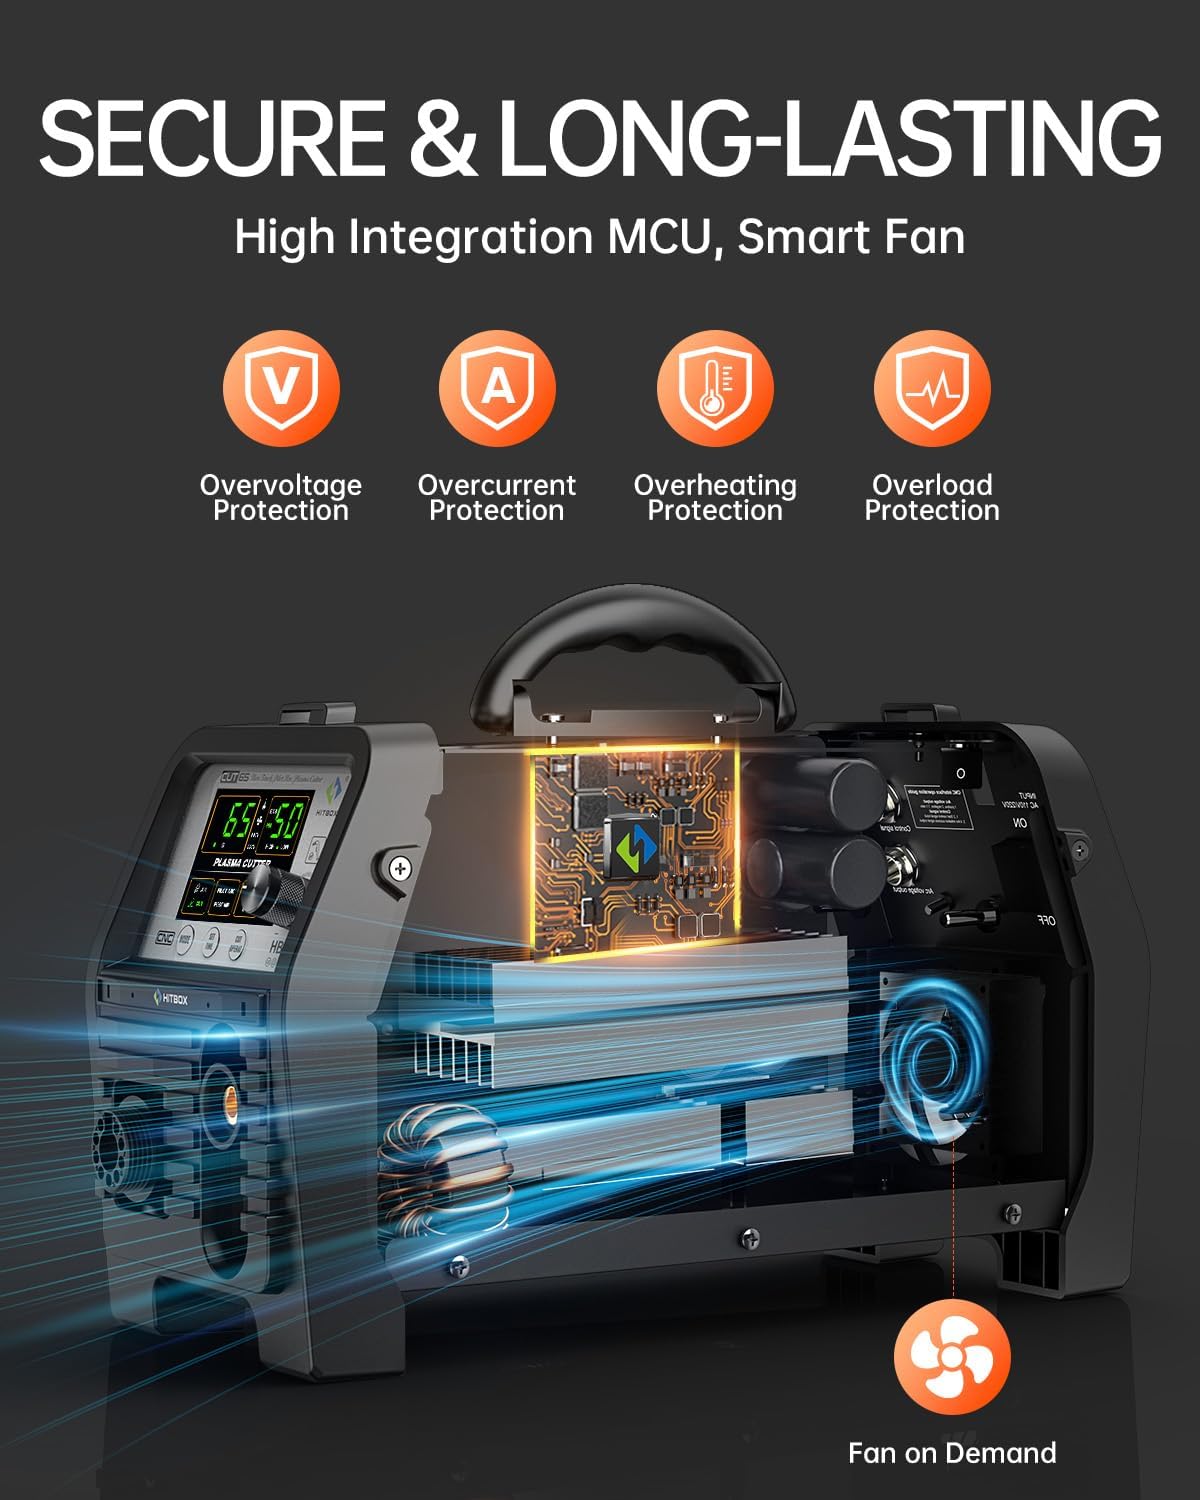
Image: Diagram illustrating the internal components and protection features like overvoltage, overcurrent, overheating, and overload protection, along with a smart fan.
- CNC Ready, Easy Control & Portability:
- Mode 2T/4T : 2T mode offers flexible control, while 4T mode reduces fatigue during long cuts.
- Adjustable Post-Flow: (2–15s) cools the torch and extends consumable life.
- CNC Ready: Designed for integration with cutting tables.
- Portabilité: Il ne pèse que 13.96 kg, ce qui le rend facile à transporter.
- Large HD Digital Display: Provides clear and precise operation data.

Image : Terminéview of powerful features including Grid Cut, CNC Function, 2T/4T Function, Post Gas Time, and Pilot Arc Time.

Image: Close-up of the large LED screen displaying current, air pressure, and various mode settings for the plasma cutter.
4. Contenu du colis
Upon opening your HITBOX HBC65 Plasma Cutter package, please verify that all items listed below are present and undamaged:

Image: All components included in the HITBOX HBC65 package, laid out for inspection.
- HITBOX HBC65 Plasma Cutter Unit
- Plasma Cutting Torch (13ft)
- Terre Clamp (4.9 pieds)
- Air Hose (6.5ft)
- Tuyau Clamps (x 2)
- Tip Nozzles (x2)
- Électrodes (x2)
- Adaptateur de prise
- GX16-02 Plug
- GX16-04 Plug
- Air Regulator & Filter
- Manuel d'utilisation
5. Installation
Follow these steps to set up your HITBOX HBC65 Plasma Cutter:
- Connect the Plasma Torch:
- Insert the main connector of the plasma torch into the corresponding socket on the front panel of the machine and tighten it securely.
- Connect the torch switch cable to the designated port (usually a smaller multi-pin connector).
- Connect the pilot arc cable to its respective terminal.
- Connectez la terre Clamp:
- Fixez la terre clamp câble vers la borne négative (-) du panneau avant.
- Fixez solidement la prise de terre.amp to the workpiece or a clean, bare metal part of the cutting table to ensure a good electrical connection.
- Connect the Air Supply:
- Attach the air hose to the air inlet on the rear panel of the plasma cutter. Use the provided hose clamps pour sécuriser la connexion.
- Connect the other end of the air hose to your external air compressor. The plasma cutter requires a stable air pressure of ≥80 PSI and ≥6.36 CFM, with a recommended working range of 50–60 PSI.
- Ensure the air regulator and filter are properly installed between the compressor and the plasma cutter to provide clean, dry air.
- Connexion électrique :
- Connect the power cable to the appropriate 110V or 220V power outlet using the provided plug adaptor if necessary.
- Mettez en marche l'interrupteur principal situé sur le panneau arrière de la machine.
5.1 Guide d'installation visuelle
Watch the following video for a detailed visual guide on setting up your plasma cutter:
Video: Installation and Setup Guide for a Plasma Cutter. This video demonstrates connecting the torch, earth clamp, and air hose, and adjusting air pressure.
Video: Easy setup of the RBC6000DL plasma cutter, showing connections and initial adjustments.
6. Mode d'emploi
Une fois la machine installée, suivez ces étapes pour son utilisation :
- Régler la pression d'air :
- Turn the knob on the air regulator to set the desired air pressure, typically between 50-60 PSI for optimal cutting. The digital display will show the current air pressure.
- Sélectionnez le mode de coupe :
- Use the control panel to select between 2T (Two-Touch) and 4T (Four-Touch) modes based on your cutting needs.
- 2T mode: Press and hold the torch button to start cutting, release to stop.
- 4T mode: Press the torch button to start, release to continue cutting, press again to stop. This mode is ideal for longer cuts to reduce hand fatigue.
- Set Current and Post-Flow:
- Réglez le courant de coupe (Amps) using the control knob according to the material thickness and type. Refer to the cutting chart (if provided) for recommended settings.
- Set the post-flow time (2-15 seconds). Post-flow air cools the torch and consumables after the arc is extinguished, extending their lifespan.
- Effectuez la découpe :
- Position the torch over the workpiece, ensuring the non-touch pilot arc feature allows for a small gap between the nozzle and the metal.
- Press the torch button to initiate the pilot arc and begin cutting. Maintain a steady travel speed for a clean cut.
- For grid cutting, the non-touch pilot arc allows for continuous cutting over gaps.

Image: A plasma cutter performing a grid cut, demonstrating the precision and capability of the tool.
6.1 Vidéos d'opération
Video: Demonstration of the CUT75P plasma cutter, showcasing its pilot arc function, clean cutting, efficient cutting, and mesh cutting capabilities.
Video: A plasma cutter demonstrating its cutting capabilities on 16mm thick metal.
7. Entretien
Un entretien régulier garantit la longévité et les performances optimales de votre découpeur plasma.
- Inspection des consommables : Regularly check the torch consumables (nozzle, electrode, shield cup) for wear and replace them as needed. Worn consumables can lead to poor cut quality and damage to the torch.
- Filtre à air : Periodically drain the water from the air filter/regulator and clean or replace the filter element to ensure a clean and dry air supply.
- Nettoyage: Keep the machine clean and free from dust and metal particles. Use compressed air to blow out internal components if necessary, ensuring the machine is unplugged.
- Inspection des câbles : Inspectez tous les câbles (alimentation, lampe torche, terre).ampVérifiez l'absence de coupures, d'abrasions ou de connexions desserrées. Réparez ou remplacez immédiatement les câbles endommagés.
8. Dépannage
If you encounter issues with your plasma cutter, refer to the following common problems and solutions:
| Problème | Cause possible | Solution |
|---|---|---|
| Aucun arc / L'arc ne démarre pas |
|
|
| Poor Cut Quality / Rough Edges |
|
|
| Machine Overheats / Shuts Down |
|
|
| Avertissement de pression atmosphérique |
|
|
9. Spécifications
| Fonctionnalité | Détail |
|---|---|
| Fabricant | HITBOX |
| Modèle | HBC65 |
| Style | 65A Non-HF |
| Vol d'entréetage | 110 V/220 V double volumetage |
| Cutting Thickness (110V Clean) | 1/32″~5/16″ (1~8 mm) |
| Cutting Thickness (110V Max) | 19/32″~5/16″ (8~15 mm) |
| Cutting Thickness (220V Clean) | 1/32″~3/8″ (1~10 mm) |
| Cutting Thickness (220V Max) | 3/8″~1″ (10~25 mm) |
| Cycle de service | 60% |
| Required Air Pressure | ≥80 PSI, ≥6.36 CFM (Recommended 50–60 PSI) |
| Pilot Arc Duration | Adjustable (3–15s) |
| Post-Flow Duration | Adjustable (2–15s) |
| Poids de l'article | 9.65 kg (21.27 lb) |
| Dimensions du colis | 49.5 x 35.5 x 22 cm |
10. Garantie et assistance
Your HITBOX HBC65 Plasma Cutter comes with a 2-year quality service warranty. HITBOX is committed to providing responsive technical support to assist you with any questions or issues you may encounter. For warranty claims, technical assistance, or general inquiries, please contact HITBOX customer service through the retailer where you purchased the product or visit the official HITBOX website pour obtenir les coordonnées de l'assistance.


