AceGamer B0DRVC22RZ
Manuel d'utilisation de la manette sans fil AceGamer pour Switch
Model: B0DRVC22RZ
Marque : AceGamer
1. Produit terminéview
The AceGamer Wireless Switch Controller is designed for an enhanced gaming experience across multiple platforms, including Nintendo Switch, Switch Lite, Switch OLED, and PC Steam. It features advanced Hall Effect joysticks to prevent drift, sensitive motion controls, adjustable vibration, and programmable back buttons for customized gameplay. With a long-lasting battery, this controller offers extended play sessions and quick charging.

Figure 1: AceGamer Wireless Switch Controller (Red-Blue variant).

Figure 2: The controller is compatible with Nintendo Switch, Switch Lite, Switch OLED, and PC Steam.
2. Configuration et connexion
2.1 Appariement initial
To connect the AceGamer Wireless Switch Controller to your Nintendo Switch console for the first time, follow these steps. A USB cable is required for the initial connection.

Figure 3: A USB cable is needed for the initial connection to the console.
- Étape 1 : On your Nintendo Switch console, navigate to the 'Controllers' option.
- Étape 2 : Select 'Change Grip/Order' on the console screen.
- Étape 3 : On the AceGamer controller, press the 'Connect Key' (small button near the USB-C port) for longer than 2 seconds.
- Étape 4 : The LED light on the controller will stop flashing when the connection is successful.
Important Note: Please do not touch the joystick when connecting, otherwise it may cause drift. If drift occurs, please reconnect the controller.

Figure 4: Visual guide for connecting the controller to your Nintendo Switch.
2.2 Reconnecting and Wake-up Function
For subsequent connections, simply press the 'Home' button on the Switch Controller to wake up and reconnect your console. For the first connection, press the 'Y' + 'Home' button.

Figure 5: Pressing the Home button wakes up and reconnects the controller.
2.3 Connection Video Guide
Video 1: A short demonstration on how to connect the AceGamer Wireless Switch Controller to your console.
3. Mode d'emploi
3.1 Hall Effect Joystick
The controller features Hall Effect joysticks, which are designed to prevent common issues like joystick drift, wear, and insensitivity. This technology provides highly precise control, ideal for intricate maneuvers in various games, and extends the lifespan of the joysticks up to 5 million rotations.

Figure 6: The Hall Effect Joystick offers high precision and durability, complemented by an ergonomic grip.

Figure 7: Key benefits of the Hall Effect Joystick include no latency, long life, no dead zone, and zero drift.
3.2 Motion Control and Vibration Feedback
The integrated 6-axis gyro sensor allows for sensitive motion control, enhancing your experience in games that utilize motion input. The controller also features built-in dual vibration motors with 4 adjustable levels of feedback (0%, 30%, 70%, 100%), providing immersive tactile responses during gameplay.

Figure 8: The controller offers 4-level vibration feedback and precise 6-axis gyro motion control.
3.3 Programmable Buttons and Turbo Function
The controller includes additional M1/M2 back buttons that can be programmed to simplify complex skill operations. These buttons can be assigned to any A/B/X/Y/L/ZL/R/ZR/L3/R3/D-pad buttons, supporting up to 16 button assignments. Two programming modes are available: single assignment and multiple assignment.
The Turbo burst function supports both auto and manual turbo modes with three adjustable speeds: 5 shots/s, 12 shots/s, and 20 shots/s.

Figure 9: The M1 and M2 back buttons can be programmed for various in-game actions.
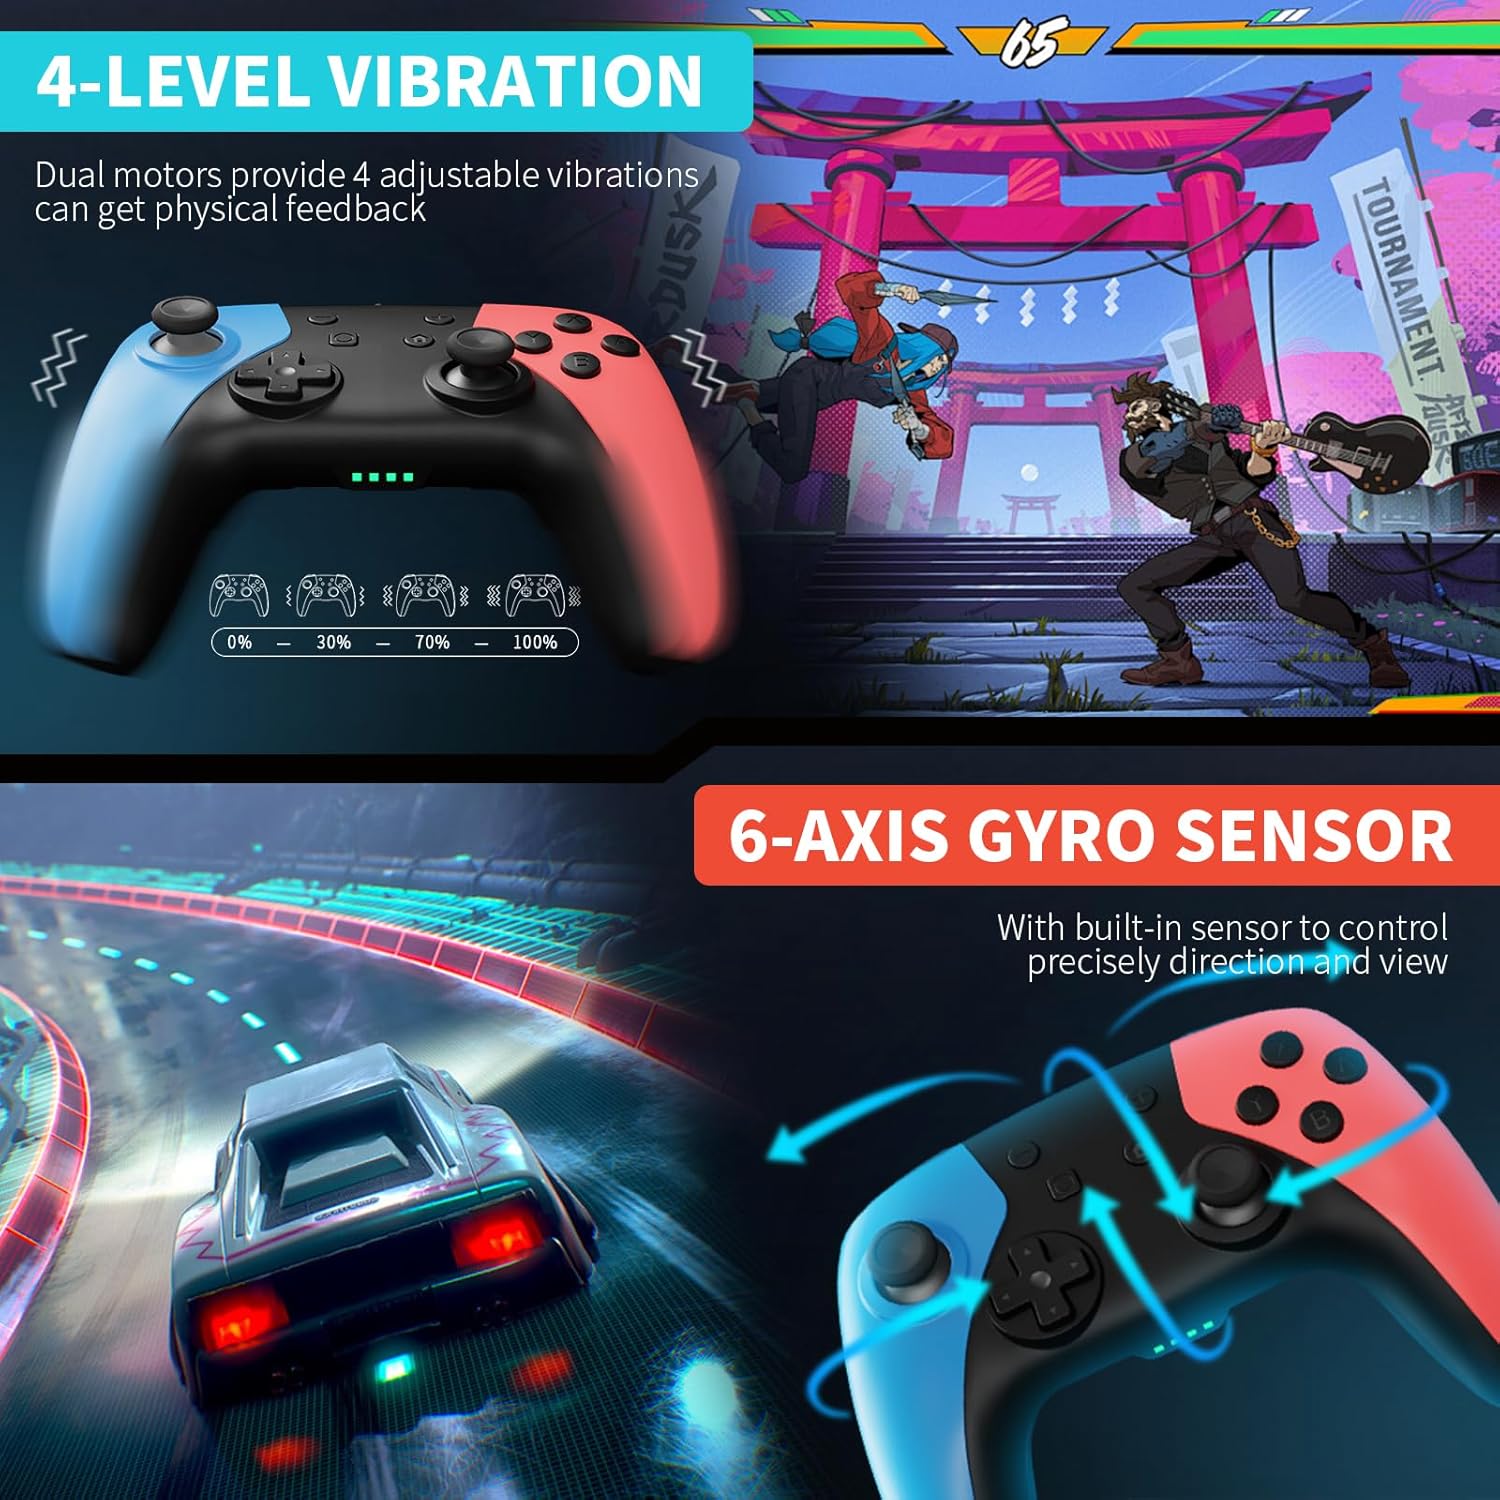
Figure 10: The Turbo function offers three adjustable speeds for rapid button presses.

Figure 11: The controller features a non-slip back grip for comfort and highlights the programmable function.
4. Batterie et charge
The AceGamer controller is equipped with a built-in 1000 mAh lithium battery. A full charge takes approximately 3-4 hours and provides up to 12 hours of continuous gameplay. The controller also features an automatic shutdown function after 5 minutes of inactivity to conserve battery life.

Figure 12: The controller's 1000 mAh battery offers 15 hours of game time and charges in 3 hours.
5. Dépannage
5.1 Fixing Joystick Drift
If you experience joystick drift, you can recalibrate the 3D joystick and L2/R2 triggers by following these steps:
- Étape 1 : Press the "L1" + "R1" + "connect key" simultaneously to enter calibration mode. The LED indicators (1, 3 and 2, 4) will flash alternately.
- Étape 2 : Swing both the left and right joysticks 3 times in a circular motion.
- Étape 3 : Appuyez 3 fois de suite sur les gâchettes L2 et R2 jusqu'au bout.
- Étape 4 : Press the "Home" key. LED2 will light up after 2 seconds, indicating the calibration process is complete and the controller has exited calibration mode.

Figure 13: Detailed steps for calibrating joysticks to resolve drift issues.
5.2 Solving Inaccurate Motion Detection
If you encounter issues with inaccurate motion detection, view drift, or response delay, you can calibrate the gyroscope:
- Étape 1 : Éteignez le contrôleur.
- Étape 2 : Press and hold the "L1" + "R1" + "connect key" simultaneously for 1 second to enter gyroscope calibration mode. The LED indicators (1, 2 and 3, 4) will flash alternately.
- Étape 3 : Press the "+" key. Light No. 3 will be on for 1 second and then turn off, indicating calibration is complete.

Figure 14: Steps for calibrating the gyroscope to correct motion detection inaccuracies.
6. Spécifications
| Fonctionnalité | Détail |
|---|---|
| Batterie | 1 pile A requise (incluse) |
| Capacité de la batterie | 1000 mAh |
| Temps de charge | 3-4 heures |
| Temps de jeu continu | Jusqu'à 12 XNUMX heures |
| Connectivité | Sans fil |
| Type de joystick | Joystick à effet Hall |
| Détecteur de mouvement | Capteur gyroscopique à 6 axes |
| Niveaux de vibration | 4 niveaux (0%, 30%, 70%, 100%) |
| Vitesses turbo | 3 speeds (5, 12, 20 shots/s) |
| Boutons programmables | M1/M2 (up to 16 button assignments) |
| Dimensions du colis | 17 x 11.6 x 7 cm |
| Poids | 330 g |
| Fabricant | AceGamer |
| ASIN | B0DRVC22RZ |
| Pays d'origine | Chine |
7. Garantie et assistance
AceGamer provides warranty service for this product. If you have any questions or encounter problems with your controller, please contact AceGamer customer support for assistance. Please note that this is a third-party product and not manufactured by Nintendo.
Ask a question about this manual
Ask about setup, troubleshooting, compatibility, parts, safety, or missing instructions. Manuals+ will review the question and use this page’s manual context to help answer it.