1. Introduction
Thank you for choosing the BEWISHOME White Dresser with Charging Station and LED Lights, Model KCG02W. This modern 6-drawer dresser is designed to provide versatile storage and enhance your living space with integrated LED lighting and convenient charging capabilities. Please read this manual thoroughly before assembly and use to ensure proper installation and safe operation.
2. Consignes de sécurité
Consignes de sécurité importantes :
- Suivez toujours attentivement les instructions de montage.
- Assurez-vous que toutes les pièces sont solidement fixées avant utilisation.
- Do not overload drawers.
- Use the provided anti-tipping kit to secure the dresser to a wall. This is crucial to prevent serious injury from tipping furniture.
- Tenez les enfants et les animaux domestiques éloignés de la zone de montage.
- Only use the charging station for compatible devices and within specified electrical limits.
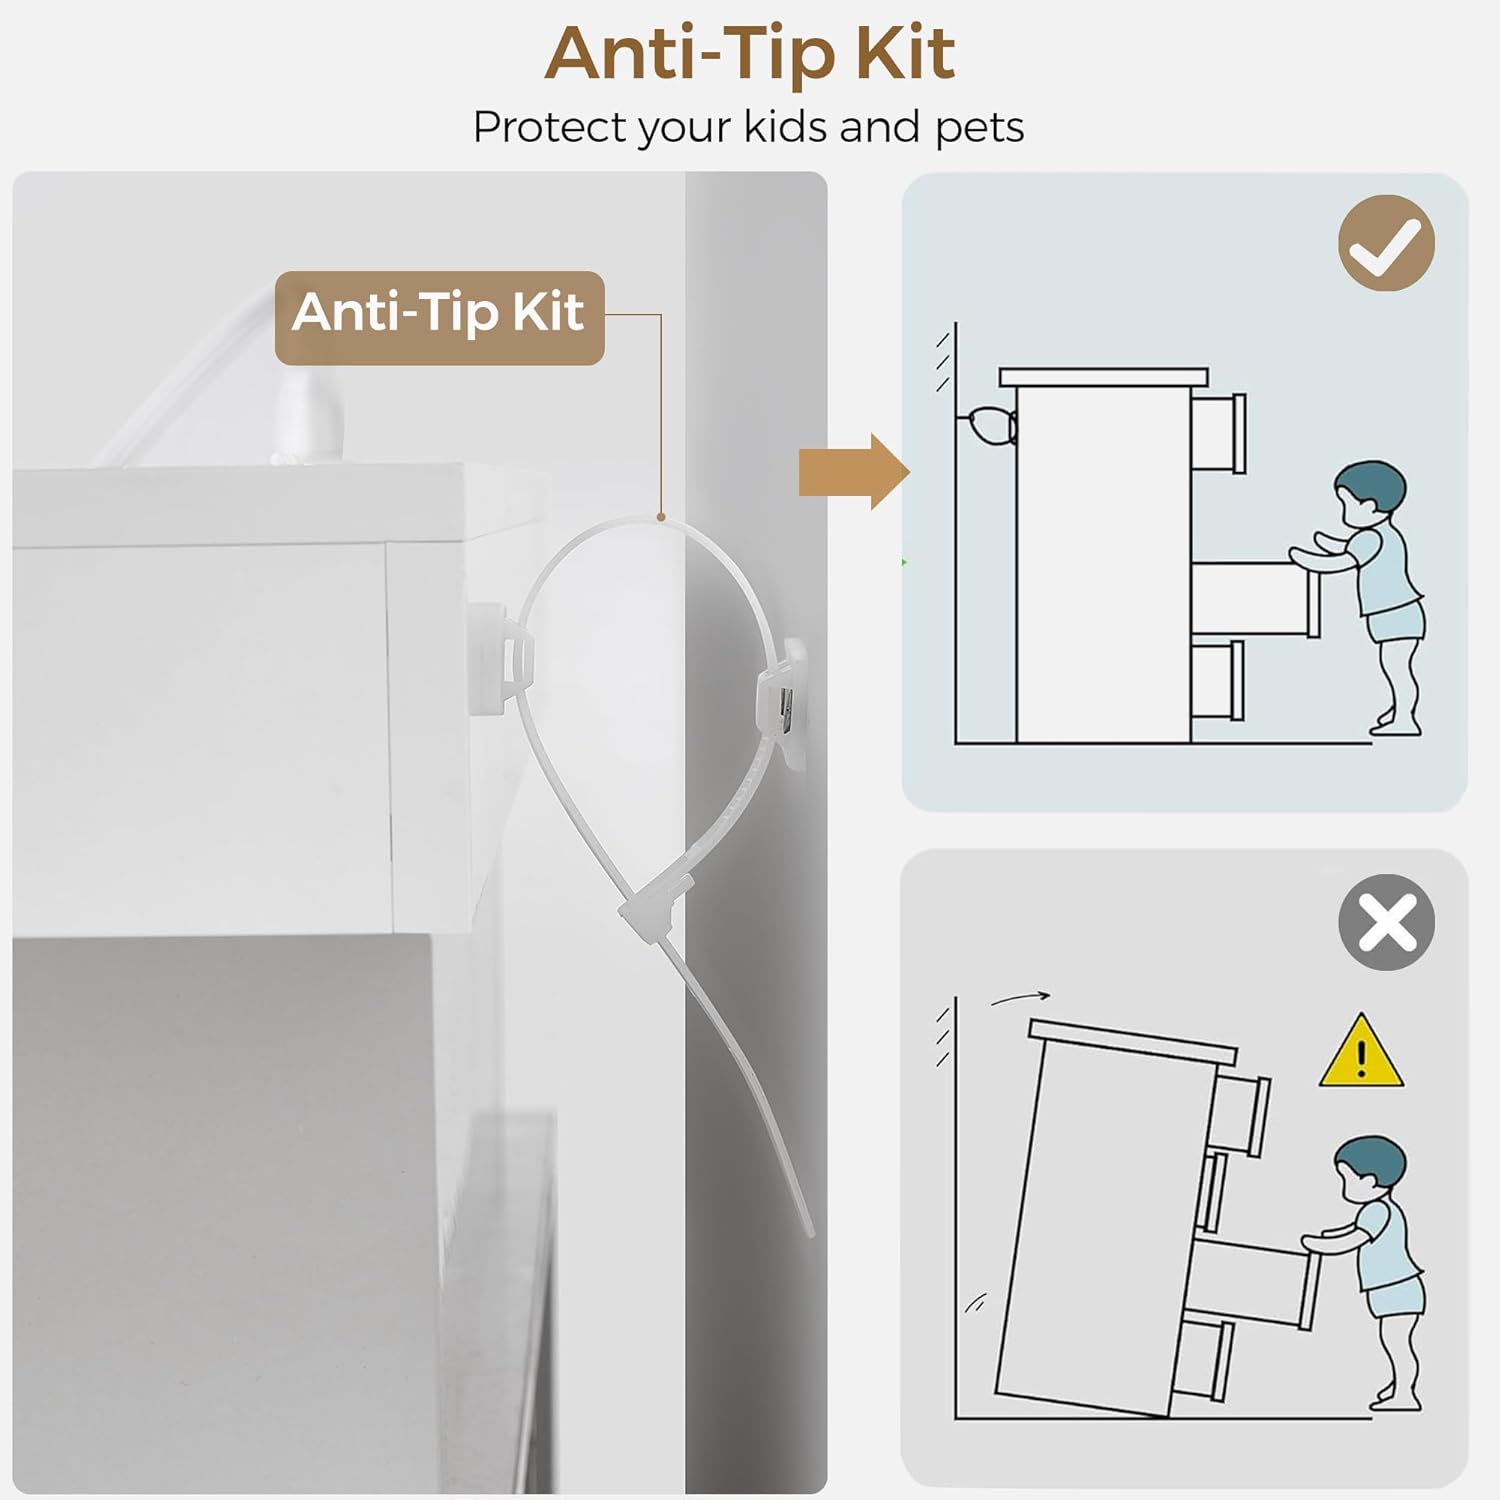
Figure 2.1: Diagram illustrating the installation of the anti-tip kit to secure the dresser to a wall, preventing accidental tipping.
3. Contenu du colis
Avant de commencer l'assemblage, vérifiez que toutes les pièces sont présentes et en bon état. Consultez la liste des pièces incluse dans l'emballage.
- Dresser panels and hardware
- 6 Drawer components
- Bande lumineuse LED et télécommande
- Charging station unit (2 USB ports, 2 AC outlets)
- Kit anti-basculement
- Instructions de montage
4. Instructions de montage
Assembly is required for this dresser. Each part is labeled to assist with the process. It is recommended to have two people for assembly.
- Déballer et identifier les pièces : Retirez soigneusement tous les composants de leur emballage. Disposez-les sur une surface propre et douce pour éviter les rayures. Identifiez chaque pièce à l'aide de la liste des pièces fournie.
- Assembler le châssis principal : Follow the step-by-step diagrams in the separate assembly guide to construct the dresser's main frame. Ensure all cam locks and screws are tightened securely.
- Installer les glissières de tiroir : Attach the drawer slides to the dresser frame and drawer sides according to the instructions. Ensure they are level and aligned for smooth operation.
- Assembler les tiroirs : Construct each of the six drawers. Insert the drawer bottoms and secure the back panels.
- Insérer des tiroirs : Carefully slide the assembled drawers into the dresser frame. Test each drawer for smooth opening and closing.
- Installer des lumières LED : Adhere the LED light strip to the designated area under the top shelf. Connect the power cable.
- Installer la borne de recharge : Insert the charging station unit into the pre-cut opening on the top surface. Secure it in place and connect its power cable.
- Kit anti-basculement à installer : Secure the dresser to a wall using the anti-tipping kit provided. This step is essential for safety.
For detailed visual instructions, please refer to the separate assembly manual included in your package.
Vidéo 4.1 : Un overview of the BEWISHOME White 6-Drawer Dresser, showcasing its features and potential uses in various rooms.
5. Mode d'emploi
5.1 Utilisation des lumières LED
The dresser is equipped with multi-color LED lights that can be controlled using the included remote control.
- Marche/Arrêt : Appuyez sur le bouton marche/arrêt de la télécommande pour allumer ou éteindre les lumières.
- Sélection de couleur : Use the color buttons on the remote to select from 7 main colors.
- Modes dynamiques : Choose from 22 dynamic modes to create different lighting effects.
- Réglage de la luminosité : Réglez les niveaux de luminosité à l'aide des boutons prévus à cet effet.

Figure 5.1: Image displaying the dresser with its LED lights illuminated in various colors, alongside the remote control used for operation.
5.2 Utilisation de la station de recharge
La station de recharge intégrée offre un accès pratique à l'alimentation pour vos appareils électroniques.
- Ports USB : Connect your USB-compatible devices (e.g., phones, headphones) to the 2 USB ports (5V/2.1A) for charging.
- Prises secteur : Plug in small appliances or chargers into the 2 standard AC outlets (125V/12A).
- Ensure the dresser's main power cord is plugged into a functional wall outlet.

Figure 5.2 : Un aperçu détaillé view of the dresser's built-in charging station, highlighting the two USB ports and two AC outlets.
5.3 Utilisation du tiroir
The dresser features six spacious drawers for organized storage.
- Open and close drawers gently to ensure longevity of the slides.
- Distribute weight evenly within drawers to prevent strain on the structure.
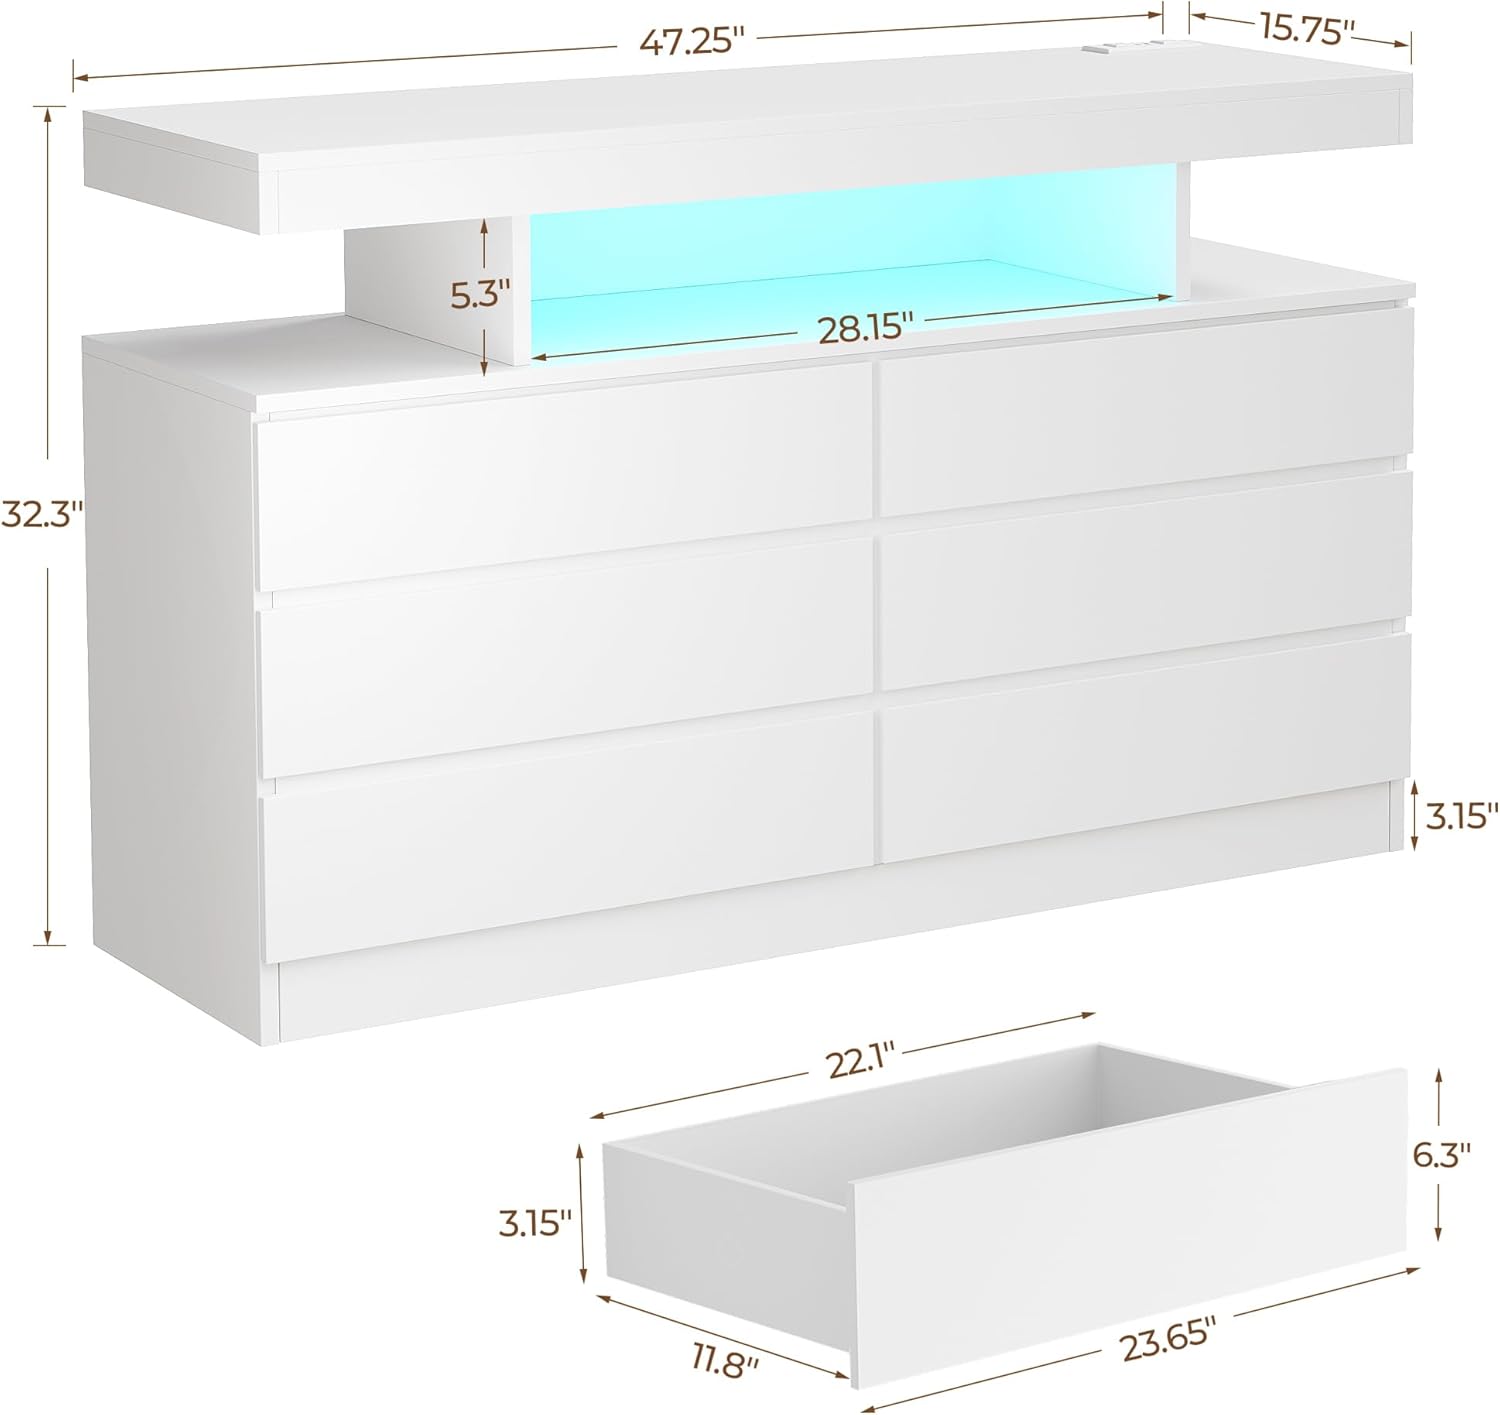
Figure 5.3: The dresser with several drawers partially open, illustrating the internal storage capacity and the open display shelf with LED lighting.
6. Entretien
Un entretien approprié prolongera la durée de vie et préservera l'apparence de votre commode.
- Nettoyage: Essuyez la surface avec un chiffon sec. Évitez les nettoyants abrasifs ou les produits chimiques agressifs qui pourraient endommager la finition.
- Glissières de tiroirs : Periodically check drawer slides for smooth operation. If needed, a small amount of silicone lubricant can be applied.
- Matériel: Occasionally check and tighten any loose screws or fasteners to maintain structural integrity.
- Lumières LED : If LED lights malfunction, ensure connections are secure. Do not attempt to repair electrical components yourself.
7. Dépannage
Si vous rencontrez des problèmes avec votre commode, consultez les solutions courantes suivantes :
| Problème | Cause possible | Solution |
|---|---|---|
| Les lumières LED ne fonctionnent pas | Power cable disconnected; remote control battery low; LED strip malfunction. | Ensure power cable is securely plugged in. Replace remote control battery. Contact customer support if issue persists. |
| La borne de recharge ne fonctionne pas | Dresser not plugged in; device not compatible; charging station malfunction. | Verify dresser is plugged into a live outlet. Test with a different device. Contact customer support. |
| Les tiroirs sont difficiles à ouvrir/fermer | Overloaded drawer; misaligned slides; loose hardware. | Reduce drawer contents. Check and adjust drawer slide alignment. Tighten all drawer hardware. |
| La commode semble instable | Loose assembly; anti-tip kit not installed or improperly installed. | Re-tighten all assembly hardware. Ensure the anti-tip kit is correctly installed and secured to a wall stud. |
8. Spécifications
- Marque: BEWISHOME
- Nom du modèle : KCG02M
- Matériel: Bois d'ingénierie
- Type de finition: Peint
- Dimensions du produit (P x L x H) : 15.75" x 47.25" x 32.3"
- Nombre de tiroirs: 6
- Poids de l'article : 90.4 livres
- Type de montage : Montage au sol
- Fonctionnalités supplémentaires : Multi-color LED lights, Integrated Charging Station (2 USB ports, 2 AC outlets)
- Couleur: Blanc
- Type de chambre: Bedroom, Entryway, Hallway, Home Office, Living Room
- Instructions d'entretien du produit : Essuyer avec un chiffon sec
- Assemblage requis : Oui

Figure 8.1: Detailed dimensional drawing of the dresser, including overall measurements and individual drawer dimensions.
9. Garantie et assistance
For any questions, concerns, or to report missing/damaged parts, please contact BEWISHOME customer support. While specific warranty details are not provided in this manual, please retain your proof of purchase for any potential claims.
Vous trouverez souvent les coordonnées du vendeur sur l'emballage du produit ou sur le site du détaillant. website où le produit a été acheté.