1. Introduction
Merci pour votre achatasing the MLWSHR Digital LED Alarm Clock Model 8808. This device combines a digital alarm clock with a thermo-hygrometer, offering dual alarms, snooze function, date and year display, 12/24 hour switch, weekday settings, Daylight Saving Time (DST) functionality, auto-dimmable display with three brightness levels, and a convenient 5V1A USB output for charging other devices. Please read this manual carefully to ensure proper use and maintenance of your new alarm clock.
2. Consignes de sécurité
- Tenez l'appareil à l'écart de l'eau et des environnements à forte humidité.
- N’exposez pas l’appareil à des températures extrêmes ou à la lumière directe du soleil pendant des périodes prolongées.
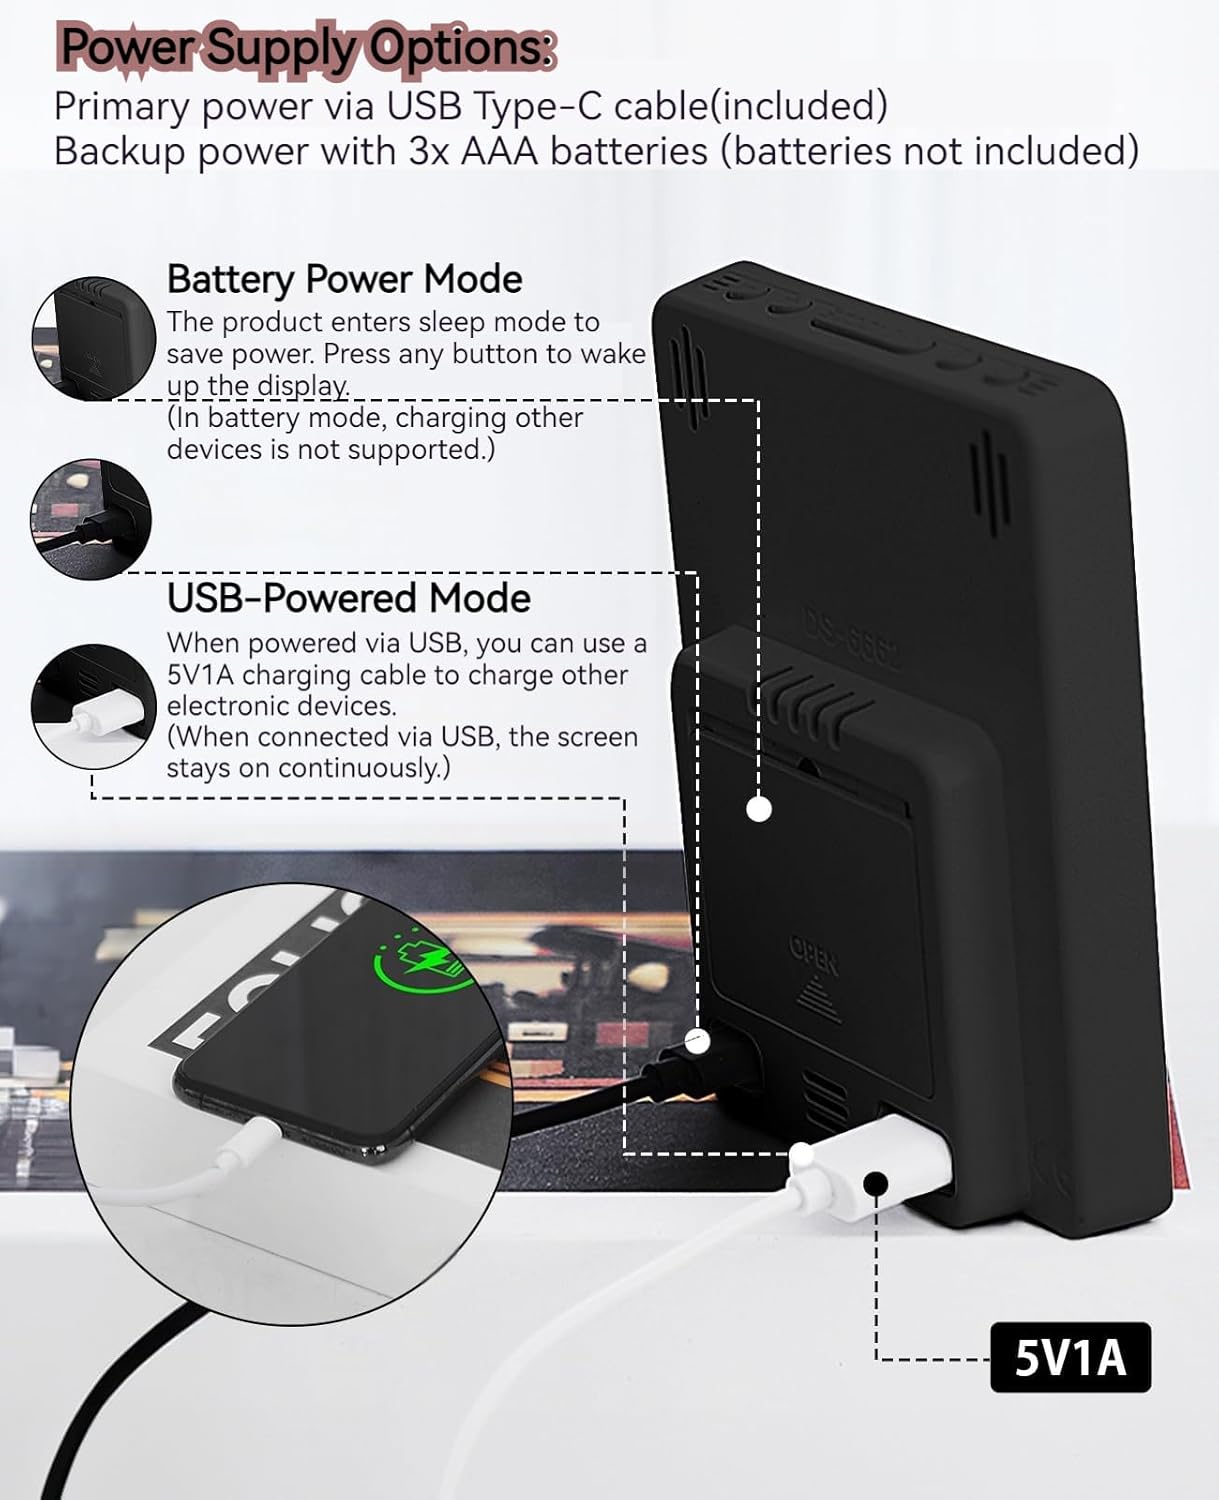
- Use only the provided USB Type-C cable for power.
- N’essayez pas de démonter ou de réparer l’appareil vous-même. Contactez le service client en cas de problème.
- Ensure proper ventilation when using the USB output to charge other devices.
3. Contenu du colis
- MLWSHR Digital LED Alarm Clock Model 8808
- Câble d'alimentation USB de type C
- Manuel d'utilisation
4. Produit terminéview
Familiarisez-vous avec les principaux composants et commandes de votre réveil.
This image displays the front of the MLWSHR Digital LED Alarm Clock, highlighting the time display, weekday indicators, temperature in Celsius, humidity percentage, and dual alarm icons. It also points to the Daylight Saving Time (DST) indicator.

This image illustrates the side and back of the alarm clock, detailing the USB Type-C input for primary power, the battery compartment for 3x AAA backup batteries (not included), and the USB-A output (5V1A) for charging other devices. It also shows the control buttons located on the top edge.
Contrôles :
- Bouton de réglage: Permet d'accéder au mode de réglage de l'heure, de la date et des alarmes.
- Bouton HAUT (+) : Augmente les valeurs lors du réglage, ajuste la luminosité.
- Bouton BAS (-) : Diminue les valeurs lors du réglage, ajuste la luminosité.
- Bouton SNOOZE/LUMIÈRE : Active la fonction de répétition d'alarme, ajuste la luminosité de l'écran.
- Bouton ALARME 1 : Activates/deactivates Alarm 1, enters Alarm 1 setting.
- Bouton ALARME 2 : Activates/deactivates Alarm 2, enters Alarm 2 setting.
- Bouton 12/24 heures : Permet de basculer entre les formats d'affichage de l'heure 12 heures et 24 heures.
- Touche °C/°F : Switches between Celsius and Fahrenheit temperature display.
5. Installation
5.1 Alimentation
The MLWSHR Digital LED Alarm Clock can be powered in two ways:
- Primary Power (USB Type-C): Connect the provided USB Type-C cable to the clock's input port and plug the other end into a 5V1A USB power adapter (not included). When powered via USB, the display will remain continuously on.
- Backup Power (3x AAA Batteries): Insert 3 AAA batteries (not included) into the battery compartment on the back of the clock. In battery-only mode, the display will enter sleep mode to conserve power. Press any button to temporarily activate the display. Note that the USB output for charging other devices is not supported when operating on battery power alone.
5.2 Réglage initial de la date et de l'heure
After connecting power, the clock will typically display a default time. To set the correct time and date:
- Appuyez et maintenez enfoncé le ENSEMBLE Appuyez sur le bouton pendant 3 secondes pour accéder au mode de réglage de l'heure. Les chiffres des heures clignoteront.
- Utilisez le HAUT (+) or VERS LE BAS (-) boutons pour régler l'heure.
- Presse ENSEMBLE Confirmez à nouveau l'heure et passez au réglage des minutes. Les chiffres des minutes clignoteront.
- Utilisez le HAUT (+) or VERS LE BAS (-) boutons pour régler les minutes.
- Continuez à appuyer ENSEMBLE to cycle through and set the Year, Month, and Day using the HAUT (+) or VERS LE BAS (-) boutons de réglage.
- Après avoir réglé le jour, appuyez sur ENSEMBLE une dernière fois pour quitter le mode de réglage.
6. Mode d'emploi
6.1 Commutation du format 12/24 heures
Appuyez sur le 12/24H bouton permettant de basculer entre les formats d'heure 12 heures (avec indicateur AM/PM) et 24 heures.
This video demonstrates various features of the MLWSHR Digital LED Alarm Clock, including the time, temperature, humidity, weekday display, auto/manual brightness adjustment, 12/24 hour switch, and the easy-to-use buttons and USB-C input/USB-A output.
6.2 Réglage des alarmes (Alarme 1 et Alarme 2)
The clock features two independent alarms. Each alarm can be set for specific days of the week (Monday-Friday, Monday-Saturday, or Monday-Sunday).

This image illustrates the dual alarm functionality, showing how each alarm can be customized to ring on specific days of the week: Monday to Friday, Monday to Saturday, or every day. It highlights the alarm icons and weekday indicators on the display.
- Appuyez sur le ALARME 1 or ALARME 2 button to select the desired alarm. The alarm icon will appear on the display.
- Press and hold the selected ALARME button for 3 seconds to enter alarm setting mode. The hour digits will flash.
- Utilisez le HAUT (+) or VERS LE BAS (-) boutons pour régler l'heure de l'alarme.
- Appuyez sur le ALARME Appuyez à nouveau sur le bouton pour confirmer l'heure et passer au réglage des minutes.
- Utilisez le HAUT (+) or VERS LE BAS (-) boutons pour régler les minutes de l'alarme.
- Appuyez sur le ALARME button again to set the alarm frequency (e.g., Mon-Fri, Mon-Sat, Mon-Sun). Use HAUT (+) or VERS LE BAS (-) pour sélectionner.
- Appuyez sur le ALARME Appuyez une dernière fois sur le bouton pour quitter le mode de réglage de l'alarme.
- To turn an alarm ON or OFF, simply press the corresponding ALARME 1 or ALARME 2 button briefly. The alarm icon will appear (ON) or disappear (OFF) from the display.
6.3 Fonction de répétition
When an alarm sounds, you can activate the snooze function for a temporary delay.

This image shows the clock's snooze button and how it functions. When the alarm rings, a brief press of the snooze button will delay the alarm for 5 minutes. Holding the button for more than two seconds will turn off the alarm for that day.
- Lorsque le réveil sonne, appuyez sur la touche SNOOZE / LUMIÈRE button briefly. The alarm will pause and ring again after 5 minutes.
- To turn off the alarm for the current day, press and hold the SNOOZE / LUMIÈRE button for more than 2 seconds, or press any other button (except SNOOZE / LUMIÈRE).
6.4 Réglage de la luminosité
The clock features an auto-dimmable display and three manual brightness levels.
- Intensité automatique : The built-in light sensor automatically adjusts the display brightness based on ambient light conditions. This is the default setting.
- Luminosité manuelle : Appuyez brièvement sur la touche SNOOZE / LUMIÈRE button to cycle through 3 manual brightness levels (L-01, L-02, L-03).
- To return to auto-dimmable mode, continue pressing the SNOOZE / LUMIÈRE button until 'L-AU' appears on the display.
6.5 Thermometer & Hygrometer
The clock displays indoor temperature and humidity levels.

This image highlights the temperature and humidity readings on the clock's display. It also provides guidance on ideal humidity levels and suggests actions (humidifier/dehumidifier) if levels are too low or too high. The temperature detection range is 23°F to 122°F (-5°C to 50°C) with an error margin of ±2°F.
- Commutateur d'unité de température : Appuyez sur le ° C / ° F button to switch between Celsius and Fahrenheit temperature display.
- The temperature range is 23°F to 122°F (-5°C to 50°C) with an error margin of ±2°F.
- The humidity measurement error is within ±5%.
6.6 USB Power Output (5V1A)
The clock features a USB-A output port (5V1A) that can be used to charge other electronic devices.

This image demonstrates the use of the clock's USB-A output port to charge a smartphone. The clock provides a 5V1A output, making it a convenient charging station. This feature is only available when the clock is powered via its USB Type-C input.
- Connect your device's charging cable to the USB-A output port on the back of the alarm clock.
- Ensure the alarm clock is powered via its USB Type-C input for this feature to function. The USB output is not active when the clock is running on battery power alone.
6.7 Heure d'été (DST)
The clock supports Daylight Saving Time adjustment.
- Pour activer ou désactiver l'heure d'été, appuyez longuement sur le bouton. Heure d'été button (if available, or refer to the SET button sequence for DST in specific models). The DST indicator will appear or disappear.
7. Entretien
- Nettoyez l'horloge avec un chiffon doux et sec. N'utilisez pas de produits nettoyants abrasifs ni de solvants.
- Si l'horloge n'est pas utilisée pendant une période prolongée, retirez les piles AAA pour éviter les fuites.
- Keep the USB ports free from dust and debris.
8. Dépannage
| Problème | Cause possible | Solution |
|---|---|---|
| Display is off or intermittent. | Running on battery power in sleep mode, or no power. | Press any button to activate display in battery mode. Connect USB Type-C cable for continuous display. Check USB power source. |
| USB output not charging devices. | Clock is running on battery power, or USB cable is faulty. | Ensure the clock is connected to primary USB Type-C power. Try a different USB cable. |
| L'alarme ne sonne pas. | L'alarme n'est pas activée ou est mal réglée. | Check if the alarm icon is displayed. Re-set the alarm time and frequency. |
| La mesure de température est inexacte. | Environmental factors or sensor error. | Allow time for the sensor to stabilize. Ensure the clock is not near heat sources or vents. Note the ±2°F error margin. |
| Cannot set time/date. | Not in setting mode, or buttons are unresponsive. | Press and hold the SET button for 3 seconds. Ensure the clock has stable power. |
9. Spécifications
- Marque: MLWSHR
- Numéro de modèle : 8808
- Type d'affichage : DIRIGÉ
- Source d'alimentation : USB Type-C (5V1A) / 3x AAA Batteries (backup)
- Dimensions du produit : 3.54 po L x 4.72 po H
- Caractéristiques: Dual Alarms, Snooze, Thermo-Hygrometer, Date & Year Display, 12/24 Hour Switch, Weekdays, DST, Auto Dimmable (3 levels), USB Output (5V1A)
- Matériel: Plastique écologique
- Utilisation intérieure/extérieure : Intérieur
10. Garantie et assistance
The MLWSHR Digital LED Alarm Clock Model 8808 comes with a Garantie d'un an à compter de la date d'achat. Cette garantie couvre les défauts de fabrication et les dysfonctionnements dans des conditions normales d'utilisation.
For technical support, warranty claims, or any questions regarding your product, please contact MLWSHR customer service through the retailer's platform or visit our official webConsultez le site pour obtenir nos coordonnées. Veuillez vous munir de votre reçu d'achat et du numéro de modèle lorsque vous contactez l'assistance.