1. Plus deview
The AsiaHorse Pegasus Micro ATX PC Case is designed for enthusiasts seeking a blend of aesthetic appeal and functional performance. It features a unique 270° panoramic tempered glass design, providing an unobstructed view of your internal components. Engineered for optimal airflow, this case supports various cooling configurations to maintain stable system performance. Its spacious interior accommodates diverse DIY needs, simplifying component installation and cable management.

Figure 1: AsiaHorse Pegasus Micro ATX PC Case showcasing its panoramic view and internal lighting.
Caractéristiques principales :
- 270° Curved Panoramic Glass Design: Offers an immersive, unobstructed view of internal components and RGB lighting effects.
- Optimized Airflow System: Features 9 strategically placed fan mounts for efficient cooling and stable performance.
- Spacious Customizable Interior: 50% larger than standard Micro ATX cases, providing ample room for wire management, component installation, and water cooling solutions.
- Rich I/O Ports: Includes 1x USB 3.0, 1x USB 2.0, and 1x Type-C 3.2 port for fast data transfer and broad compatibility.
- Construction durable : Made of high-quality SPCC steel and thickened tempered glass for stability and protection of valuable PC components.

Figure 2: The 270° curved tempered glass panel provides a seamless view.

Figure 3: Optimized airflow design for efficient cooling.
2. Configuration et installation
This section provides a general guide for assembling your PC components within the AsiaHorse Pegasus case. For detailed visual instructions, please refer to the official assembly video below.
2.1 Étapes d'installation des composants
- Préparer le dossier : Carefully remove the tempered glass side panels. The case features a mortise and tenon structure for tool-free removal and installation of side panels.
- Install Motherboard and CPU: Secure your Micro ATX or ITX motherboard into the case. Install the CPU and RAM onto the motherboard before mounting it in the case.
- Installer le refroidisseur de processeur : Apply thermal paste to the CPU. If using an AIO liquid cooler, attach the fans to the radiator and then mount the radiator to the designated top or side fan mounts. Ensure the combined thickness of the water cooling unit and fan does not exceed 52mm when installing at the top. If it exceeds, install the motherboard and CPU power cable first, then the water cooling.
- Installer les ventilateurs : Mount additional case fans in the designated positions (Top, Bottom, Side, Rear) as per your cooling strategy.
- Installer l'alimentation électrique (PSU) : Slide the PSU into its bottom-mounted compartment and secure it with screws.
- Installer les disques de stockage : Mount 2.5" SSDs and 3.5" HDDs in their respective drive bays.
- Installer la carte graphique (GPU) : Insert your GPU into the appropriate PCIe slot and secure it. The case supports GPUs up to 400mm in length and 180mm in height.
- Gestion des câbles: Utilize the ultra-sized rear cavity for easy cable management, ensuring a clean build and improved airflow. Use cable ties or the provided cable combs for a tidy setup.
- Connecter les câbles : Connect all necessary power and data cables to your components.
- Réassembler le boîtier : Reattach the side panels and ensure all connections are secure.
Video 1: Official AsiaHorse Pegasus PC Case Assembly Video Demo. This video provides a step-by-step visual guide for installing components into the case.

Figure 4: Powerful space layout illustrating component compatibility and dimensions.

Figure 5: Mortise and tenon structure for swift assembly and disassembly.
3. Utilisation de votre boîtier PC
Once your PC is assembled, the AsiaHorse Pegasus case facilitates optimal operation through its design features.
3.1 Flux d'air et refroidissement
The case is engineered with an optimized airflow system to ensure excellent cooling efficiency. The strategic placement of fan mounts (Top, Bottom, Side, Rear) allows for efficient intake of cool air and expulsion of hot air, crucial for stable performance during demanding tasks. Ensure fans are installed in the correct orientation for optimal airflow (intake vs. exhaust).

Figure 6: Airflow diagram illustrating the case's cooling capabilities.
3.2 Ports d'E/S avant
The front I/O panel provides convenient access to essential ports for your peripherals:
- 1 port USB 3.0 : Pour un transfert de données rapide avec les appareils compatibles.
- 1 port USB 2.0 : Suitable for connecting mice, keyboards, and other standard peripherals.
- 1x Type-C 3.2: Offers faster transfer speeds and stronger compatibility with modern Type-C devices.
- Audio HD : Pour les connexions casque et microphone.
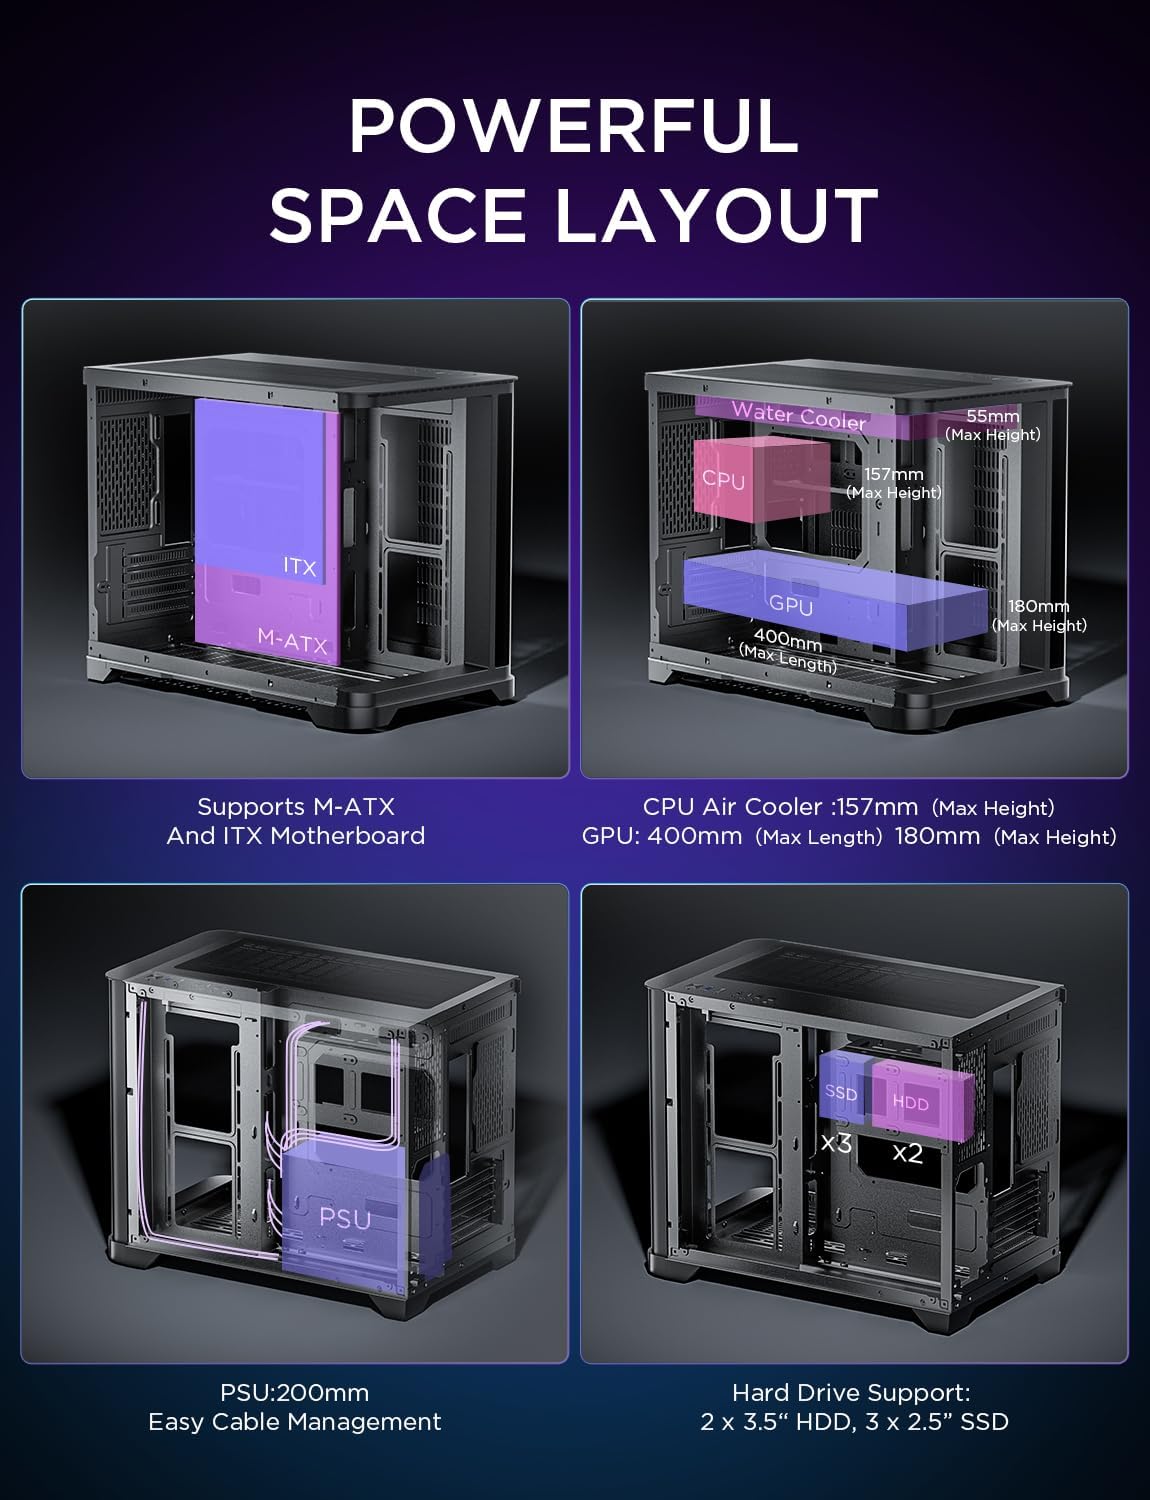
Figure 7: Front I/O panel with USB 3.0, USB 2.0, and Type-C ports.
4. Entretien
Regular maintenance ensures the longevity and optimal performance of your PC and case.
4.1 Nettoyage du filtre à poussière
The AsiaHorse Pegasus case incorporates multiple dust-proof designs, including magnetic dust filters and a pull-out bottom dust filter, to keep your PC case spotless. Regularly clean these filters to prevent dust buildup, which can impede airflow and lead to overheating.
- Filtres à poussière magnétiques : Easily remove the magnetic filters located on the top and other intake areas.
- Pull-Out Bottom Dust Filter: The bottom filter can be conveniently pulled out for cleaning without disassembling the entire case.
Gently clean the filters with a soft brush or rinse them with water (ensure they are completely dry before reinstallation). This simple routine will help maintain optimal cooling performance.

Figure 8: Multiple dust-proof designs for easy maintenance.
5. Dépannage
This section addresses common issues you might encounter. For more complex problems, please refer to the manuals of individual components or contact customer support.
5.1 Absence d'alimentation / Système ne démarrant pas
- Vérifiez les connexions électriques : Ensure the power supply unit (PSU) is properly connected to the wall outlet and the power switch on the PSU is in the 'ON' position. Verify all internal power cables (24-pin motherboard, CPU, GPU, etc.) are securely seated.
- Connecteurs du panneau avant : Double-check that the front panel power switch connector is correctly attached to the motherboard's header pins.
- Sièges composants : Reseat the RAM modules, graphics card, and any other expansion cards to ensure they are properly installed.
5.2 Problèmes de surchauffe
- Vérifiez le fonctionnement du ventilateur : Vérifiez que tous les ventilateurs du boîtier et ceux du refroidisseur de processeur tournent correctement.
- Nettoyer les filtres à poussière : Refer to the Maintenance section (4.1) for cleaning dust filters.
- Check Thermal Paste: Ensure the CPU cooler has adequate thermal paste applied and is making proper contact with the CPU.
- Orientation des fans : Confirm that intake and exhaust fans are oriented correctly to create effective airflow.
5.3 Ports d'E/S avant non fonctionnels
- Check Motherboard Connections: Ensure the USB and audio cables from the front I/O panel are correctly connected to the corresponding headers on your motherboard.
- Installation du pilote : Verify that the necessary motherboard drivers, especially for USB and audio, are installed.
6. Spécifications
| Fonctionnalité | Spécification |
|---|---|
| Dimensions (L × l × H) | 453 mm × 280 mm × 377 mm (17.83 x 11.02 x 14.84 pouces) |
| Compatibilité de la carte mère | Micro ATX, ITX |
| Type de cas | Mid Tower |
| Matériel | Acier SPCC, verre trempé |
| Longueur maximale du GPU | 400 mm |
| Hauteur maximale du GPU | 180mm (with 4 horizontal PCIe slots) |
| Hauteur maximale du refroidisseur de processeur | 157 mm |
| Longueur maximale du bloc d'alimentation | 200 mm |
| Support de radiateur (supérieur) | 360mm / 240mm |
| Support de radiateur (côté) | 240mm / 120mm |
| Soutien des fans | Top (3x 120mm), Bottom (3x 120mm), Side (2x 120mm), Back (1x 120mm) |
| Baies de lecteur | 2x 3.5" HDD + 3x 2.5" SSD |
| Ports d'E / S avant | 1x USB 3.0, 1x USB 2.0, 1x Type-C 3.2, HD Audio |
| Poids de l'article | 3 livres |
Video 2: AsiaHorse MATX PC Case showcasing its dimensions and features.
7. Garantie et assistance
AsiaHorse is committed to providing high-quality products. For specific warranty details, please refer to the warranty card included with your product or visit the official AsiaHorse website. If you encounter any issues or require technical assistance, please contact AsiaHorse customer support through their official channels.
Pour plus d’informations et d’assistance, veuillez visiter le Boutique AsiaHorse sur Amazon.