sainlogic SC088black
Manuel d'utilisation de la station météo Sainlogic
Model: SC088black
Marque : Sainlogic
Introduction
The Sainlogic Wireless Indoor Outdoor Weather Station provides comprehensive real-time weather data for your home and garden. This advanced system monitors various environmental factors, including temperature, humidity, wind speed and direction, rainfall, and air pressure. Designed for ease of use and accurate readings, it helps you stay informed about local weather conditions, aiding in planning outdoor activities and understanding weather patterns.

Figure 1: Sainlogic Weather Station Display Console and Outdoor Sensor.
Installation
Setting up your Sainlogic Weather Station is a straightforward process. Follow these steps to ensure proper functionality and accurate data collection.
1. Déballage et identification des composants
Carefully unbox all components and verify that all parts are present:
- Console d'affichage
- 5-in-1 Outdoor Sensor (Rain Gauge, Solar Panel, Wind Vane, Anemometer, Thermohygrometer Radiation Shield)
- Support de montage et vis
- Adaptateur secteur pour console d'affichage
- Manuel d'utilisation
Vidéo 1 : Terminéview of the Sainlogic Weather Station components and features.
2. Alimentation de la console d'affichage
The display console can be powered by the included power adapter or by 3 AAA batteries (not included) for backup. For continuous operation and optimal display brightness, it is recommended to use the power adapter.
- Connect the power adapter to the console and plug it into a wall outlet.
- (Optional) Insert 3 AAA batteries into the battery compartment on the back of the console.

Figure 2: Powering the Display Console using the power adapter and optional AAA batteries.
3. Installation du capteur extérieur
The 5-in-1 outdoor sensor is designed for flexible placement with a 328-ft wireless range. Choose a location that is open and free from obstructions to ensure accurate readings for wind, rain, and temperature.
- Install batteries in the outdoor sensor (refer to the sensor's specific instructions for battery type and placement).
- Mount the outdoor sensor using the included bracket and screws. Ensure it is level for accurate rain and wind direction readings.
- Ideal locations include a pole in an open area, a fence post, or a rooftop.
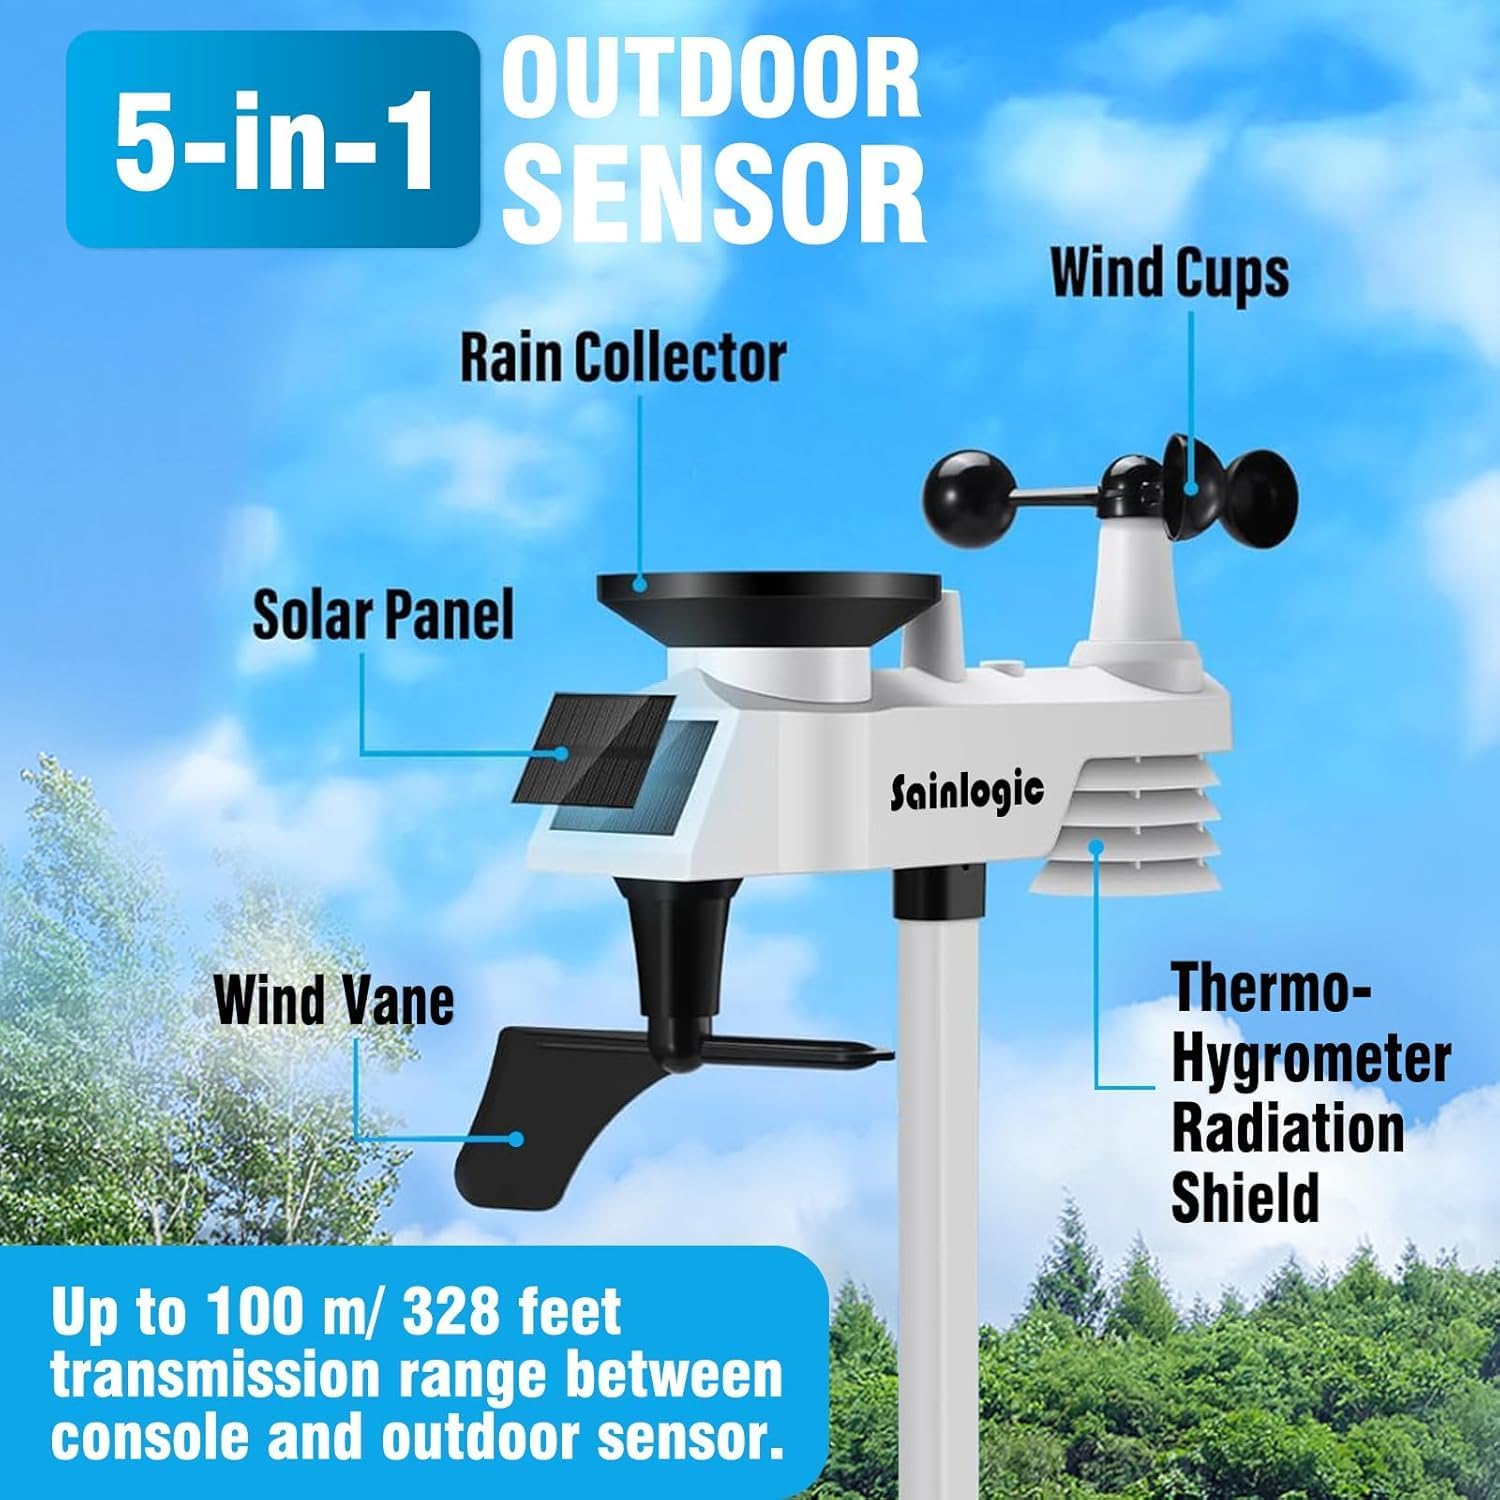
Figure 3: Components of the 5-in-1 Outdoor Sensor, including rain collector, solar panel, wind vane, anemometer, and thermohygrometer radiation shield.

Figure 4: Various installation options for the outdoor sensor, demonstrating its 328-foot transmission range.
4. Sensor and Console Pairing
Once both the console and sensor are powered on, they should automatically pair. If pairing does not occur, refer to the detailed user manual for specific troubleshooting steps, which usually involve resetting both units and bringing them closer together temporarily.
Mode d'emploi
The 7.5-inch LCD display console provides a clear and organized view of all weather data. Familiarize yourself with the display layout and button functions for optimal use.

Figure 5 : Détaillé view of the display console, highlighting indoor/outdoor temperature, humidity, wind speed/direction, barometric pressure, rainfall, and moon phase.
Caractéristiques d'affichage :
- Température et humidité intérieures/extérieures : Real-time readings for both inside and outside environments.
- Vitesse et direction du vent : Displays current wind speed (gust and average) and direction via a compass rose.
- Pression barométrique: Shows current air pressure, which can indicate weather trends.
- Précipitations : Tracks daily, weekly, or monthly rainfall accumulation.
- Prévisions météorologiques: Provides a visual forecast based on barometric pressure changes.
- Phase de lune: Indique la phase lunaire actuelle.
- Heure Date: Automatically updates for convenience.
Réglage de la luminosité de l'affichage :
The 7.5-inch LCD screen features adjustable backlighting with three levels (100%, 80%, 60%) to ensure clear readability in various lighting conditions, day or night.

Figure 6: Illustration of the three-level dimming feature for the display console.
Réglage des alarmes :
The weather station supports multiple alarm modes for various weather parameters, allowing you to set alerts for specific conditions such as high/low temperature, wind gust, or rainfall thresholds.

Figure 7 : Plusview of various alarm modes available on the weather station.
Entretien
Regular maintenance ensures the longevity and accuracy of your Sainlogic Weather Station.
Capteur extérieur :
- Nettoyage du pluviomètre : Unscrew and remove the rain collector funnel every 3 months or as needed to clean out any debris or insects. This ensures accurate rainfall measurements.
- Checking Wind Sensors: Periodically inspect the wind cups and wind vane for any obstructions or damage. Ensure they spin freely.
- Remplacement de la batterie : Replace batteries in the outdoor sensor as needed. Low battery indicators will appear on the display console.
Console d'affichage :
- Nettoyage: Wipe the display screen and console body with a soft, damp chiffon. Évitez les nettoyants abrasifs.
- Source d'alimentation : Ensure the power adapter is securely connected. If using backup batteries, replace them when the low battery indicator appears.
Dépannage
If you encounter issues with your weather station, try these common troubleshooting steps:
- Aucune donnée extérieure affichée :
- Check batteries in the outdoor sensor and console. Replace if low.
- Ensure the outdoor sensor is within the 328-ft transmission range and free from major obstructions (thick walls, large metal objects, high voltage lignes).
- Try resetting both the outdoor sensor and the display console (refer to the full user manual for specific reset procedures).
- Lectures inexactes :
- Température/Humidité : Ensure the outdoor sensor is not in direct sunlight or near heat sources. The radiation shield helps, but extreme conditions can affect readings.
- Vitesse et direction du vent : Verify the outdoor sensor is mounted securely and level, and that the wind cups and vane are unobstructed and spinning freely.
- Précipitations : Check the rain collector funnel for debris. Ensure the sensor is level.
- Problèmes d'affichage :
- If the display is dim, ensure the power adapter is connected or replace batteries.
- If the display is frozen, try restarting the console by removing and reinserting batteries/power.
For more detailed troubleshooting, please consult the complete user manual or contact Sainlogic customer support.
Caractéristiques
| Fonctionnalité | Spécification |
|---|---|
| Marque | sainlogic |
| Numéro de modèle | SC088noir |
| Plage de température extérieure | -40°C à +60°C (-40°F à +140°F) |
| Plage de température intérieure | 0°C à +60°C (32°F à +140°F) |
| Taux d'humidité | 10%-99% HR |
| Vitesse du vent | Jusqu'à 112 mph |
| Direction du vent | 0-360° |
| Précipitations | 0-9999mm |
| Pression atmosphérique | 300 à 1100 hPa |
| Portée de transmission sans fil | Jusqu'à 328 pieds (100 m) |
| Type d'affichage | LCD avec rétroéclairage réglable |
| Source d'alimentation (console) | Power Adapter (included), 3 AAA batteries (not included) |
| Matériel | Acrylonitrile butadiène styrène (ABS) |
| Dimensions du produit (console) | 0.98"P x 7.3"L x 5.9"H |
Garantie et assistance
Sainlogic offers a warranty for its weather station products. You may be eligible to activate and claim a 1-year free extension to your warranty. Please refer to the warranty card included in your product packaging or visit the official Sainlogic website for details on how to activate your warranty.
For technical support, troubleshooting assistance, or warranty claims, please contact Sainlogic customer service through their official channels. Contact information can typically be found in the user manual or on the brand's website.
Ressources en ligne :
- Official Sainlogic Website: www.sainlogic.com (Remarque : ceci est un espace réservé) URLVeuillez vous référer à la documentation produit pour plus de précisions. URL)
- Manuel d'utilisation (PDF) : Télécharger le manuel d'utilisation
Ask a question about this manual
Ask about setup, troubleshooting, compatibility, parts, safety, or missing instructions. Manuals+ will review the question and use this page’s manual context to help answer it.