1. Mise en place et préparation initiale
This section guides you through the initial setup of your POOLIN EOC06 Embroidery Machine, ensuring it is ready for operation.
1.1 Déballage et inspection
Carefully remove all components from the packaging. Verify that all items listed in the packing list are present and undamaged. Report any missing or damaged parts to customer support immediately.
1.2 Placement des machines
Place the embroidery machine on a stable, flat surface that can support its weight (approximately 35 pounds). Ensure there is adequate space around the machine for operation and maintenance, including clearance for the embroidery arm and hooping area.

Figure 1.1 : The POOLIN EOC06 Embroidery Machine, illustrating its approximate dimensions of 23 inches deep, 27 inches wide, and 12.5 inches high. This image helps in planning the placement of the machine.
1.3 Connexion d'alimentation
Connect the power cord to the machine's power input and then to a suitable electrical outlet. Ensure the power switch is in the 'Off' position before connecting to power.
1.4 Attaching the Embroidery Arm and Hoops
Attach the embroidery arm to the machine as per the instructions in the included quick start guide. The machine comes with multiple hoop sizes: two 5.5x5.5 inch hoops, one 8x8 inch hoop, and one 7.9x11 inch hoop. Select the appropriate hoop for your design and attach it securely to the embroidery arm.
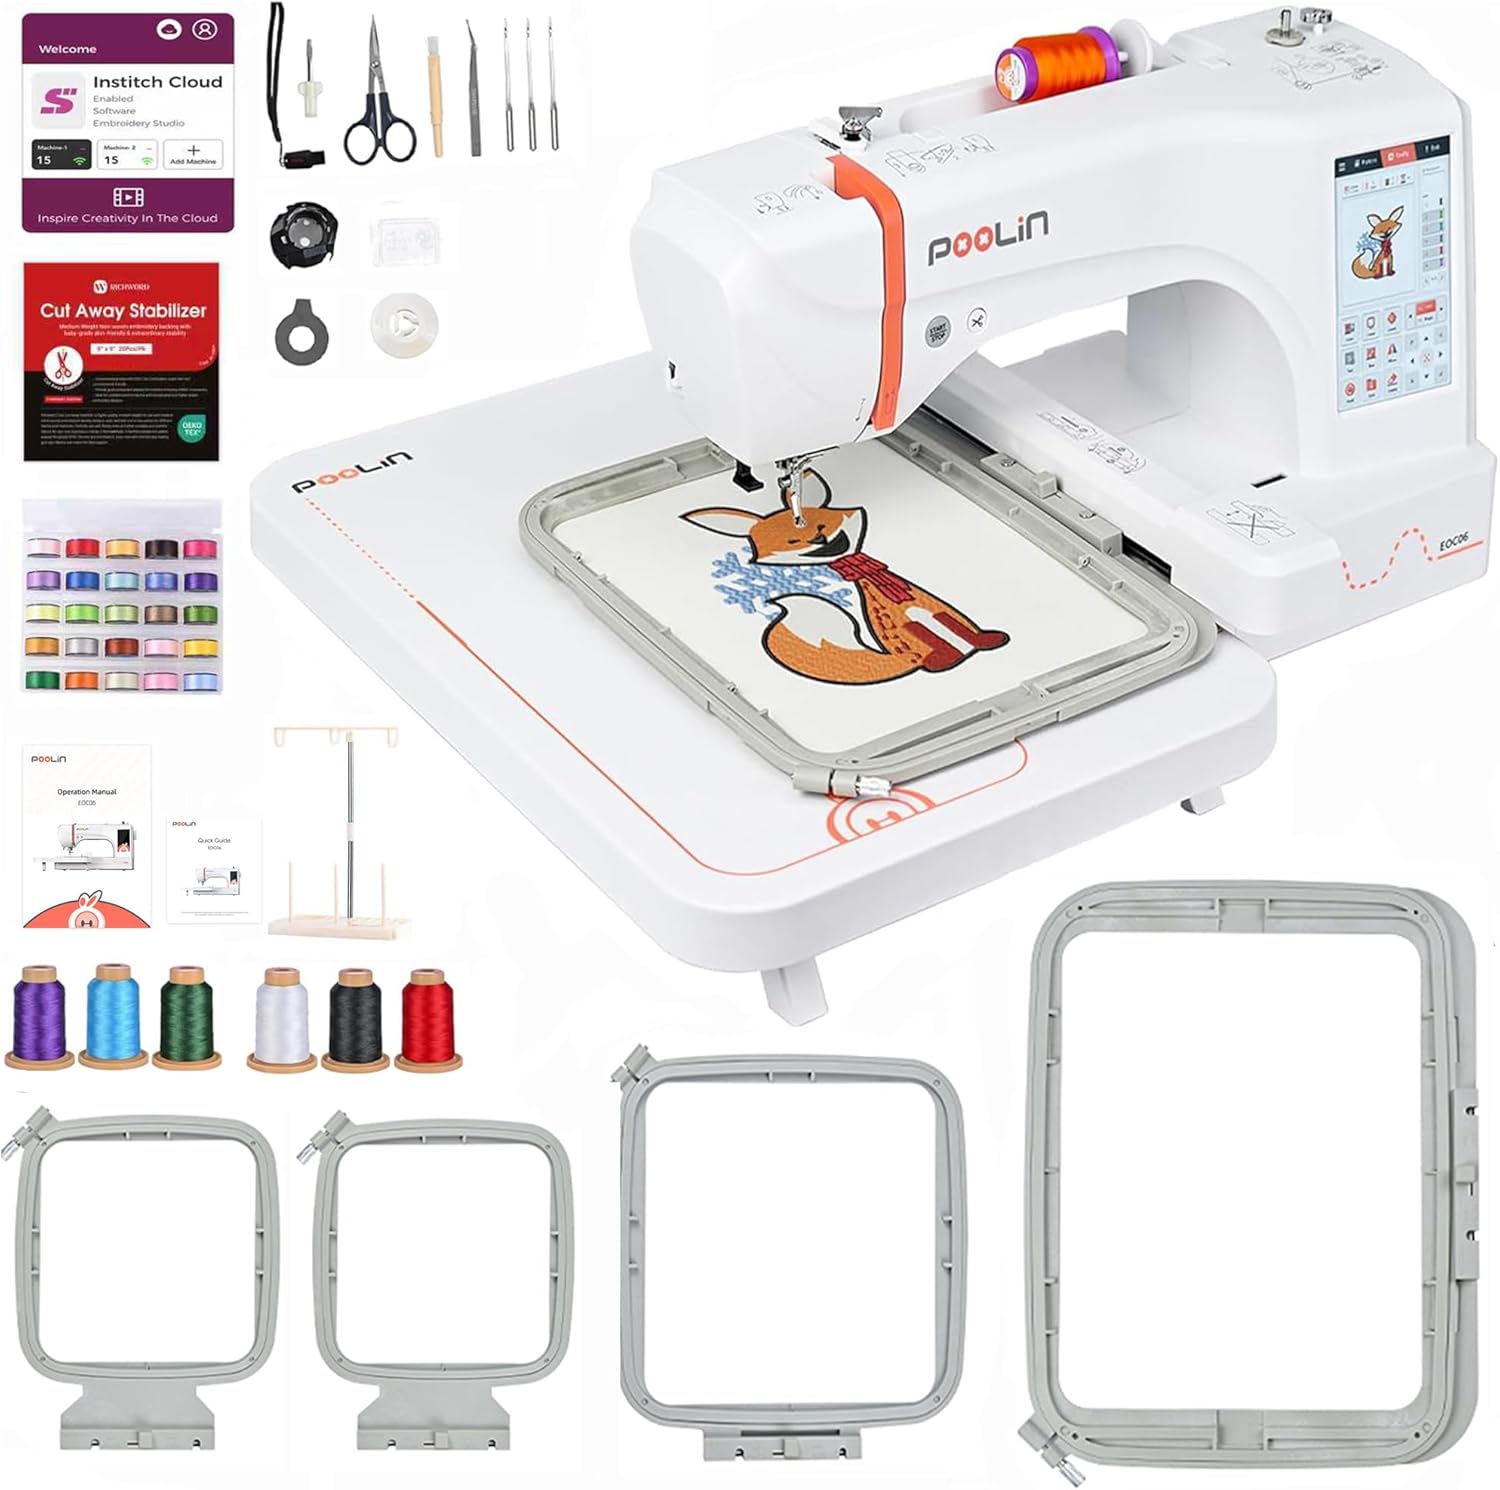
Figure 1.2 : Un plusview of the POOLIN EOC06 Embroidery Machine along with its included accessories, such as different sized hoops, threads, and tools. This image provides a visual reference for all components.
1.5 Enfilage de la machine
Follow the threading path indicated on the machine for the upper thread. Ensure the thread is correctly seated in all guides and tension discs. Wind the bobbin with the desired bobbin thread and insert it into the bobbin case according to the machine's instructions. The machine features an automatic needle threader for convenience.
1.6 Stabilizer and Fabric Preparation
Always use an appropriate stabilizer for your fabric and design to ensure optimal stitch quality and prevent fabric puckering. Place the fabric and stabilizer securely within the chosen embroidery hoop, ensuring the fabric is taut but not stretched.

Figure 1.3 : A collection of essential embroidery supplies that come with the machine, including various hoops, spools of thread, and a package of cut-away stabilizer. These items are crucial for starting your embroidery projects.
2. Utilisation de la machine
This section details the steps for operating your POOLIN EOC06 Embroidery Machine, from selecting designs to initiating the embroidery process.
2.1 Powering On and Touchscreen Navigation
Turn on the machine using the main power switch. The 7-inch color touchscreen will illuminate, displaying the Institch i3 Computer System interface. Navigate through the menus by tapping the icons and options on the screen, similar to operating a mobile phone.

Figure 2.1 : Un détail view of the 7-inch LCD touchscreen, showing the user interface for pattern selection and configuration. The touch-sensitive screen allows for intuitive control and adjustment of embroidery settings.
2.2 Sélection et modification des motifs
The machine comes with 200 built-in patterns. You can select a pattern from the machine's library or import your own designs in DST or DSB format via USB or Wi-Fi. The touchscreen allows you to drag, resize, rotate, and combine patterns. You can also adjust colors for different sections of the design.
2.3 Broderie de lettres
The EOC06 supports letter embroidery with 8 built-in fonts. You can input text directly on the touchscreen, adjust the size, spacing, and angle of individual letters, and combine them with existing patterns.

Figure 2.2 : The machine's interface demonstrating the letter embroidery function, allowing users to input text, select fonts, and adjust various parameters for personalized designs.
2.4 Ajustement des paramètres
Before starting embroidery, review and adjust settings such as embroidery speed and thread tension. The machine features intelligent tension adjustment, which can be fine-tuned via the touchscreen to suit different fabric types and threads.
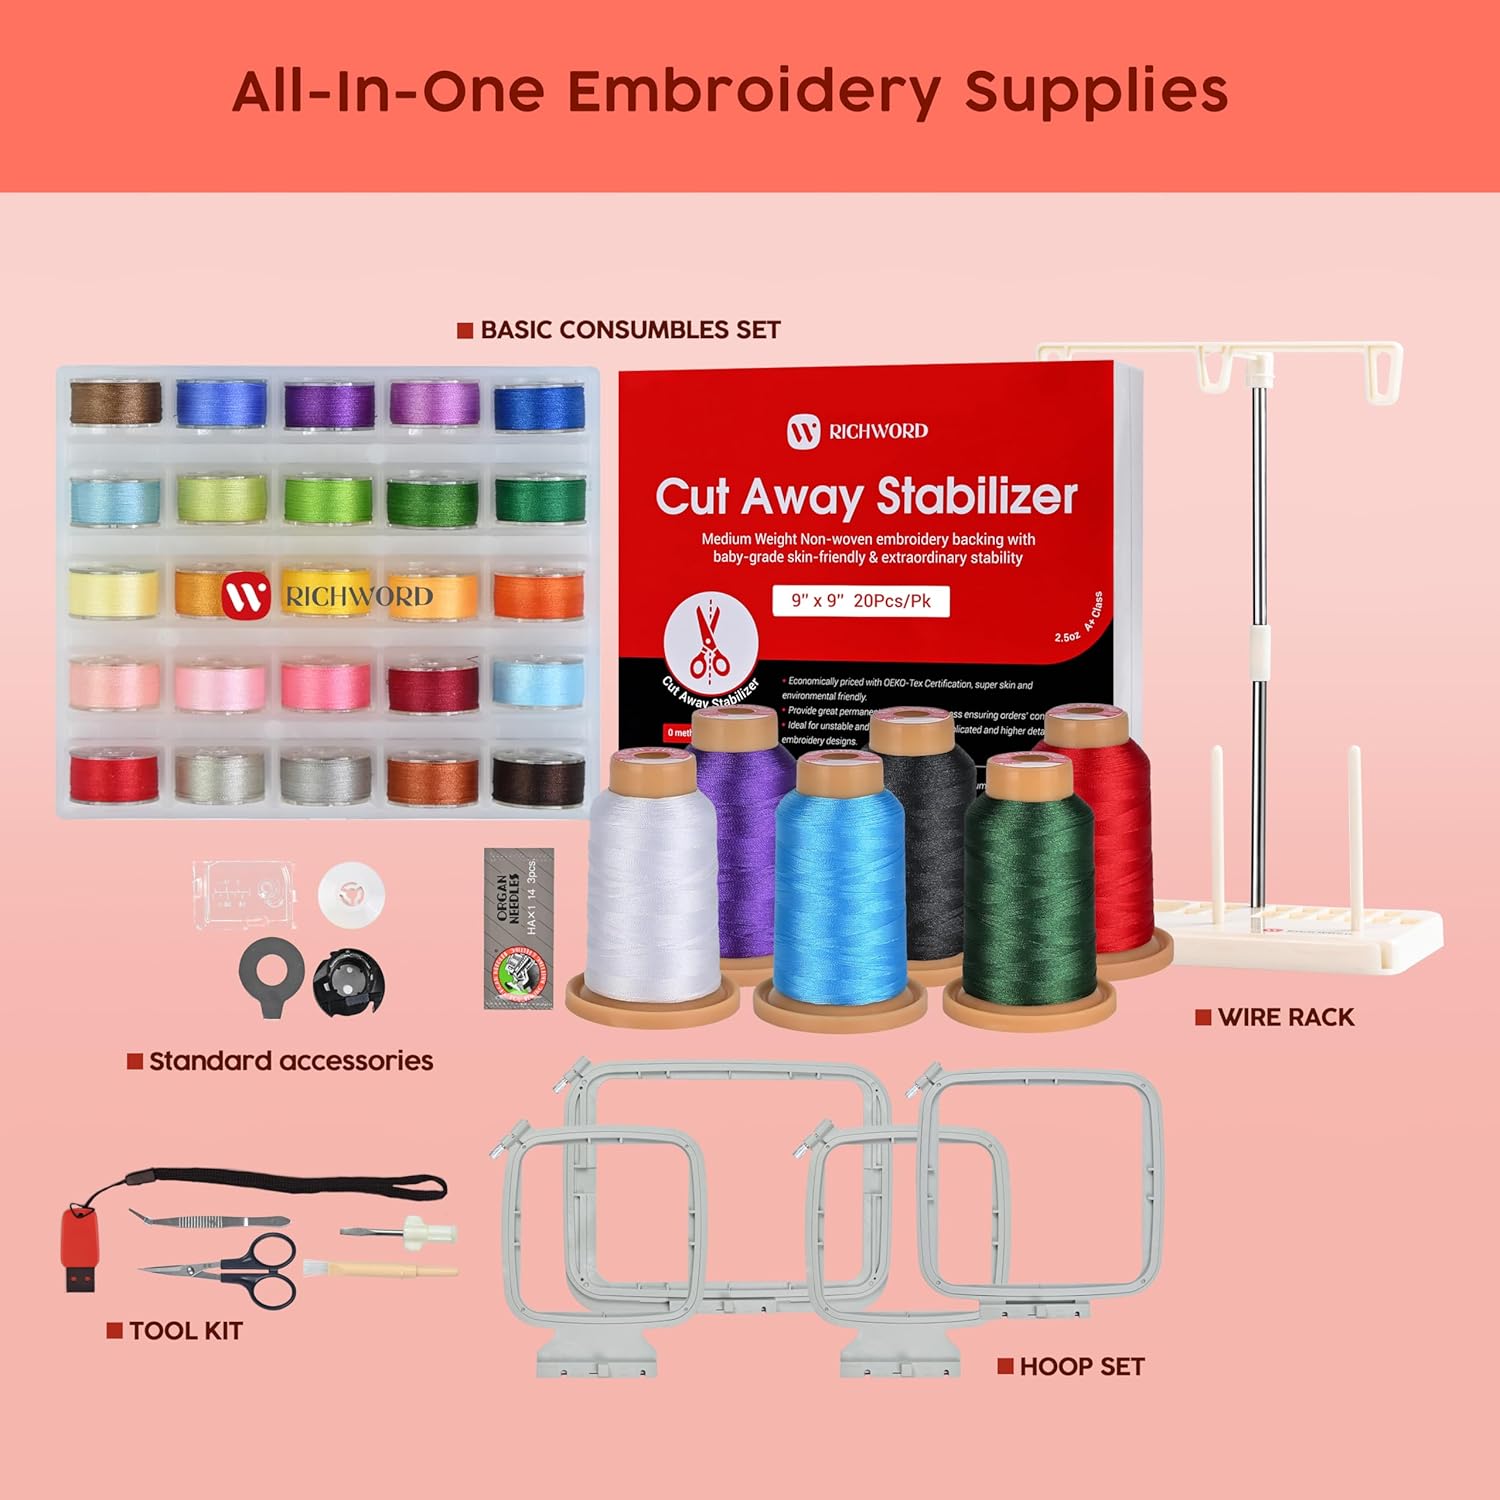
Figure 2.3 : An image showing the intelligent tension adjustment feature on the touchscreen, which allows precise control over thread tension for optimal stitch quality.
2.5 Starting and Monitoring Embroidery
Once your design is selected, edited, and the hoop is attached, press the 'Ready' button on the screen, then initiate the embroidery process. The machine will automatically begin stitching. Monitor the progress on the screen. The machine includes automatic thread trimming when one color embroidery is completed, simplifying multi-color designs.
3. Entretien
Regular maintenance ensures the longevity and optimal performance of your POOLIN EOC06 Embroidery Machine.
3.1 Nettoyage
After each use, especially after completing large projects, clean the machine to remove lint and dust accumulation. Use a small brush or vacuum cleaner attachment to clear the bobbin area, needle plate, and feed dogs. Avoid using compressed air directly into the machine, as it can push debris further inside.
3.2 Remplacement de l'aiguille
Replace the needle regularly, typically after 8-10 hours of embroidery or if you notice skipped stitches or thread breaks. Always use the correct needle type and size (e.g., size 90/14 for common fabrics) for your project. For thicker fabrics, consider using a coarser fabric needle.
3.3 Lubrification
Refer to the detailed instruction manual for specific lubrication points and recommended lubricants. Proper lubrication reduces friction and wear on moving parts.
3.4 Stockage
When not in use, cover the machine with a dust cover to protect it from dust and debris. Store it in a dry, stable environment away from direct sunlight or extreme temperatures.
4. Dépannage des problèmes courants
This section provides solutions for common problems you might encounter during operation.
4.1 Thread Breaks
- Cause: Incorrect threading, improper tension, damaged needle, poor quality thread, or lint buildup.
- Solution: Re-thread the machine carefully, adjust tension, replace the needle, use high-quality embroidery thread, and clean the thread path.
4.2 Mailles sautées
- Cause: Bent or dull needle, incorrect needle size for fabric, improper threading, or insufficient stabilizer.
- Solution: Replace the needle, ensure the correct needle is used, check threading, and use adequate stabilizer.
4.3 Poor Stitch Quality (Loopy/Uneven Stitches)
- Cause: Incorrect upper or bobbin thread tension, improper hooping, or unsuitable stabilizer.
- Solution: Adjust upper and bobbin tension, ensure fabric is hooped tautly without stretching, and select the correct stabilizer for your fabric and design.
4.4 Machine Not Starting/Responding
- Cause: Power issue, safety sensor engaged (e.g., presser foot not down, hoop not attached correctly), or error message on screen.
- Solution: Check power connection, ensure all safety requirements are met, and refer to the error code displayed on the touchscreen for specific instructions.
For more detailed troubleshooting, please refer to the comprehensive user manual provided with your machine or visit the official Poolin support channels.
5. Spécifications du produit
| Fonctionnalité | Spécification |
|---|---|
| Numéro de modèle | EOC06 |
| Dimensions du produit (L x l x H) | 23 x 27 x 12.5 pouces |
| Poids de l'article | 35 livres |
| Zone de broderie maximale | 7.9 x 11 pouces |
| Cerceaux inclus | 2x (5.5x5.5 pouces), 1x (8x8 pouces), 1x (7.9x11 pouces) |
| Taille de l'écran tactile | Écran LCD couleur de 7 pouces |
| Motifs intégrés | 200 |
| Polices intégrées | 8 |
| Connectivité | USB, Wi-Fi |
| Fonctions automatiques | Needle threader, Bobbin winding, Thread trimming |
| Composants inclus | Machine, 4 hoops, 6 rolls thread, 100 backing papers, 24 bobbins, thread rack, instruction manual, operation guide, accessories bag |
6. Garantie et assistance
6.1 Garantie du produit
For detailed information regarding the manufacturer's warranty for your POOLIN EOC06 Embroidery Machine, please refer to the warranty card included in your product packaging or contact Poolin customer service directly. Extended protection plans may also be available for purchase from your retailer.
6.2 Assistance clientèle
Poolin offers comprehensive support for its products. If you encounter any issues or have questions not covered in this manual, please utilize the following resources:
- Manuel d'utilisation officiel (PDF) : A detailed user guide is available for download at https://manuals.plus/m/7ebe37af6f89a5bd366fcb5cccfd82d2f9af5ca751987673fc62702c2e2169d0.
- Communauté en ligne : Rechercher "Poolin Embroidery Machine Groups" on Facebook to join a community of users and receive one-to-one after-sales service from engineers.
- Chaîne YouTube officielle : Visit the official "Poolin" YouTube channel for teaching videos, tutorials, and real usage feedback.