1. Introduction
This manual provides detailed instructions for the installation, operation, and programming of your DieseRC 433Mhz RF Wireless Remote Control Switch. This 2-channel AC relay receiver is designed to control various electrical devices and motors remotely, offering convenience and flexibility. Please read this manual thoroughly before installation and use to ensure proper functionality and safety.
2. Contenu du colis
Le colis doit contenir les éléments suivants :
- 1x DieseRC 433Mhz RF Relay Receiver Module
- 1x Protective Casing for Receiver Module
- 2 télécommandes à 2 boutons

Figure 1 : Components of the DieseRC RF Wireless Remote Control Switch kit.
3. Spécifications
| Fonctionnalité | Spécification |
|---|---|
| Marque | Diese RC |
| Numéro de modèle | 2 Boutons |
| Relations | Sans fil |
| Type de terminal | Clamp |
| Appareils compatibles | AC |
| Type de batterie à distance | Dioxyde de lithium et de manganèse (CR2032) |
| Modes de fonctionnement | Momentané, à bascule, verrouillé |
| Puissance maximale | 2500 watts |
| Vol de travailtage | 85 V-250 V CA |
| Volume de sortietage | 1V-250V |
| Évaluation actuelle | 10A |
| Matériau de contact | Cuivre |
| Type de contact | Normalement ouvert (NO) |
| Type de montage | Support mural |
| Fréquence | 433 MHz |
| Type de code | 1527 Learning Code or 2262 Fixed Code |
4. Consignes de sécurité
- Risque électrique : Always disconnect power before installing or servicing the device. Improper wiring can lead to electric shock or fire.
- Personnel qualifié: L'installation doit être effectuée par un électricien qualifié ou une personne compétente.
- VoltagCompatibilité : Assurer le vol de fonctionnementtage of your device matches the specifications of this receiver (AC 85V-250V).
- Capacité de charge: Do not exceed the maximum current rating of 10A or power rating of 2500W.
- Environnement: Install the receiver in a dry, well-ventilated area, away from direct sunlight, high temperatures, and corrosive environments.
- Enfants: Keep remote controls and the receiver out of reach of children.
5. Installation et câblage
The receiver module features input terminals (N, L) for power supply and output terminals (NO, COM, NC) for connecting your device. Refer to the wiring diagrams below for common applications.
5.1 Définitions des terminaux
- N: Entrée fil neutre
- L: Entrée de fil sous tension
- NON: Normally Open contact (connects to COM when activated)
- COM: Contact commun
- CAROLINE DU NORD: Normally Closed contact (connects to COM when deactivated)
5.2 Schémas de câblage
Below are typical wiring configurations for various devices. Always ensure power is disconnected before making any connections.

Figure 2 : Four common wiring modes for the receiver module.
- AC Device: Connect the live wire from the power source to the 'L' input. Connect the neutral wire from the power source to the 'N' input. For the device, connect one wire to 'COM' and the other to 'NO'.
- DC Device: Connect the AC power source to 'L' and 'N' inputs. Connect the DC power supply output to the 'COM' and 'NO' terminals, ensuring correct polarity for your DC device.
- AC Motor (e.g., for rolling shutters): Connect the AC power source to 'L' and 'N' inputs. Connect the motor's 'Up' wire to one 'NO' terminal and 'Down' wire to the other 'NO' terminal. Connect the motor's common wire to the corresponding 'COM' terminals. Ensure proper grounding.
- Docteur moteur: Connect the AC power source to 'L' and 'N' inputs. Connect the DC power supply output to the 'COM' terminals. Connect the motor's positive and negative wires to the 'NO' terminals.
5.3 Ex d'applicationamples

Figure 3 : Remote control for garage doors.
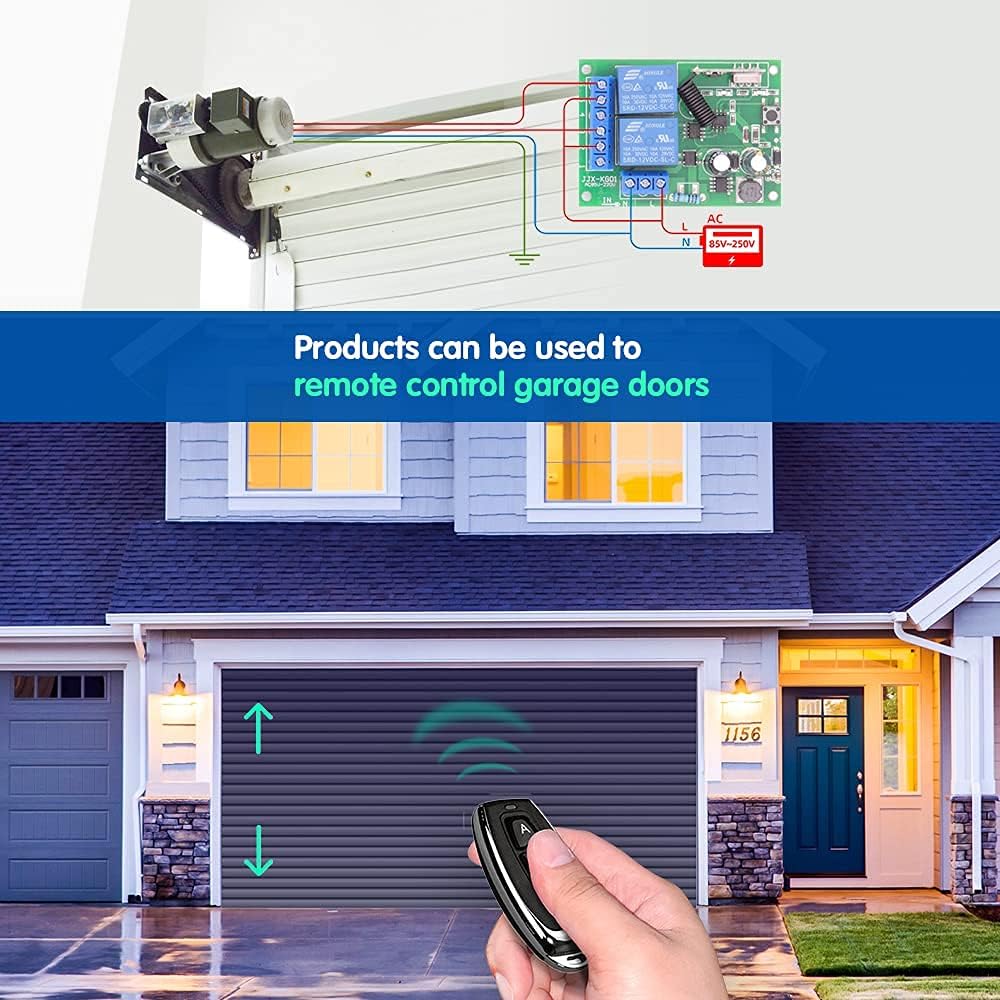
Figure 4 : Remote control for lighting systems.
6. Modes de fonctionnement
The receiver supports three operating modes: Momentary, Toggle, and Latched. Each mode offers different control behavior for your connected devices.

Figure 5 : Visual representation of operating modes.
6.1 Mode momentané
In Momentary mode, the relay is activated only while the remote control button is pressed and held. Releasing the button deactivates the relay. This mode is suitable for applications like electric door locks or temporary power supply.
6.2 Mode bascule
In Toggle mode, pressing the remote control button once activates the relay, and it remains active. Pressing the same button again deactivates the relay. This mode is ideal for controlling lights or other devices that require a persistent ON/OFF state.
6.3 Mode verrouillé
In Latched mode, pressing button 'A' on the remote activates Relay 1. Pressing button 'B' on the remote activates Relay 2 and simultaneously deactivates Relay 1. This mode is useful for applications where only one of two relays should be active at any given time, such as controlling the up/down movement of a motor where both directions should not be active simultaneously.
7. Programmation de la télécommande
To pair your remote control with the receiver and set the desired operating mode, follow these steps:

Figure 6 : Remote control programming steps.
- Sélectionnez le mode: Press the learning button on the receiver module a specific number of times according to the desired mode:
- Pour Mode momentané: Appuyez sur le bouton d'apprentissage 1 fois.
- Pour Mode à bascule: Appuyez sur le bouton d'apprentissage 2 fois.
- Pour Mode verrouillé : Appuyez sur le bouton d'apprentissage 3 fois.
- Associer la télécommande : Within approximately 3 seconds after the indicator light flashes, press the 'A' button on your remote control. The indicator light will flash again to confirm successful pairing for the first relay.
- Pair Second Button (if applicable): If you are using a 2-channel setup (e.g., for Latched mode), press the 'B' button on your remote control. The indicator light will flash again to confirm successful pairing for the second relay.
- Test: Test the remote control to ensure the desired operating mode is correctly set.
8. Réinitialisation du récepteur
To clear all programmed remote controls from the receiver, follow these steps:

Figure 7 : Resetting the receiver module.
- Appuyez sur le bouton d'apprentissage du module récepteur 8 fois consécutivement.
- The indicator light will flash rapidly and then turn off, indicating that all stored remote control codes have been cleared.
After a reset, you will need to reprogram your remote controls following the steps in Section 7.
9. Remote Control Details
The remote control features two buttons (A and B) and is powered by a CR2032 lithium cell battery.

Figure 8 : Components of the 2-button remote control.
9.1 Remplacement de la batterie
If the remote control's range decreases or it stops responding, the battery may need replacement. To replace the battery:
- Ouvrez soigneusement le boîtier de la télécommandeasing.
- Retirez l'ancienne pile CR2032.
- Insérez une nouvelle pile CR2032 avec le côté positif (+) vers le haut.
- Fermez la télécommande casing en toute sécurité.
10. Dépannage
- L'appareil ne répond pas :
- Vérifiez la sécurité et l'exactitude de tous les branchements électriques.
- Assurez-vous que le récepteur est sous tension.
- Vérifiez que la pile de la télécommande n'est pas déchargée.
- Reprogram the remote control to the receiver (see Section 7).
- Plage de fonctionnement courte :
- Remplacez la pile de la télécommande.
- Assurez-vous qu'il n'y ait pas d'obstacles importants (par exemple, des murs épais, des objets métalliques) entre la télécommande et le récepteur.
- Avoid installing the receiver near large metal structures or other RF interference sources.
- Le relais émet un clic, mais l'appareil ne s'active pas :
- Check the wiring between the receiver's output terminals (NO, COM, NC) and your device.
- Ensure the device itself is functioning correctly when directly powered.
11. Entretien
The DieseRC RF Wireless Remote Control Switch requires minimal maintenance. Keep the receiver module and remote controls clean and dry. Avoid exposing them to extreme temperatures, humidity, or corrosive substances. Do not attempt to repair the internal components yourself; contact qualified personnel if service is required.
12. Garantie et assistance
For warranty information or technical support, please refer to the product packaging or contact DieseRC customer service through your retailer. Keep your purchase receipt as proof of purchase.