1. Introduction
Thank you for choosing the NiPoGi E1 Mini PC. This compact and powerful mini PC is designed for a variety of tasks, from home server applications and educational use to web browsing, business office tasks, and digital signage. Equipped with an AMD Ryzen 3250U processor and pre-installed with Windows 11 Pro, it offers fast responsiveness and smooth operation. This manual provides essential information for setting up, operating, maintaining, and troubleshooting your device.

Figure 1: NiPoGi E1 Mini PC Overview
2. Contenu du colis
Veuillez cocher la case correspondant aux éléments suivants :
- NiPoGi E1 Mini PC
- Adaptateur secteur
- Câble HDMI
- Support de montage VESA
- Vis de montage (4 pièces)
- Manuel de l'utilisateur (ce document)

Figure 2: Included accessories with the NiPoGi Mini PC E1.
3. Produit terminéview
3.1. Processeur et performances
The NiPoGi E1 Mini PC is powered by an AMD Ryzen 3250U processor with a pulse frequency of up to 3.50GHz and 4MB L3 cache. This processor delivers robust performance for everyday computing tasks, outperforming many entry-level mini PCs. It ensures faster responsiveness and smoother operation for various applications.
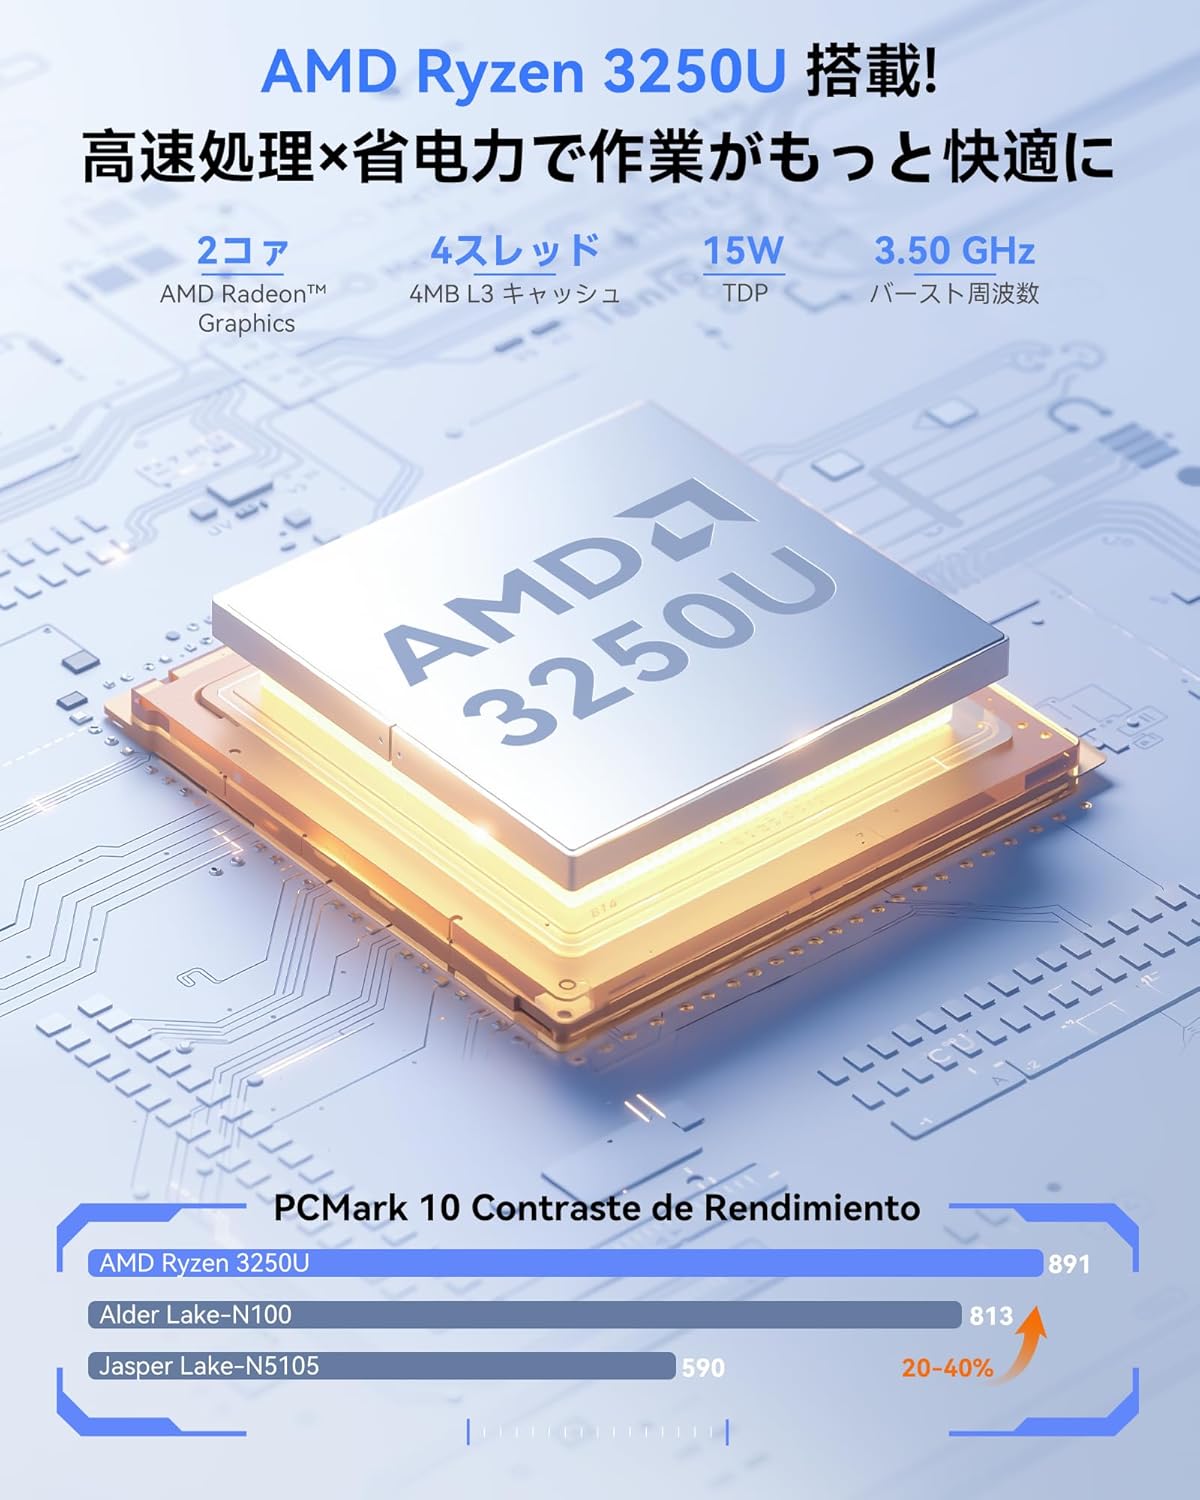
Figure 3: AMD Ryzen 3250U Processor

Figure 4: Performance comparison of AMD Ryzen 3250U against other processors.
3.2. Ports et interfaces
The mini PC offers a comprehensive set of ports for connecting various peripherals:
- 1x HDMI 2.0 Port
- 1 port DisplayPort 1.4
- 2 ports USB 3.2
- 2 ports USB 2.0
- 1x RJ45 Gigabit Ethernet Port
- 1x 5.5/2.1mm DC Power Input Jack
- 1 prise casque 3.5 mm

Figure 5 : Avant et arrière view of the NiPoGi Mini PC showing all available ports.

Figure 6: The NiPoGi Mini PC can connect to a wide range of office and home entertainment devices.
3.3. Compact Design and Dimensions
The NiPoGi E1 Mini PC features a space-saving design, measuring approximately 10 x 10 x 4 cm and weighing only 0.38 kg. Its ultra-compact size allows for flexible placement on your desk or mounted behind a monitor, reducing clutter and optimizing your workspace.

Figure 7: The compact dimensions of the NiPoGi Mini PC, highlighting its small footprint compared to traditional desktops.
3.4. Système de refroidissement
The mini PC incorporates an ultra-quiet cooling fan for efficient heat dissipation. High-speed fan blades quickly disperse heat, ensuring stable long-term operation and preventing performance throttling.
4. Installation
4.1. Connexion de périphériques
- Connecter le moniteur : Use an HDMI cable to connect your monitor to the HDMI 2.0 port on the mini PC. Alternatively, use a DisplayPort cable for the DP 1.4 port.
- Connecter le clavier et la souris : Plug your USB keyboard and mouse into the available USB ports (USB 3.2 or USB 2.0). For wireless peripherals, ensure Bluetooth is enabled and pair them.
- Connecter l'alimentation : Plug the power adapter into the DC input jack on the mini PC, then connect it to a power outlet.
4.2. Mise sous tension initiale
Press the power button located on the front of the mini PC. The system will boot up, and you will see the Windows 11 Pro setup screen or desktop if already configured. Follow the on-screen instructions for initial Windows setup if prompted.
4.3. Montage VESA
The included VESA mount bracket allows you to attach the mini PC to the back of a compatible monitor or to a wall, further saving desk space. Secure the bracket to the monitor/wall using the provided screws, then slide the mini PC onto the bracket.

Figure 8: Various placement options for the NiPoGi Mini PC, including VESA mounting behind a monitor.
5. Mode d'emploi
5.1. Allumer/éteindre et redémarrer
- Mise sous tension : Appuyez sur le bouton d'alimentation.
- Fermer: Sous Windows, cliquez sur le bouton Démarrer, puis sélectionnez Alimentation > Arrêter.
- Redémarrage: Cliquez sur le bouton Démarrer de Windows, puis sélectionnez Alimentation > Redémarrer.
5.2. Connectivité réseau
The NiPoGi E1 Mini PC supports both wired and wireless network connections:
- LAN filaire: Connect an Ethernet cable to the RJ45 port on the back of the mini PC. The system will automatically detect and connect to the network.
- Wifi: The device supports 2.4G/5G dual-band Wi-Fi. In Windows, click the Wi-Fi icon in the taskbar, select your desired network, enter the password, and connect.
- Bluetooth : The mini PC features Bluetooth 4.2. To connect Bluetooth devices, go to Windows Settings > Devices > Bluetooth & other devices, turn on Bluetooth, and pair your device.
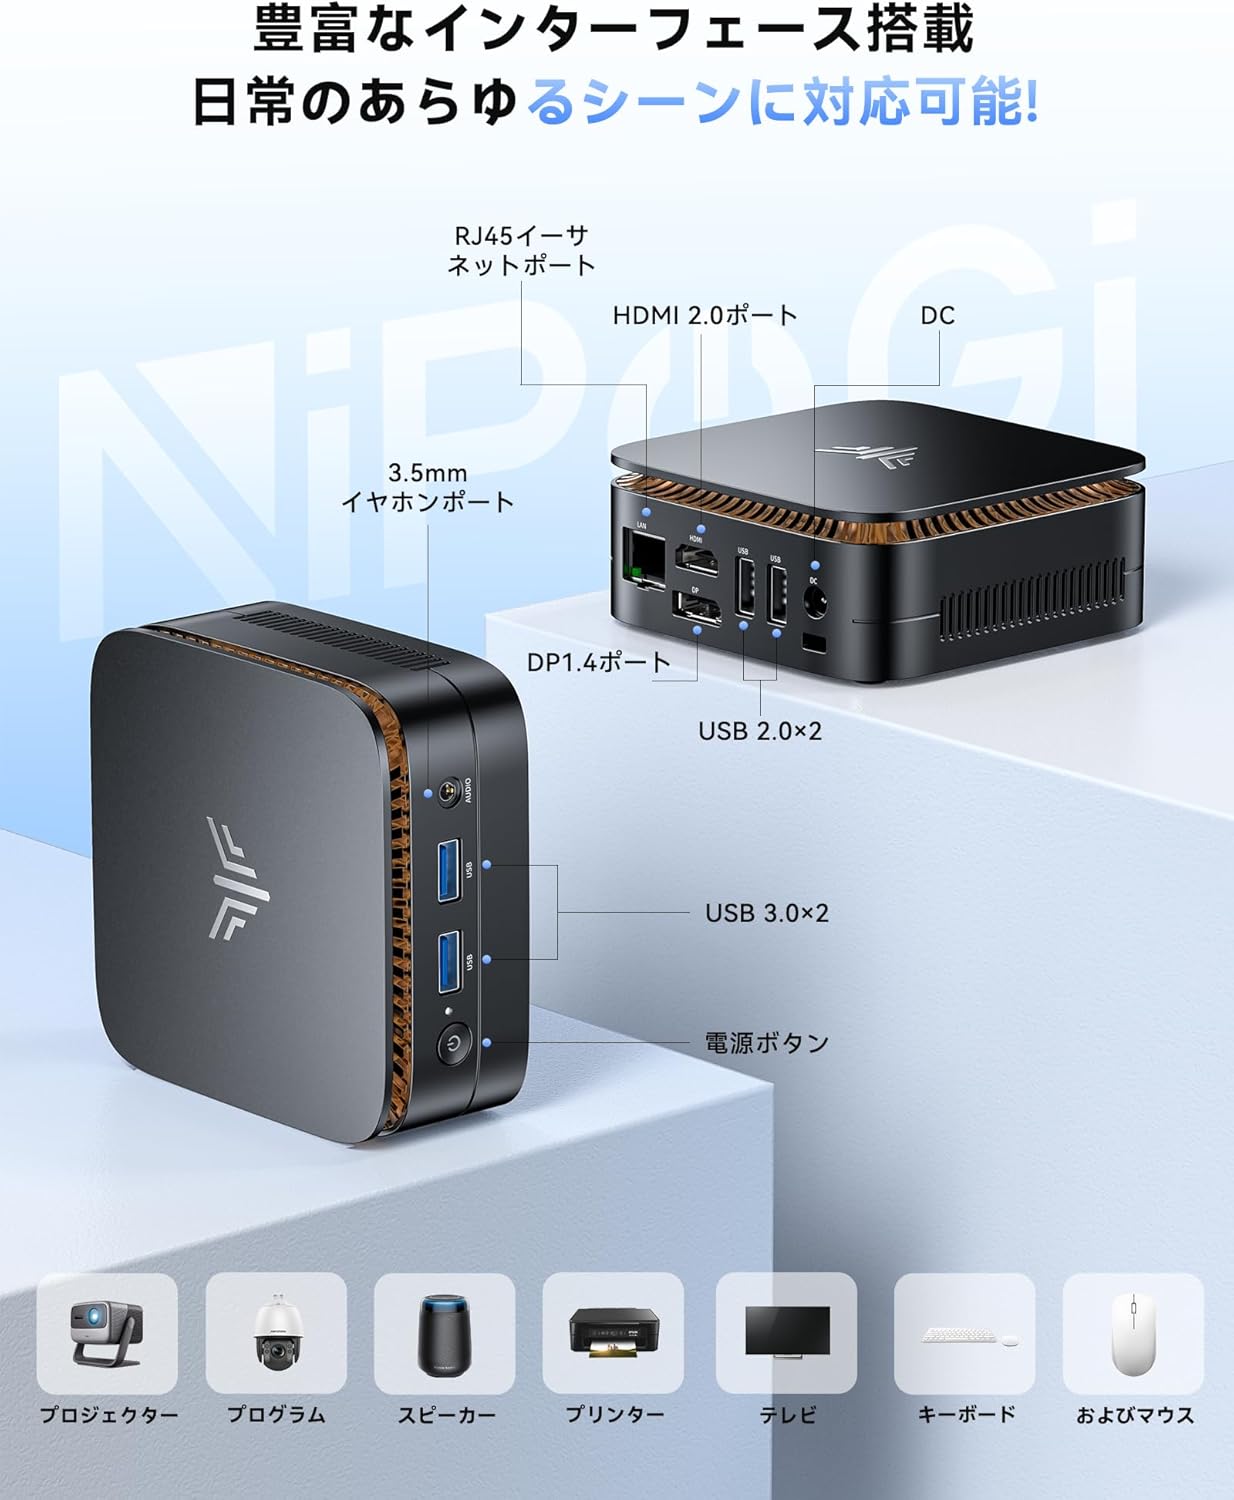
Figure 9: The NiPoGi Mini PC offers stable 2.4G/5G Wi-Fi and Bluetooth 4.2 connectivity for various devices.
5.3. Configuration à double écran
The mini PC supports dual display output via its HDMI 2.0 and DisplayPort 1.4 interfaces, allowing for an immersive 4K Ultra HD experience. This is ideal for multitasking, business presentations, or extended workspaces.
- Connectez votre moniteur principal au port HDMI 2.0.
- Connect your secondary monitor to the DisplayPort 1.4.
- Sous Windows, faites un clic droit sur le bureau et sélectionnez « Paramètres d'affichage ».
- Configure your displays (e.g., extend, duplicate) as needed. The AMD Radeon Graphics GPU ensures stable image and sound processing for high-resolution output.

Figure 10: The NiPoGi Mini PC supports dual 4K displays for enhanced productivity.
6. Extension de stockage et de mémoire
The NiPoGi E1 Mini PC comes with 8GB DDR4 RAM and a 256GB M.2 2280 SSD. Both can be upgraded to enhance performance and storage capacity:
- Mise à niveau de la RAM : The 8GB DDR4 RAM can be upgraded to a maximum of 16GB.
- Extension SSD : The 256GB M.2 2280 SSD can be upgraded to a maximum of 2TB. Additionally, you can install a 2.5-inch SATA SSD/HDD for further storage expansion. The PCIe SSD offers significantly faster read/write speeds compared to traditional SATA SSDs.
Note: Upgrading components may require technical knowledge. If unsure, consult a professional.

Figure 11: Internal components showing 8GB DDR4 RAM and 256GB SSD, with options for expansion.
7. Entretien
To ensure the longevity and optimal performance of your NiPoGi E1 Mini PC, follow these maintenance guidelines:
- Garder propre: Regularly clean the exterior of the mini PC with a soft, dry cloth. Use compressed air to gently clear dust from the ventilation openings to maintain efficient cooling.
- Mises à jour logicielles : Maintenez votre système d'exploitation Windows 11 Pro et vos pilotes à jour. Cela garantit une sécurité, une stabilité et des performances améliorées.
- Évitez les obstacles : Veillez à ce que les ouvertures de ventilation ne soient pas obstruées afin de permettre une bonne circulation de l'air et d'éviter toute surchauffe.
- Arrêt sécurisé : Always shut down the system properly through the Windows menu to prevent data corruption.
8. Dépannage
If you encounter issues with your NiPoGi E1 Mini PC, refer to the following common problems and solutions:
| Problème | Cause possible | Solution |
|---|---|---|
| Aucun affichage sur le moniteur | Connexion du câble desserrée, source d'entrée incorrecte, moniteur éteint. | Check HDMI/DP cable connections. Ensure monitor is powered on and set to the correct input source. Try a different cable or monitor. |
| Le mini PC ne s'allume pas | Adaptateur secteur non connecté, prise de courant défectueuse. | Vérifiez que l'adaptateur secteur est bien branché à la fois à l'ordinateur et à une prise de courant fonctionnelle. Essayez une autre prise. |
| Problèmes de connexion Wi-Fi | Incorrect password, router issues, Wi-Fi disabled. | Check Wi-Fi password. Restart your router. Ensure Wi-Fi is enabled in Windows settings. |
| Performances lentes | Too many applications running, insufficient RAM, overheating. | Close unnecessary applications. Consider upgrading RAM. Ensure proper ventilation and clean dust from vents. |
| L'appareil Bluetooth ne se connecte pas. | Bluetooth disabled, device out of range, pairing issue. | Ensure Bluetooth is enabled in Windows settings. Move device closer to the PC. Re-pair the Bluetooth device. |
Si le problème persiste après avoir essayé ces solutions, veuillez contacter le service client.
9. Spécifications
| Fonctionnalité | Détail |
|---|---|
| Marque | NiPoGi |
| Modèle | E1-Ryzen 3250U |
| Marque de CPU | DMLA |
| Type de processeur | Ryzen 3 3250U |
| Vitesse du processeur | 3.5 GHz (Max Burst) |
| Nombre de processeurs | 4 |
| Taille du cache | 6 Mo |
| Capacité de la RAM | 8 Go DDR4 (max. 16 Go) |
| Vitesse d'horloge de la mémoire | 2666 MHz |
| Type de disque dur | Disque SSD |
| Capacité de stockage de la mémoire | 256 GB (M.2 2280 SSD, Max 2TB) |
| Interface du disque dur | PCIe x4 |
| Accélérateur graphique | Carte graphique Intel UHD (intégrée) |
| Résolution | 4096 x 2304, 3840x2160 Pixels |
| Ports HDMI | 1 2.0 (HDMI XNUMX) |
| Système opérateur | Windows 11 Pro (Supports Ubuntu, Linux, Win11 Home, Win11 IOT) |
| Poids du produit | 380 g |
| Dimensions du produit | 13.2 x 13.2 x 10.3 cm |
| Facteur de forme | Petit facteur de forme |
| Connectivité | 2.4G/5G Wi-Fi, Bluetooth 4.2, Gigabit Ethernet |
| Sécurité | TPM 2.0 Chip |
10. Garantie et assistance
Your NiPoGi Mini PC comes with an Garantie de 18 mois from the date of purchase. We strive for complete quality assurance. However, if you encounter any defects, damage, or receive an incorrect product, please contact our customer support team immediately.
Comment contacter le support :
- Go to "Account Service" on the platform where you purchased the product.
- Navigate to "Order History."
- Find your order and click on the "Seller" link.
- Select "Ask a question" to send a message to our support team.
Our customer service team is available 24/7 and aims to resolve any issues within 24 hours.