Introduction
Thank you for choosing the Sportneer Under Desk Exercise Bike & Pedal Exerciser. This versatile mini bike is designed to provide low-impact exercise for both your upper and lower body, making it ideal for muscle rehabilitation, improving circulation, and maintaining an active lifestyle while seated. Its compact and quiet design allows for convenient use at home or in the office. Please read this manual thoroughly before assembly and operation to ensure safe and effective use.
Consignes de sécurité
Avant d'utiliser ce produit, veuillez respecter les consignes de sécurité suivantes :
- Consultez un médecin avant de commencer un nouveau programme d'exercices, surtout si vous souffrez de problèmes de santé préexistants.
- Ensure the exerciser is placed on a stable, flat surface. Use the included anti-skid mat to prevent movement during use.
- Tenez les enfants et les animaux domestiques éloignés de l'appareil d'exercice pendant son fonctionnement.
- Wear appropriate athletic footwear when using the pedal exerciser.
- Ne vous tenez pas debout sur l'appareil. Il est conçu pour une utilisation en position assise uniquement.
- Check all components for wear or damage before each use. Do not use if any parts are loose or damaged.
- Adjust the resistance gradually to avoid sudden strain.
- Arrêtez immédiatement l'exercice si vous ressentez une douleur, des vertiges ou un essoufflement.
Contenu du colis
Vérifiez que tous les composants sont présents dans la boîte :
- 1 x Pedal Exerciser Unit
- 1 x Anti-Skid Mat
- 1 x Installation Tool Set (wrenches, screws)
- 1 x Stability Strap (if included with your model)
- 1 x AAA Battery (pre-installed or included for LCD display)
Configuration et assemblage
Follow these steps to assemble your Sportneer Pedal Exerciser. All necessary tools are included.
- Step 1: Attach the Stabilizer Bars
Align the two stabilizer bars (feet) with the base of the main unit. Insert the screws through the holes in the stabilizer bars and into the corresponding holes on the main unit. Tighten them securely using the provided Allen wrench.
Image: Illustration of attaching the front and rear stabilizer bars to the main body of the pedal exerciser using screws and an Allen wrench.
- Étape 2 : Installer les pédales
Identify the left (L) and right (R) pedals. The pedals are marked. Align each pedal with its corresponding crank arm. Screw the pedals into the crank arms by turning them clockwise for the right pedal and counter-clockwise for the left pedal. Ensure they are tightened firmly with the wrench until they can no longer be tightened.
Image : Gros plan view of attaching the pedals to the crank arms, highlighting the L/R markings and the direction of tightening.
- Step 3: Place the Anti-Skid Mat
Position the included anti-skid mat on the floor where you intend to use the exerciser. Place the assembled pedal exerciser on top of the mat to ensure stability and prevent sliding during use.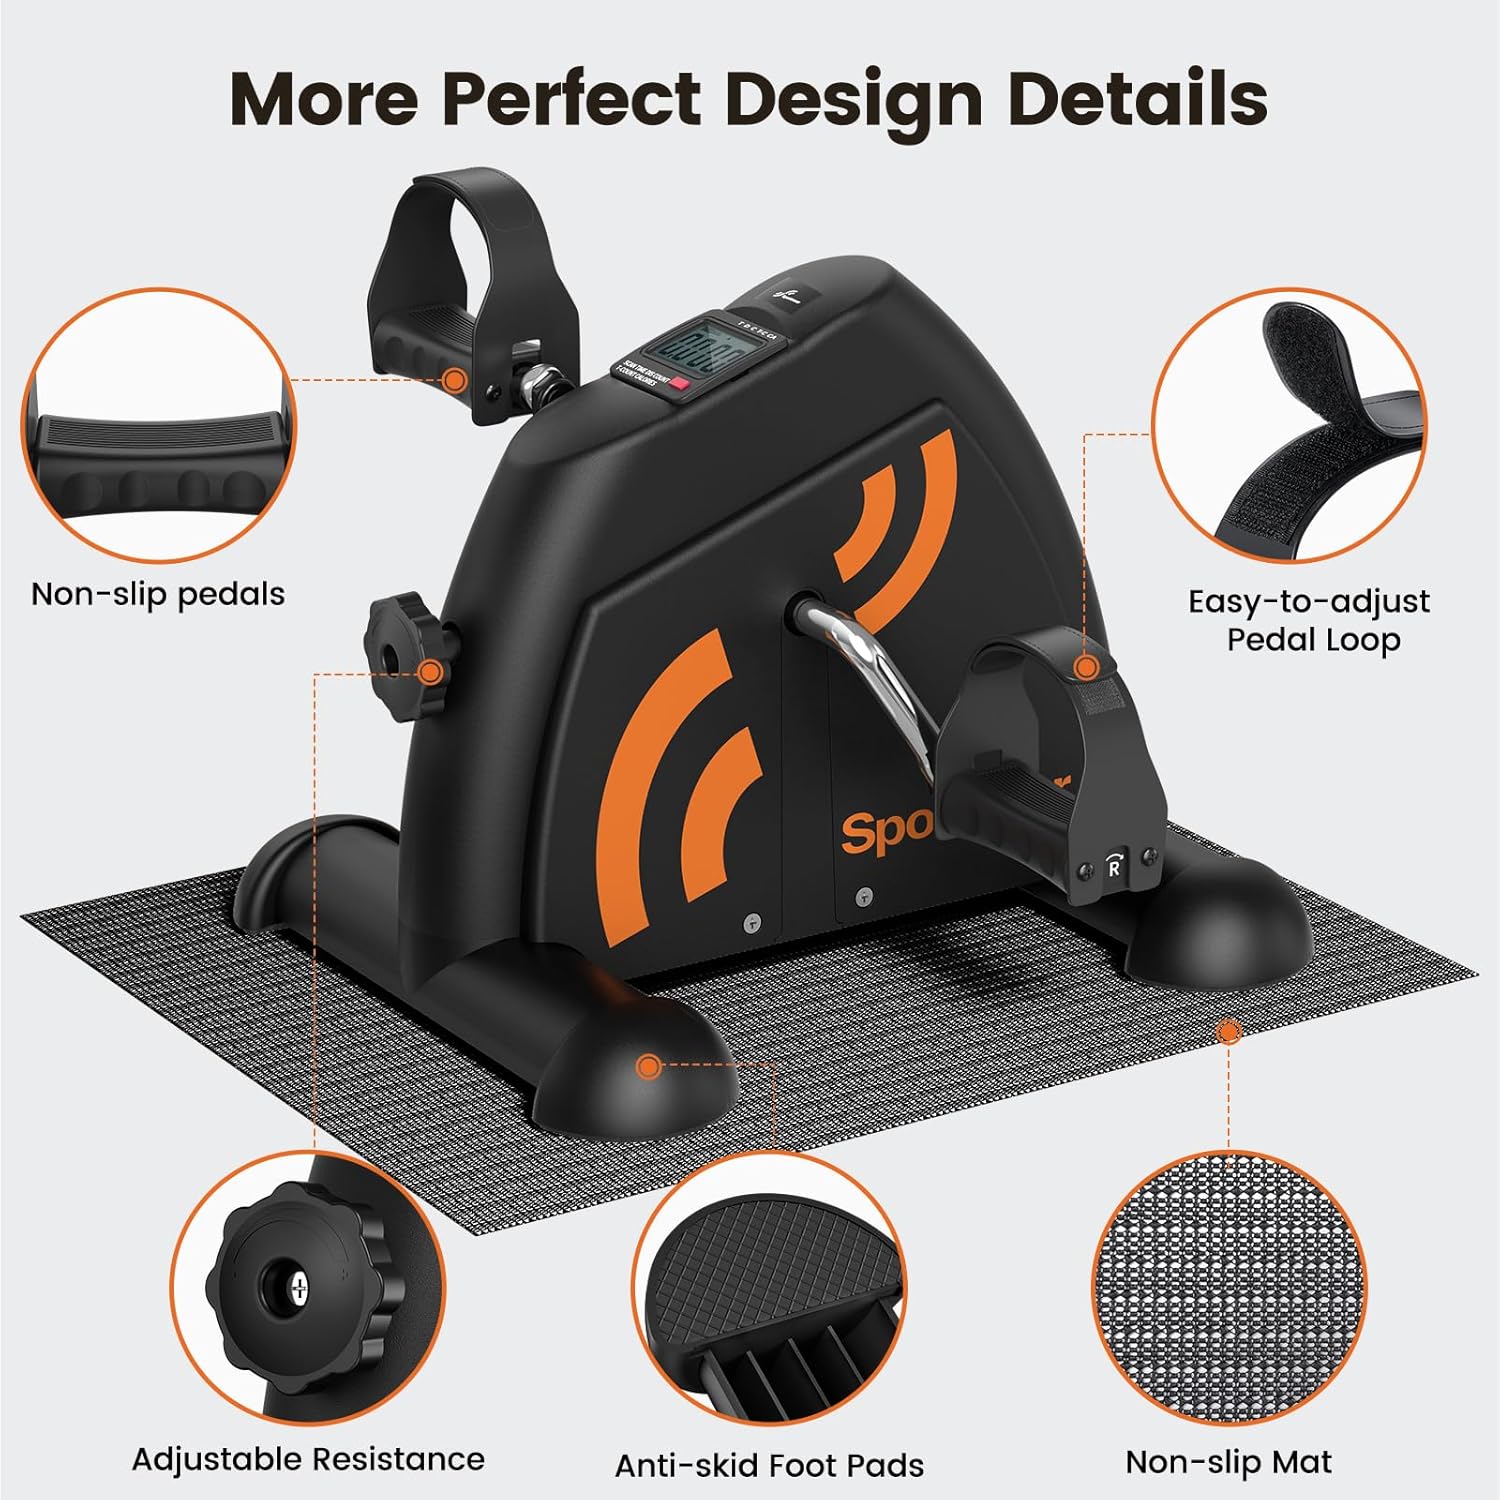
Image: The fully assembled Sportneer pedal exerciser resting on a black anti-skid mat, ready for use.
Mode d'emploi
Utilisation du pédalier
The Sportneer Pedal Exerciser can be used for both leg and arm workouts.
- For Leg Workout: Place the exerciser on the floor in front of your chair or sofa. Sit comfortably and place your feet into the pedal straps. Adjust the straps for a secure fit. Begin pedaling in a smooth, controlled motion.

Image: A person seated at a desk, pedaling the Sportneer exerciser with their feet, demonstrating its use as an under-desk fitness tool.
- For Arm Workout: Place the exerciser on a sturdy table or desk. Sit in front of it and grasp the pedals with your hands. Adjust the pedal loops for a comfortable grip. Begin rotating the pedals with your arms in a smooth, controlled motion.

Image: A person using the Sportneer exerciser on a tabletop, rotating the pedals with their hands for an arm workout.
Réglage de la résistance
The exerciser features an adjustable tension knob to customize your workout intensity.
- Turn the knob clockwise to increase resistance, making pedaling more challenging.
- Tournez le bouton dans le sens inverse des aiguilles d'une montre pour diminuer la résistance et faciliter le pédalage.
- Start with a low resistance and gradually increase as your strength improves.

Image: A close-up of the Sportneer pedal exerciser, highlighting the resistance adjustment knob on the side.
Utilisation de l'écran LCD
L'écran LCD intégré suit votre progression d'entraînement.
- Press the red button to cycle through different display modes: Time, Speed, Distance, Calories Burned, and Total Count.
- To reset the display values, press and hold the red button for a few seconds.
- The display is powered by 1 AAA battery (included). If the display becomes dim or unresponsive, replace the battery.
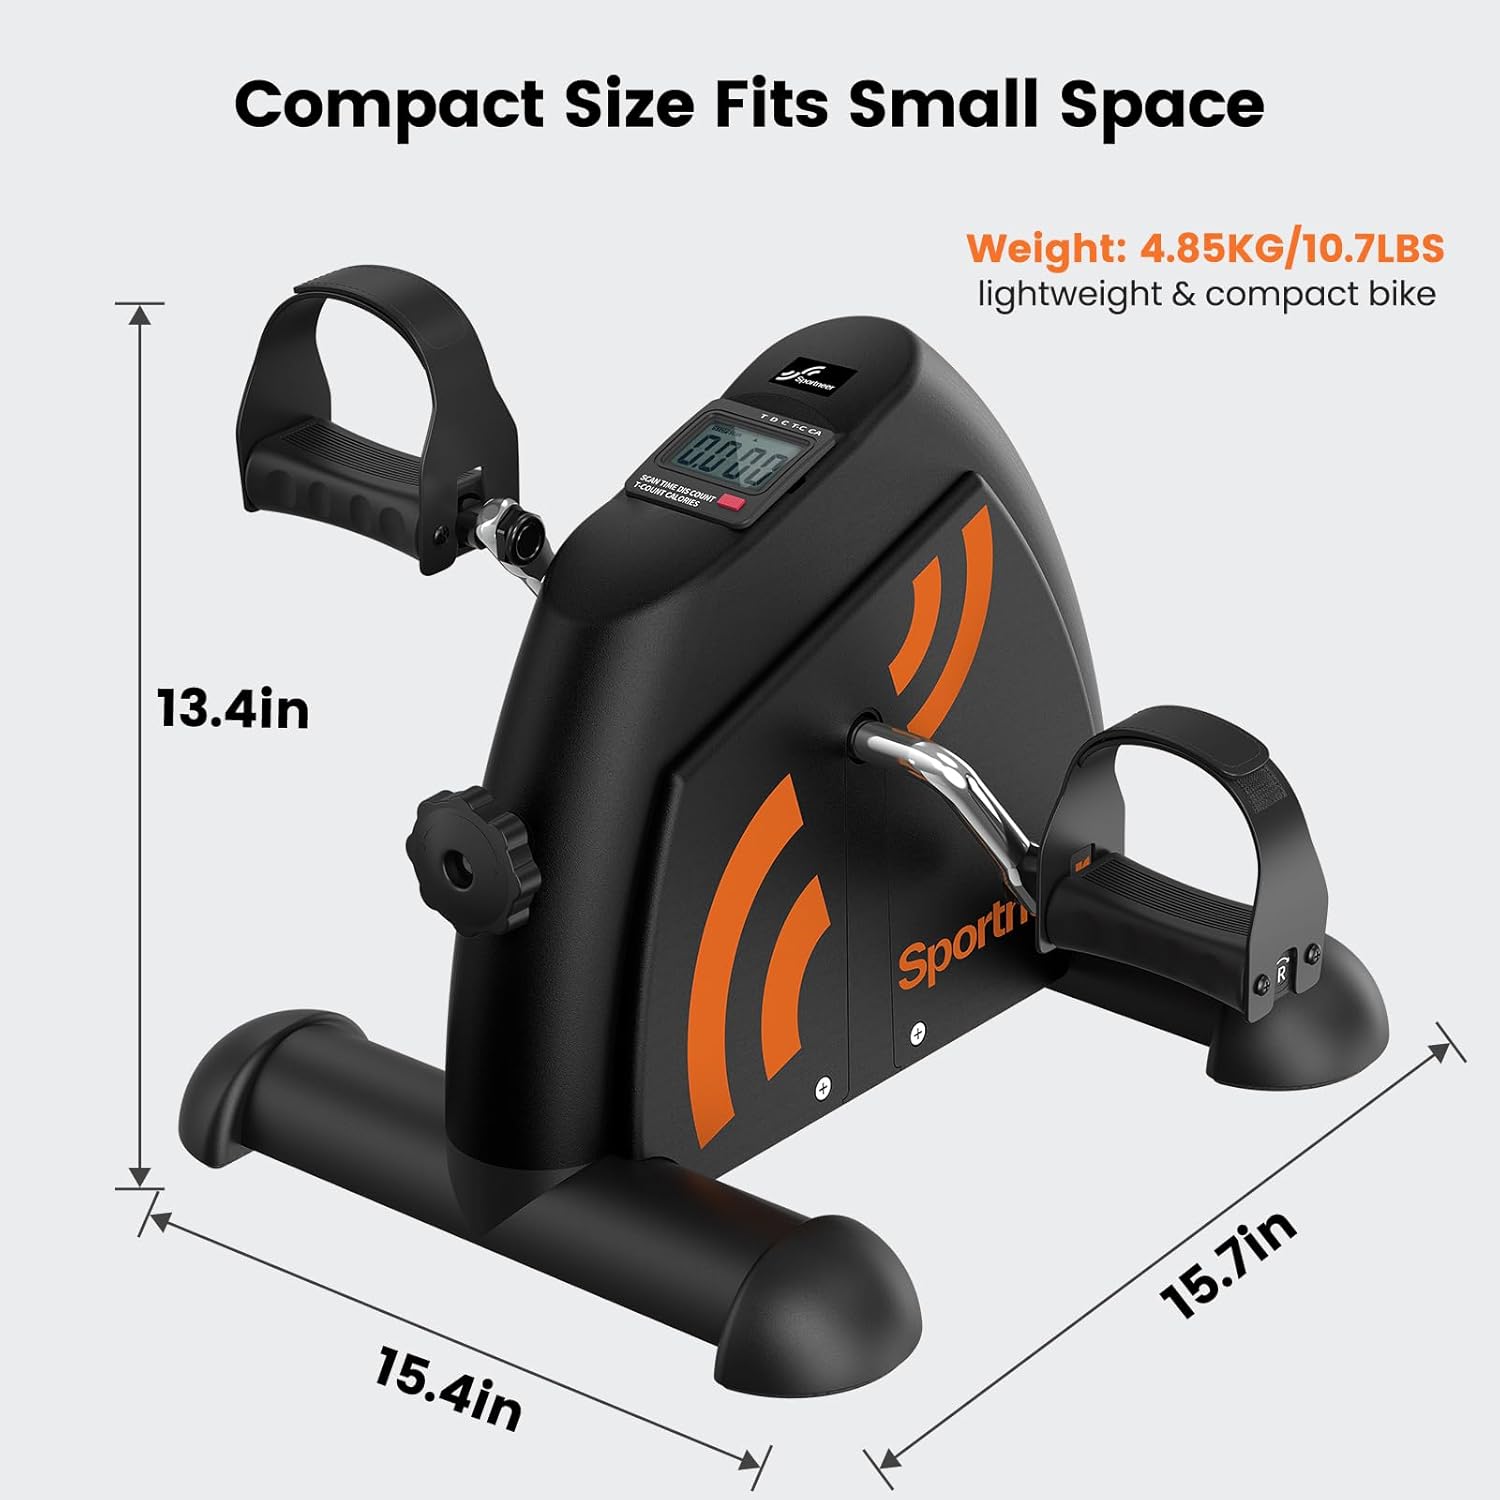
Image : Une image détaillée view of the Sportneer pedal exerciser's LCD screen, showing various metrics like time, distance, and calories burned.
Entretien
Regular maintenance ensures the longevity and optimal performance of your pedal exerciser.
- Nettoyage: Essuyez l'exerciseur avec une annonceamp Essuyez le chiffon après chaque utilisation pour enlever la transpiration et la poussière. Évitez d'utiliser des nettoyants abrasifs ou des solvants.
- Inspection: Periodically check all screws and bolts to ensure they are tight. Retighten if necessary. Inspect pedals and straps for any signs of wear or damage.
- Stockage: Store the exerciser in a cool, dry place away from direct sunlight and extreme temperatures. Its compact size allows for easy storage under a desk or in a closet.
- Remplacement de la batterie : When the LCD display fades or stops working, replace the AAA battery located in the back of the monitor.
Dépannage
| Problème | Cause possible | Solution |
|---|---|---|
| L'appareil glisse pendant son utilisation | Not on anti-skid mat; mat not properly placed; uneven surface. | Ensure the exerciser is placed firmly on the anti-skid mat. Use the included stability strap if necessary. Verify the surface is flat. |
| Pedals are stiff or jerky | Resistance knob too high; internal mechanism issue. | Decrease the resistance by turning the knob counter-clockwise. If the issue persists, contact customer support. |
| L'écran LCD est éteint ou faiblement lumineux. | Batterie déchargée ou mal installée. | Replace the AAA battery in the monitor. Ensure it is inserted with correct polarity. |
| Bruit inhabituel pendant le fonctionnement | Composants desserrés ; frottements internes. | Check and tighten all screws and bolts. If noise continues, discontinue use and contact customer support. |
Caractéristiques
| Fonctionnalité | Détail |
|---|---|
| Numéro de modèle | B0BN4DF5VL |
| Dimensions du produit | 41 cm (P) x 20 cm (L) x 33 cm (H) (16.1 pouces (P) x 7.9 pouces (L) x 13 pouces (H)) |
| Poids de l'article | 4.8 kilogrammes (10.6 livres) |
| Matériel | Acier allié |
| Type d'affichage | LCD (Time, Speed, Distance, Calories, Total Count) |
| Type de résistance | Manual Knob Adjustment |
| Source d'énergie | Self-Powered (LCD requires 1 AAA battery) |
| Composants inclus | Pedal Exerciser, Anti-Skid Mat, Installation Tool Set |
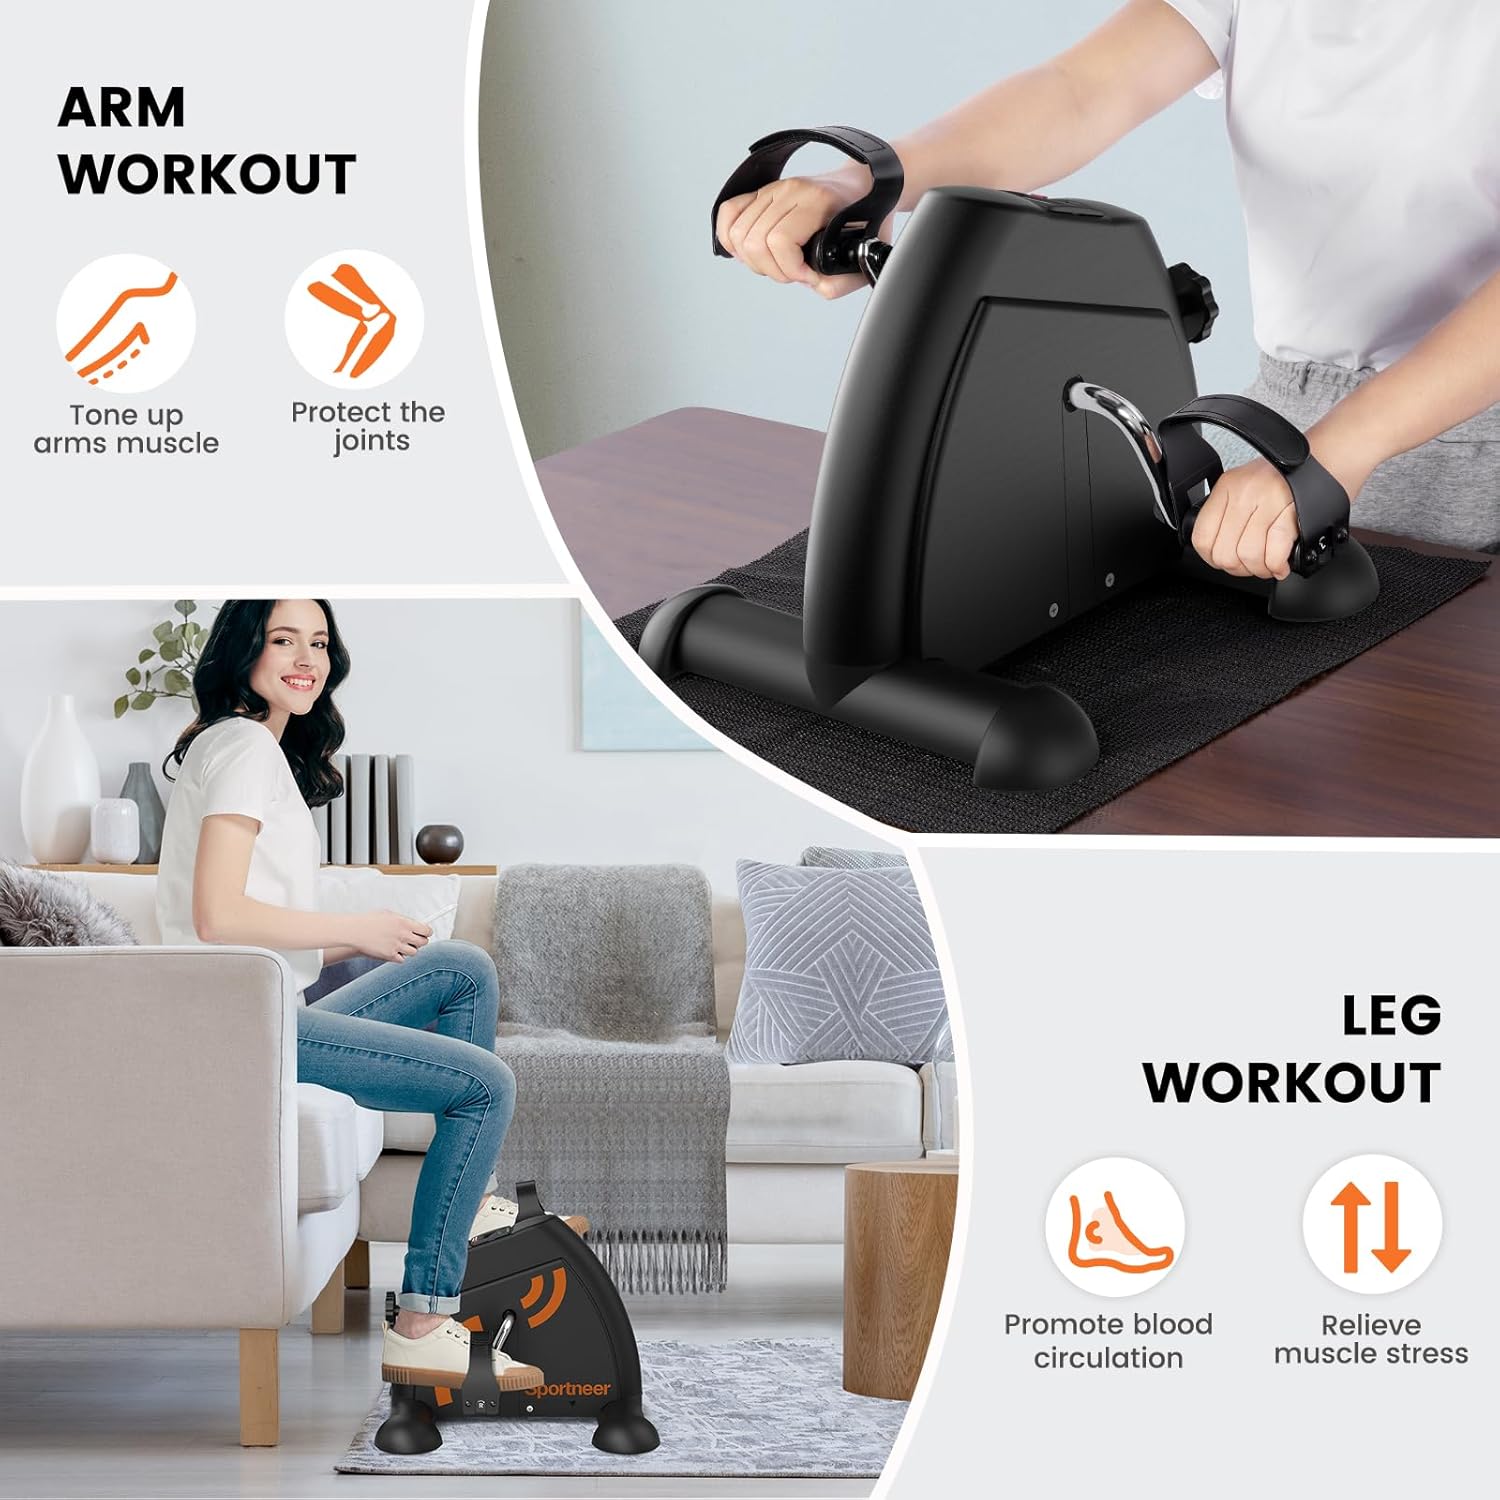
Image: The Sportneer pedal exerciser with its dimensions (15.7in length, 15.4in width, 13.4in height) and weight (10.7lbs) highlighted, emphasizing its compact and lightweight design.
Garantie et assistance
Sportneer products are designed for durability and performance. For specific warranty details, please refer to the warranty card included with your purchase or visit the official Sportneer website.
If you encounter any issues or have questions regarding your Sportneer Under Desk Exercise Bike & Pedal Exerciser, please contact Sportneer Customer Support:
- Website: www.sportneer.com (Remarque : Ceci est un espace réservé URLVeuillez vous référer à la documentation du produit pour obtenir les informations de contact correctes.)
- E-mail: support@sportneer.com (Remarque : Ceci est une adresse e-mail fictive. Veuillez vous référer à la documentation du produit pour obtenir les coordonnées exactes.)
Please have your model number (B0BN4DF5VL) and purchase date ready when contacting support.