Introduction
This manual provides essential instructions for the proper setup, operation, and maintenance of your Teamgee 12-inch Laptop Screen Extender (Model P2). Please read this guide thoroughly before use to ensure optimal performance and longevity of your device.
Produit terminéview
The Teamgee 12-inch Laptop Screen Extender is designed to expand your laptop's display capabilities, offering a dual-screen or triple-screen setup for enhanced multitasking and productivity. It features dual 12-inch Full HD IPS displays with wide viewing angles, built-in speakers, brightness control, and eye-care mode. Its portable and flexible design allows for easy transport and screen sharing.

Image: The Teamgee 12-inch Laptop Screen Extender in use, providing a triple display setup with a central laptop screen and two extended screens on either side.
Video: Level Up Your Work Space with Teamgee P2
Vidéo : Une vidéo de présentation officielle du produitasing the Teamgee P2 screen extender in various professional and creative work environments, demonstrating its versatility and ease of use.
Exigences de compatibilité
Before setting up your screen extender, ensure your laptop meets the following compatibility criteria:
- Laptop Size: Compatible with 13-inch to 16-inch laptops.
- Systèmes d'exploitation : Supports Windows, Chrome OS, and macOS (limited support for Mac M1/M2 chips).
- Required Ports:
- Option 1 (Recommended): Two full-function USB-C ports (for data, video, and power transfer).
- Option 2: One full-function USB-C port + One HDMI port + One USB-A port.
- Option 3: Two HDMI ports + Two USB-A ports (may require a docking station or hub if ports are unavailable).
- Compatibilité MacBook : Compatible with M1 Pro and M1 Max chips. Not compatible with M1/M2 base models.
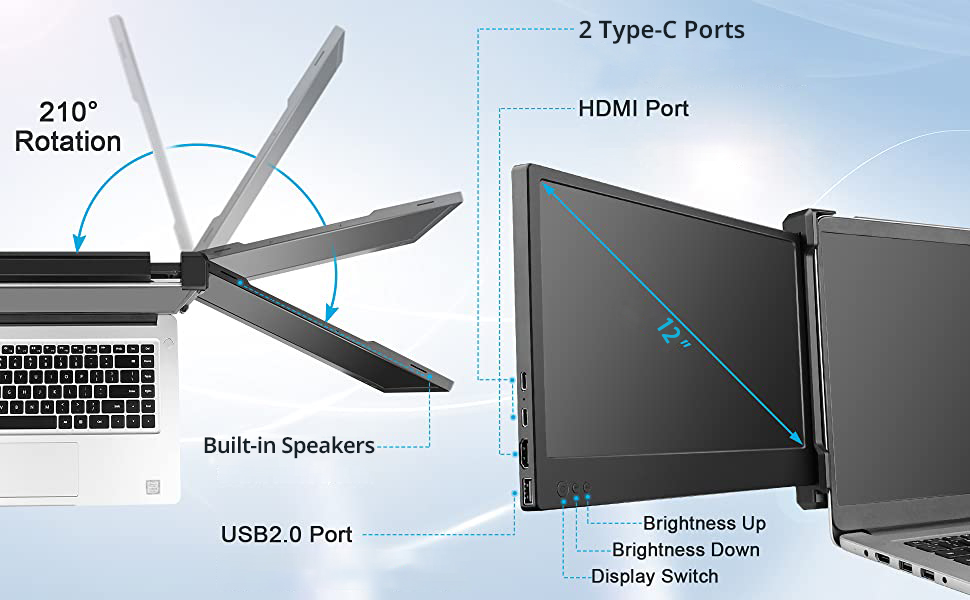
Image: A visual guide illustrating the different port configurations required for connecting the Teamgee screen extender to various laptops.
Instructions d'installation
Follow these steps to set up your Teamgee 12-inch Laptop Screen Extender:
- Identify Your Laptop Ports: Determine which ports are available on your laptop (USB-C, HDMI, USB-A). This will dictate the connection method.
- Connectez le moniteur :
- Two Full-Function USB-C Ports: Use two USB-C to USB-C cables (one for each screen).
- One USB-C + HDMI Available: Connect one USB-C to USB-C cable for one screen. For the second screen, use an HDMI to HDMI cable and a USB-A to USB-A cable.
- HDMI + USB-A Only: Connect one HDMI to HDMI cable and one USB-A to USB-A cable for each screen. A docking station or hub may be necessary if your laptop lacks sufficient ports.
- Ajuster les paramètres d'affichage : Once connected, use your laptop’s display settings to extend or mirror the screens. You can also adjust brightness, volume, and screen rotation (up to 210°) using the built-in controls on the extender.
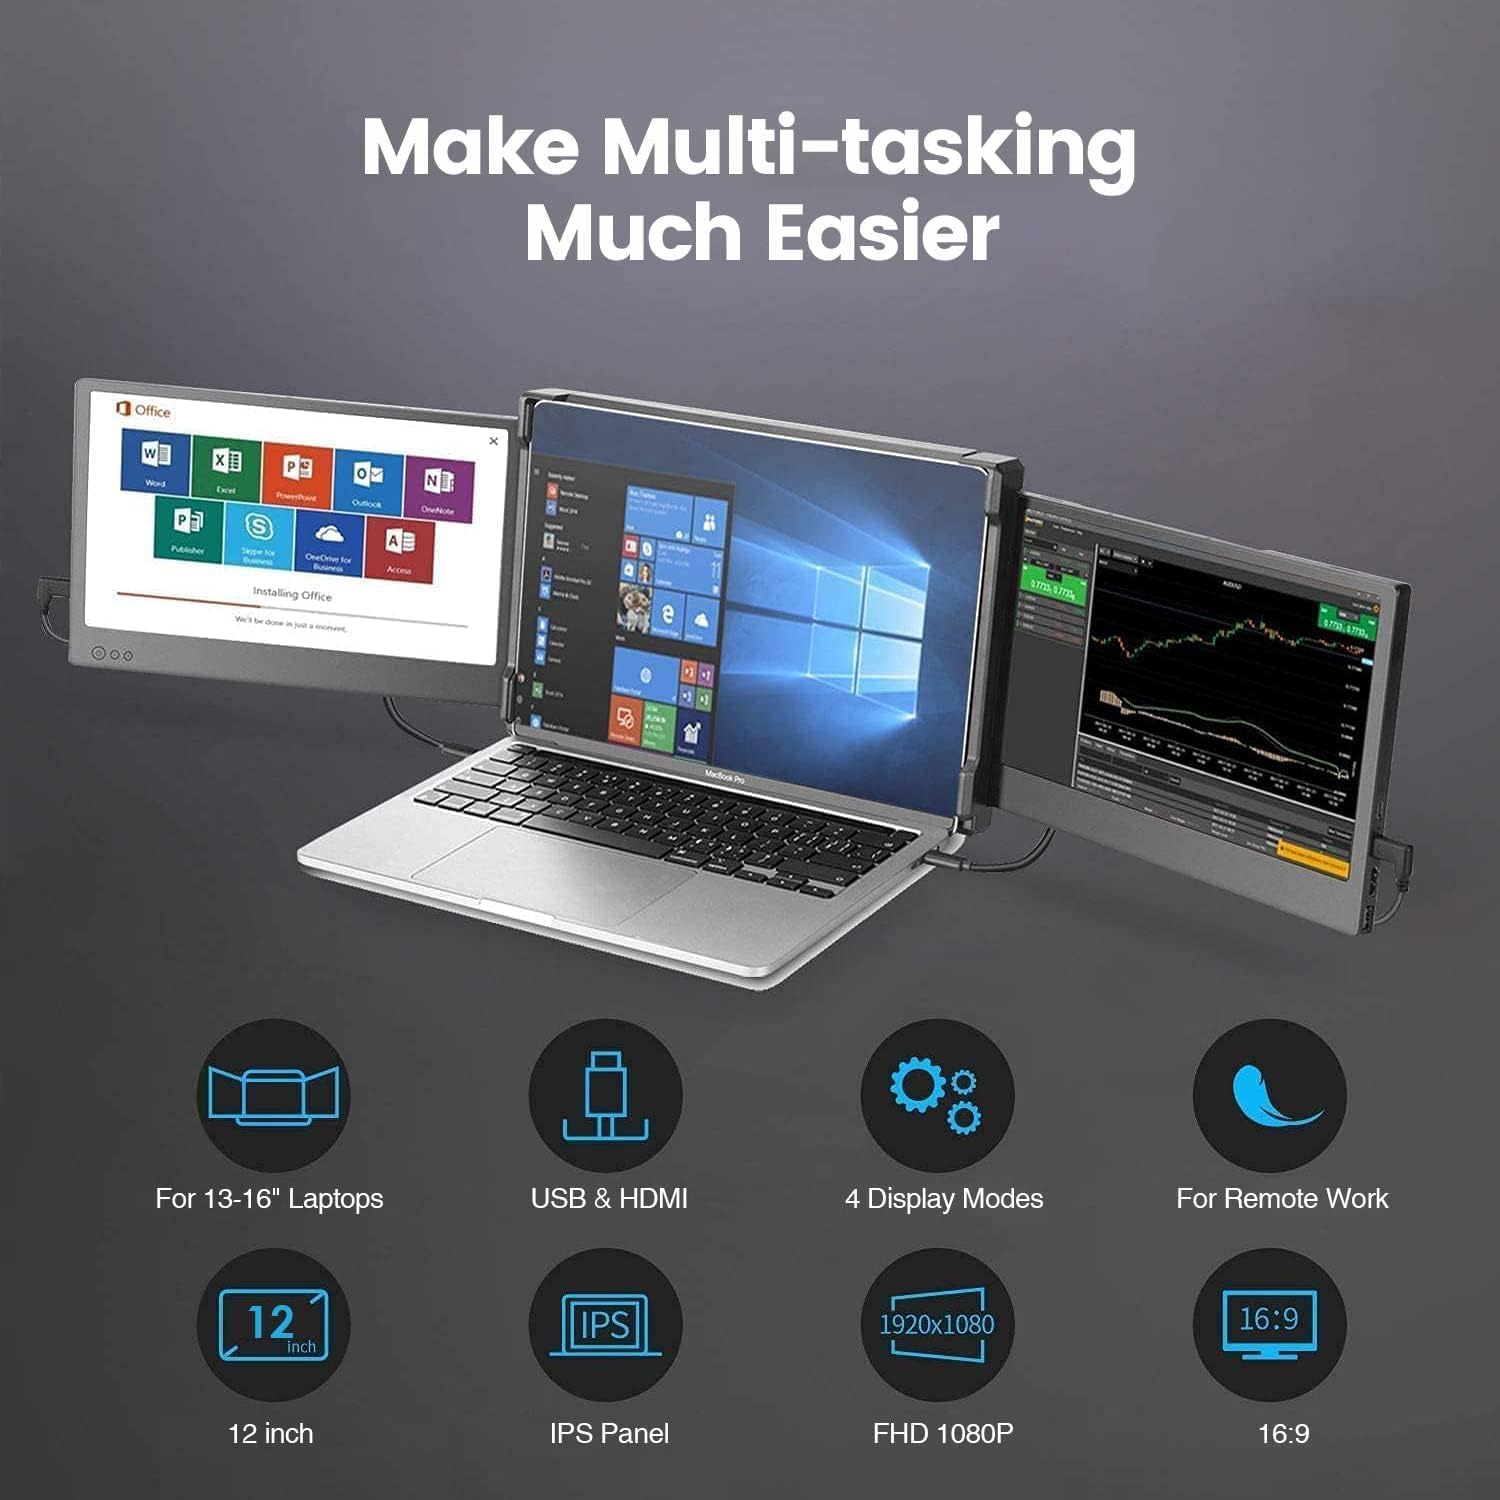
Image: A laptop with the Teamgee screen extender attached, displaying an extended desktop across three screens.
Mode d'emploi
The Teamgee screen extender offers several features for an optimized user experience:
- Modes d'affichage: Utilize your laptop's display settings to choose between extended desktop mode (each screen shows different content) or mirrored mode (all screens show the same content).
- Contrôle de la luminosité : Adjust the brightness of each screen using the dedicated buttons located on the side of the extender.
- Contrôle du volume : The built-in speakers have volume controls accessible via the extender's buttons.
- Rotation de l'écran: The screens can rotate up to 210 degrees, allowing for flexible viewing angles and easy sharing during presentations or collaborative work.
- Mode de protection oculaire : Activate eye-care mode for reduced blue light emission during prolonged use.

Image : Une image détaillée view of the control buttons on the side of the screen extender, used for adjusting brightness, volume, and display settings.
Guide de dépannage
Si vous rencontrez des problèmes, reportez-vous aux étapes de dépannage suivantes :
- Pas de signal:
- Ensure all cables (USB-C, HDMI, USB-A) are securely connected to both the extender and your laptop.
- Disconnect and reconnect the cables. If using HDMI + USB-A, connect the USB-A cable first.
- Verify your laptop's display settings are configured to detect and extend/mirror the displays.
- Dim or Low Brightness:
- Adjust the backlight setting on the extender, not just the general brightness.
- If possible, power the monitor externally using a compatible power adapter (not always included, check product packaging) to ensure sufficient power delivery for maximum brightness.
- L'écran ne s'allume pas :
- Confirm all power and data cables are securely connected.
- If using HDMI + USB-A, ensure the USB-A cable is connected before the HDMI cable to provide power.
- Try connecting to a different USB-C port or using a different power source if available.
Entretien
To ensure the longevity and optimal performance of your Teamgee screen extender, follow these maintenance guidelines:
- Nettoyage: Utilisez un chiffon doux et non pelucheux légèrement dampened with water or a screen cleaner to wipe the display surfaces. Avoid harsh chemicals or abrasive materials.
- Stockage: When not in use, fold the extender compactly and store it in the provided protective bag to prevent scratches and damage.
- Manutention: Manipulez l'appareil avec précaution. Évitez de le faire tomber ou d'exercer une force excessive sur les écrans ou les charnières.
- Gestion des câbles: Keep cables organized and untangled to prevent damage to the connectors and ports.

Image: The Teamgee screen extender folded into a compact form, ready for storage or travel, highlighting its portable design.
Caractéristiques
| Fonctionnalité | Spécification |
|---|---|
| Dimensions du produit | 15 x 12 x 4 pouces |
| Poids de l'article | 4.62 livres |
| Numéro de modèle de l'article | Teamgee P2 |
| Taille d'affichage de l'écran debout | 12 pouces |
| Rapport hauteur/largeur | 16:9 |
| Résolution | 1920 x 1200 (FHD 1080p) |
| Nombre total de ports USB | 2 |
| Description de la surface de l'écran | Brillant |
Garantie et assistance
Teamgee offers dedicated customer support for any compatibility questions or setup assistance. For support, please contact Teamgee directly via email. Refer to your product packaging or the official Teamgee website pour les informations de contact spécifiques.
The product is designed for reliability and comes with support to ensure it works for you.