1. Introduction
This manual provides essential instructions for the safe and effective use, installation, and maintenance of your SEESII 8-inch chainsaw chain and sharpening kit. Please read this manual thoroughly before use and retain it for future reference.
2. Consignes de sécurité
AVERTISSEMENT: Le non-respect de ces consignes de sécurité peut entraîner des blessures graves, voire la mort.
- Cutting chains can cause injury if incorrectly fitted to a chainsaw or if the saw is used improperly. Always install, adjust, and maintain the chain as recommended.
- Be aware of kickback, particularly when cutting with the bar nose. Kickback can lead to dangerous loss of control of the chainsaw and result in serious injury to the saw operator or bystanders.
- Before using any chainsaw, thoroughly read the manufacturer’s operating and safety instructions for the chainsaw itself.
- Ensure the saw is turned off and the battery is removed before completing any maintenance tasks. Always wear heavy-duty gloves when handling the chain to avoid injury.
- Only insert the rechargeable battery once the device is completely assembled. If the device is switched on accidentally during assembly, there is a danger of injury.
Remarque importante : Always verify your chainsaw chain bar length, pitch, gauge, and drive link count before purchasing and installing a new chain. If unsure, consult your chainsaw manufacturer or seller for confirmation.
3. Produit terminéview
The SEESII 8-inch chainsaw chain is designed for efficient cutting with features that enhance durability and user safety.
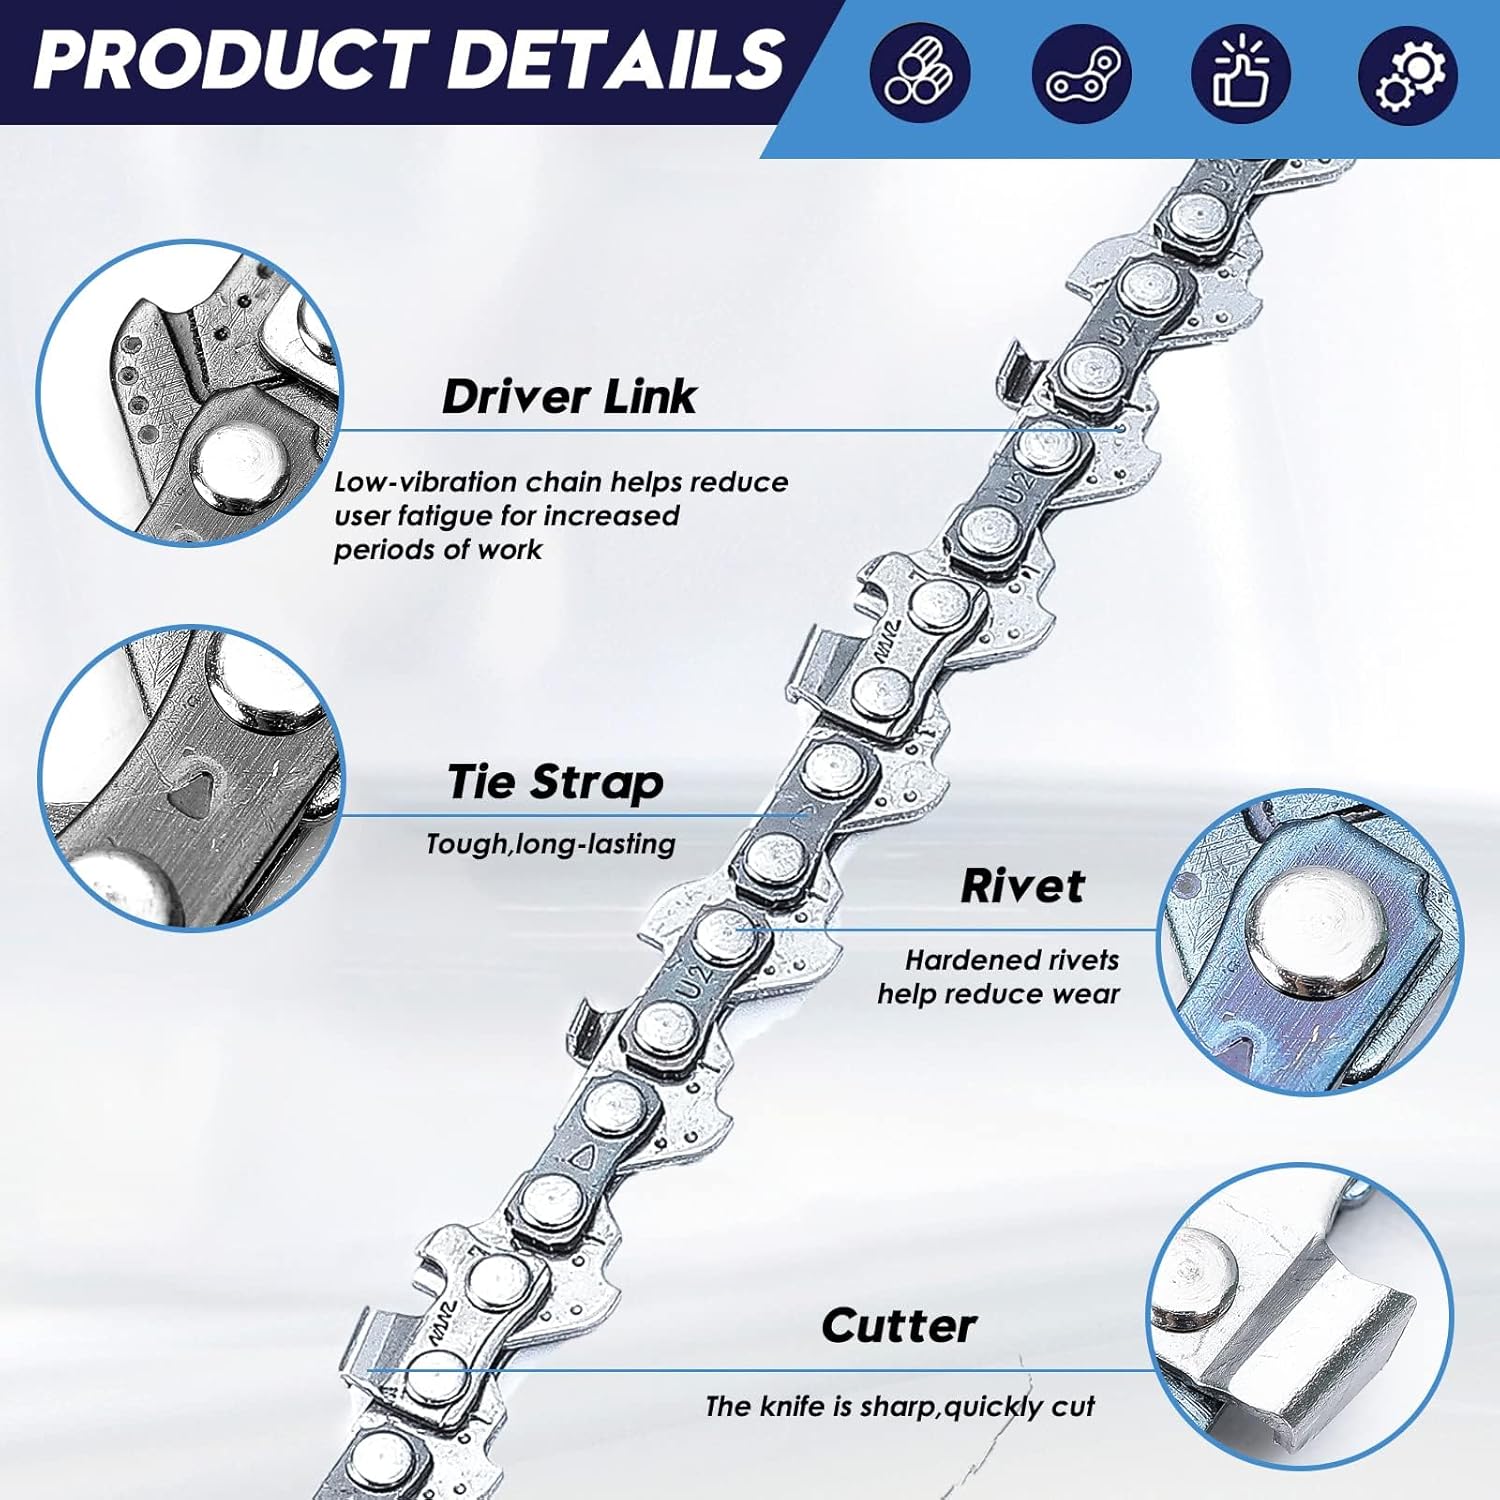
Figure 3.1: Chainsaw Chain Components. This image illustrates the key parts of the chainsaw chain, including the driver link for reduced vibration, tough tie straps, hardened rivets for less wear, and sharp cutters for efficient cutting.
Caractéristiques principales :
- Conception à faibles vibrations : Provides smoother cutting and reduced kickback for safer operation.
- Hardened Rivets: Heat-treated and quenched rivets create a stronger chain with less stretch and fewer adjustments.
- Chrome Plated Cutters: Industrial hard chrome surface helps maintain sharpness and extends cutting life.
- Pre-oiled: Each chain is pre-oiled to resist corrosion.
4. Spécifications
The following table details the specifications for the SEESII 8-inch chainsaw chain:

Figure 4.1: Chain Specifications. This image visually summarizes the critical dimensions of the chainsaw chain.
| Spécification | Valeur |
|---|---|
| Longueur de la chaîne | 8 pouces |
| Nombre de liens Drive | 47 |
| Présentation du produit | 1/4 Inches (Low Profile) |
| Jauge | 0.043 pouces |
| Type de chaîne | Ciseau complet |
| Matériel | Métal |
| Composants inclus | 2-Pack chain, 1 triangular file (2.5 mm), 1 round file (2.5 mm) |
5. Installation
5.1 Installation de la chaîne
Follow these steps to correctly install the chainsaw chain onto the guide bar:
- Assurez-vous que la tronçonneuse est éteinte et que la batterie est retirée.
- Place the chain around the guide bar, ensuring the cutting teeth are facing the correct direction (the sharp edge should face forward, away from the chainsaw body). The drive links should fit into the groove of the guide bar.
- Align the chain and guide bar with the chainsaw's sprocket and mounting points.
- Secure the guide bar and chain assembly to the chainsaw. Do not fully tighten the nut yet, as chain tension will need to be adjusted.

Figure 5.1: Chain Installation Direction. This image demonstrates the correct orientation for installing the chain, ensuring the cutting edge and drive links are properly aligned.
Video 5.1: How To Exchange and Tighten the Chain. This video provides a visual guide on the process of replacing and adjusting the tension of the chainsaw chain.
5.2 Installation de la batterie
After the chain and guide bar are securely installed, insert the fully charged battery into the chainsaw's battery slot until it clicks into place. Ensure it is firmly seated.
6. Mode d'emploi
6.1 Réglage de la tension de la chaîne
Proper chain tension is crucial for safe and efficient operation. Adjust the chain tension frequently, especially during initial use.
- Assurez-vous que la tronçonneuse est éteinte et que la batterie est retirée.
- Loosen the nut that secures the guide bar cover. The nut should be slightly loose, not fully tightened, to allow for adjustment.
- Use the provided tool to twist the tensioning screw clockwise to increase chain tension.
- Check the tension: Pull down on the chain from the center of the guide bar. There should be a 3mm-5mm gap between the chain and the guide bar. The chain should also move freely around the guide bar without binding.
- Once the correct tension is achieved, tighten the nut securely to lock the guide bar in place.

Figure 6.1: Chain Tension Check. This image illustrates the correct method for checking chain tension, aiming for a 3mm-5mm gap.
Video 6.1: How To Exchange and Tighten the Chain. This video provides a visual guide on the process of replacing and adjusting the tension of the chainsaw chain.
6.2 Lubrification de la chaîne
Regular lubrication of the chain is essential to reduce friction, prevent wear, and ensure smooth cutting performance.
- Assurez-vous que la tronçonneuse est éteinte et que la batterie est retirée.
- Apply chainsaw bar and chain oil (or suitable lubricating oil) along the entire length of the chain, especially in the groove of the guide bar.
- Manually rotate the chain a few times to distribute the oil evenly.

Figure 6.2: How to Oil the Chain. This image demonstrates the proper method for lubricating the chainsaw chain.
Video 6.2: How To Oil the Chain. This video provides a visual guide on how to properly lubricate the chainsaw chain.
6.3 Fonctionnement général
When operating the chainsaw, ensure you maintain a firm grip and proper stance. The low vibration design of the chain contributes to user comfort and control during cutting tasks.

Figure 6.3: Low Vibration Operation. This image illustrates the chainsaw in use, emphasizing the benefits of the chain's low vibration design for user comfort and safety.
7. Entretien
7.1 Affûtage de la chaîne
Regular sharpening maintains the chain's cutting efficiency and extends its lifespan. Your kit includes one 2.5 mm triangular file and one 2.5 mm round file à cet effet.
- Assurez-vous que la tronçonneuse est éteinte et que la batterie est retirée.
- Secure the guide bar to prevent movement.
- Utilisez le bon file (tour file for cutters, triangular file for depth gauges) to sharpen each tooth according to the manufacturer's recommendations for your chainsaw. Maintain the correct filing angle.
- Sharpen all teeth on one side, then flip the chainsaw and sharpen the teeth on the other side.

Figure 7.1: Chain Sharpening. This image illustrates the use of a file to sharpen the chainsaw chain, a key maintenance task.
7.2 Entretien général
- Clean the chain and guide bar after each use to remove sawdust, resin, and debris.
- Store the chain in a dry place to prevent rust. The pre-oiled coating helps resist corrosion.
- Inspect the chain for any damage, cracks, or excessive wear before each use. Replace damaged chains immediately.
8. Dépannage
This section addresses common issues you might encounter with your chainsaw chain.
| Problème | Cause possible | Solution |
|---|---|---|
| La chaîne ne coupe pas efficacement. | Dull chain, incorrect tension, insufficient lubrication | Sharpen the chain, adjust tension, apply more oil |
| Chain binds or jams | Incorrect tension (too tight), debris in guide bar, damaged chain | Adjust tension (loosen slightly), clean guide bar, inspect and replace chain if damaged |
| Vibrations excessives | Damaged chain, loose components, incorrect tension | Inspect chain for damage, check all fasteners, adjust chain tension |
| Chain wears quickly | Lack of lubrication, improper sharpening, cutting abrasive materials | Lubricate regularly, sharpen correctly, avoid cutting dirty wood or ground |
9. Garantie et assistance
For warranty information or technical support regarding your SEESII chainsaw chain and sharpening kit, please refer to the documentation provided with your original chainsaw purchase or contact your seller directly. Keep your purchase receipt as proof of purchase.