Jansite f7ff6f26-bf6b-4b89-90da-7a343c3540b0
Jansite Portable Cordless Tire Inflator User Manual
Model: f7ff6f26-bf6b-4b89-90da-7a343c3540b0
1. Introduction
Thank you for choosing the Jansite Portable Cordless Tire Inflator. This device is designed for convenient and efficient inflation of various items, including car tires, bicycle tires, motorcycle tires, sports balls, and inflatable toys. Featuring a powerful 150PSI capacity, a 3000mAh rechargeable battery, a digital LED display, and an automatic shut-off function, this inflator provides a reliable solution for your inflation needs. Please read this manual thoroughly before use to ensure proper operation and safety.

This image displays the main unit of the Jansite Portable Cordless Tire Inflator alongside its flexible inflation hose and a set of interchangeable nozzles for different applications.
2. Consignes de sécurité
Pour éviter toute blessure ou tout dommage, veuillez toujours respecter les consignes de sécurité suivantes :
- Gardez l'appareil hors de portée des enfants.
- N’utilisez pas le gonfleur dans des conditions humides ou à proximité de liquides ou de gaz inflammables.
- Évitez toute utilisation continue prolongée. Laissez l'appareil refroidir après 10 à 15 minutes d'utilisation afin d'éviter toute surchauffe.
- Veillez à utiliser la pression de gonflage appropriée. Un gonflage excessif peut entraîner des blessures graves ou des dommages.
- Ne dirigez pas l'embout de gonflage vers des personnes ou des animaux.
- Utilisez uniquement les accessoires et le câble de chargement fournis.
- Si l'appareil présente des signes de dommages, ne l'utilisez pas. Contactez le service client.
3. Contenu du colis
Veuillez vérifier le colis pour vous assurer que tous les articles sont présents :

This image displays all items included in the product package: the main inflator unit, inflation hose, various nozzles, a carrying pouch, a user manual, and a USB charging cable.
- Jansite Portable Cordless Tire Inflator Unit
- Tuyau de gonflage flexible
- Adaptateur de valve Presta
- Aiguille à bille
- Buse d'anneau de bain
- Câble de chargement USB
- Pochette de rangement
- Manuel de l'utilisateur (ce document)
4. Produit terminéview
Familiarize yourself with the components and controls of your inflator:

A detailed diagram illustrating the physical dimensions of the inflator (221mm height, 55mm width) and labeling its control panel components, including the power display, power switch, unit switch, digital LCD display, pressure value adjustment buttons, USB input/output, and internal storage for small nozzles.
- Affichage de la puissance : Indique le niveau de la batterie.
- Interrupteur: Allume/éteint l'appareil.
- Commutateur d'unité : Cycles through pressure units (PSI, BAR, KPA, KG/CM²).
- Écran LCD numérique : Affiche la pression actuelle et la pression préréglée.
- Pressure Value Adjustment Buttons (+/-): Increases or decreases target pressure.
- Entrée USB: Pour charger le gonfleur.
- Output for Power Bank: Pour recharger des appareils externes.
- Small Nozzle Storage: Convenient compartment for accessories.
5. Chargement de l'appareil
Before first use, fully charge the inflator. The device features a 3000mAh rechargeable battery.
- Connect the provided USB charging cable to the USB input port on the inflator.
- Connectez l'autre extrémité du câble USB à un adaptateur secteur USB approprié (non inclus) ou à un port USB d'ordinateur.
- The power display will indicate the charging status. Once fully charged, the indicator will show a full battery.
- Une charge complète prend généralement plusieurs heures.

This image highlights the inflator's separate battery design, emphasizing its long standby time of approximately 120 days, which contributes to extended battery life.
6. Fonctionnement
6.1. Étapes fondamentales de l'inflation
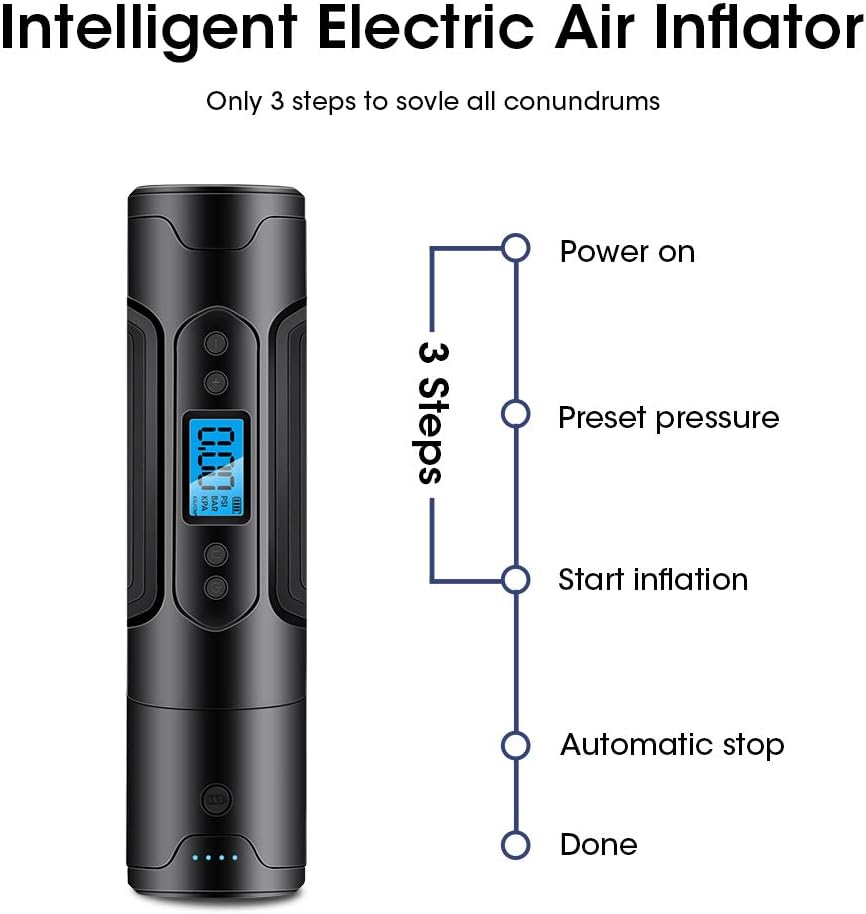
This diagram outlines the simple three-step process for using the inflator: Power on, Preset pressure, and Start inflation, followed by automatic stopping when the target pressure is reached.
- Mise sous tension : Press the Power Switch to turn on the device. The digital display will illuminate.
- Sélectionnez l'unité : Press the Unit Switch to cycle through desired pressure units (PSI, BAR, KPA, KG/CM²).
- Définir la pression cible : Use the Pressure Value Adjustment Buttons (+/-) to set your desired target pressure. Refer to the item's manufacturer recommendations for correct pressure.
- Raccorder le tuyau : Screw the flexible inflation hose onto the inflator's air outlet. Attach the appropriate nozzle to the hose if needed (e.g., for balls or swim rings).
- Se connecter à l'élément : Securely connect the inflation hose/nozzle to the valve stem of the item you wish to inflate.
- Démarrer l'inflation : Press the Power Switch again to begin inflation. The display will show the current pressure increasing.
- Arrêt automatique : Le gonfleur s'arrêtera automatiquement une fois la pression cible préréglée atteinte.
- Déconnecter: Carefully disconnect the hose from the item and then from the inflator.
6.2. Utilisation de la lumière LED
The inflator is equipped with an LED light for illumination in low-light conditions.
- To turn on the LED light, press and hold the Power Switch for 3 seconds while the device is on.
- To turn off the LED light, press and hold the Power Switch for 3 seconds again.
6.3. Fonction de batterie externe
The detachable battery can be used as a power bank to charge other USB-powered devices.

An illustration showing the inflator's dual functionality: its detachable battery can act as a power bank to charge mobile devices, and the integrated LED light provides emergency illumination for up to 7 hours at 80 lumens.
- Ensure the inflator's battery is charged.
- Connect your device's USB charging cable to the USB output port on the inflator.
- Le gonfleur commencera à charger votre appareil.

Une illustration montrantasing the key features of the Jansite air pump, including its digital pressure display, integrated power bank functionality, LED light for illumination, and automatic shut-off capability upon reaching the preset pressure.

An image demonstrating the versatility of the inflator, showing its use for inflating car tires, bicycle tires, sports balls, and various swim rings or inflatable toys.
7. Entretien
- Nettoyage: Essuyez l'appareil avec un chiffon doux et sec. N'utilisez pas de produits chimiques agressifs ni de nettoyants abrasifs.
- Stockage: Store the inflator in a cool, dry place, away from direct sunlight and extreme temperatures. Ensure the battery is partially charged (around 50%) if storing for extended periods to prolong battery life.
- Entretien de la batterie: Charge the battery regularly, even if not in use, to maintain its health. Avoid completely draining the battery frequently.
8. Dépannage
| Problème | Cause possible | Solution |
|---|---|---|
| L'appareil ne s'allume pas. | La batterie est épuisée. | Chargez complètement l'appareil. |
| L'inflation est lente ou ne fonctionne pas. | Hose or nozzle not securely connected; incorrect pressure unit selected; item valve is faulty. | Ensure all connections are tight. Verify the pressure unit. Check the item's valve. |
| L'appareil s'arrête prématurément. | Target pressure reached; battery low; overheating. | Check preset pressure. Recharge battery. Allow device to cool down. |
| La durée de vie de la batterie est plus courte que prévu. | Frequent full discharge; old battery; extreme temperatures. | Avoid frequent full discharges. Store in moderate temperatures. Consider battery replacement if very old. |
9. Spécifications
| Fonctionnalité | Détail |
|---|---|
| Marque | Jansite |
| Nom du modèle | f7ff6f26-bf6b-4b89-90da-7a343c3540b0 |
| Pression maximale | 150 PSI |
| Capacité de la batterie | 3000 mAh (Lithium Polymère) |
| Voltage | 3.7 volts |
| Source d'énergie | Alimenté par batterie |
| Caractéristiques spéciales | Automatic Shut-Off, LED Light, Portable, Power Bank Function |
| Poids de l'article | 1.26 livres |
| Dimensions du colis | 10.63 x 3.7 x 3.43 pouces |
| Code UPC | 759337623894 |
10. Garantie et assistance
Jansite is committed to providing quality products. For any questions, technical support, or warranty inquiries regarding your Portable Cordless Tire Inflator, please refer to the contact information provided with your purchase or visit the official Jansite website.
Veuillez conserver votre preuve d'achat pour les réclamations au titre de la garantie.