1. Produit terminéview
The Cooler Master ARGB & PWM HUB is designed to expand the cooling and lighting capabilities of your computer system. It allows for simultaneous connection of up to six Addressable RGB (3-pin) devices and six PWM (4-pin) fans. This compact hub helps manage cables efficiently and ensures stable power delivery to all connected components.

Image 1 : Haut view of the Cooler Master ARGB & PWM Hub, showing all six ARGB and PWM ports, along with the SATA power connector and motherboard sync headers.
2. Principales caractéristiques
- Multi-Connection Capability: Connects up to 6 Addressable RGB (3-pin) headers and 6 PWM (4-pin) headers simultaneously.
- Built-in Magnet Design: Features integrated magnets for easy and secure attachment to any metallic surface within your PC case, simplifying installation and cable management.
- Compact et pratique : Small form factor saves space and contributes to a neat and tidy internal case appearance.
- Alimentation SATA : Utilizes a SATA power connector to ensure stable power output, even when all ports are fully utilized.
3. Guide d'installation
3.1 Déballage et inspection
Carefully remove the ARGB & PWM Hub from its packaging. Inspect the unit for any signs of damage. Ensure all included cables are present.
3.2 Montage du moyeu
The hub features built-in magnets. Choose a suitable metallic surface inside your PC case, such as the back of the motherboard tray or a drive bay, and simply place the hub onto it. Ensure it is securely attached and does not interfere with other components or airflow.
3.3 Connexion de l'alimentation
Connect a SATA power cable from your power supply unit (PSU) to the SATA power input port on the hub. This provides the necessary power for all connected fans and ARGB devices.
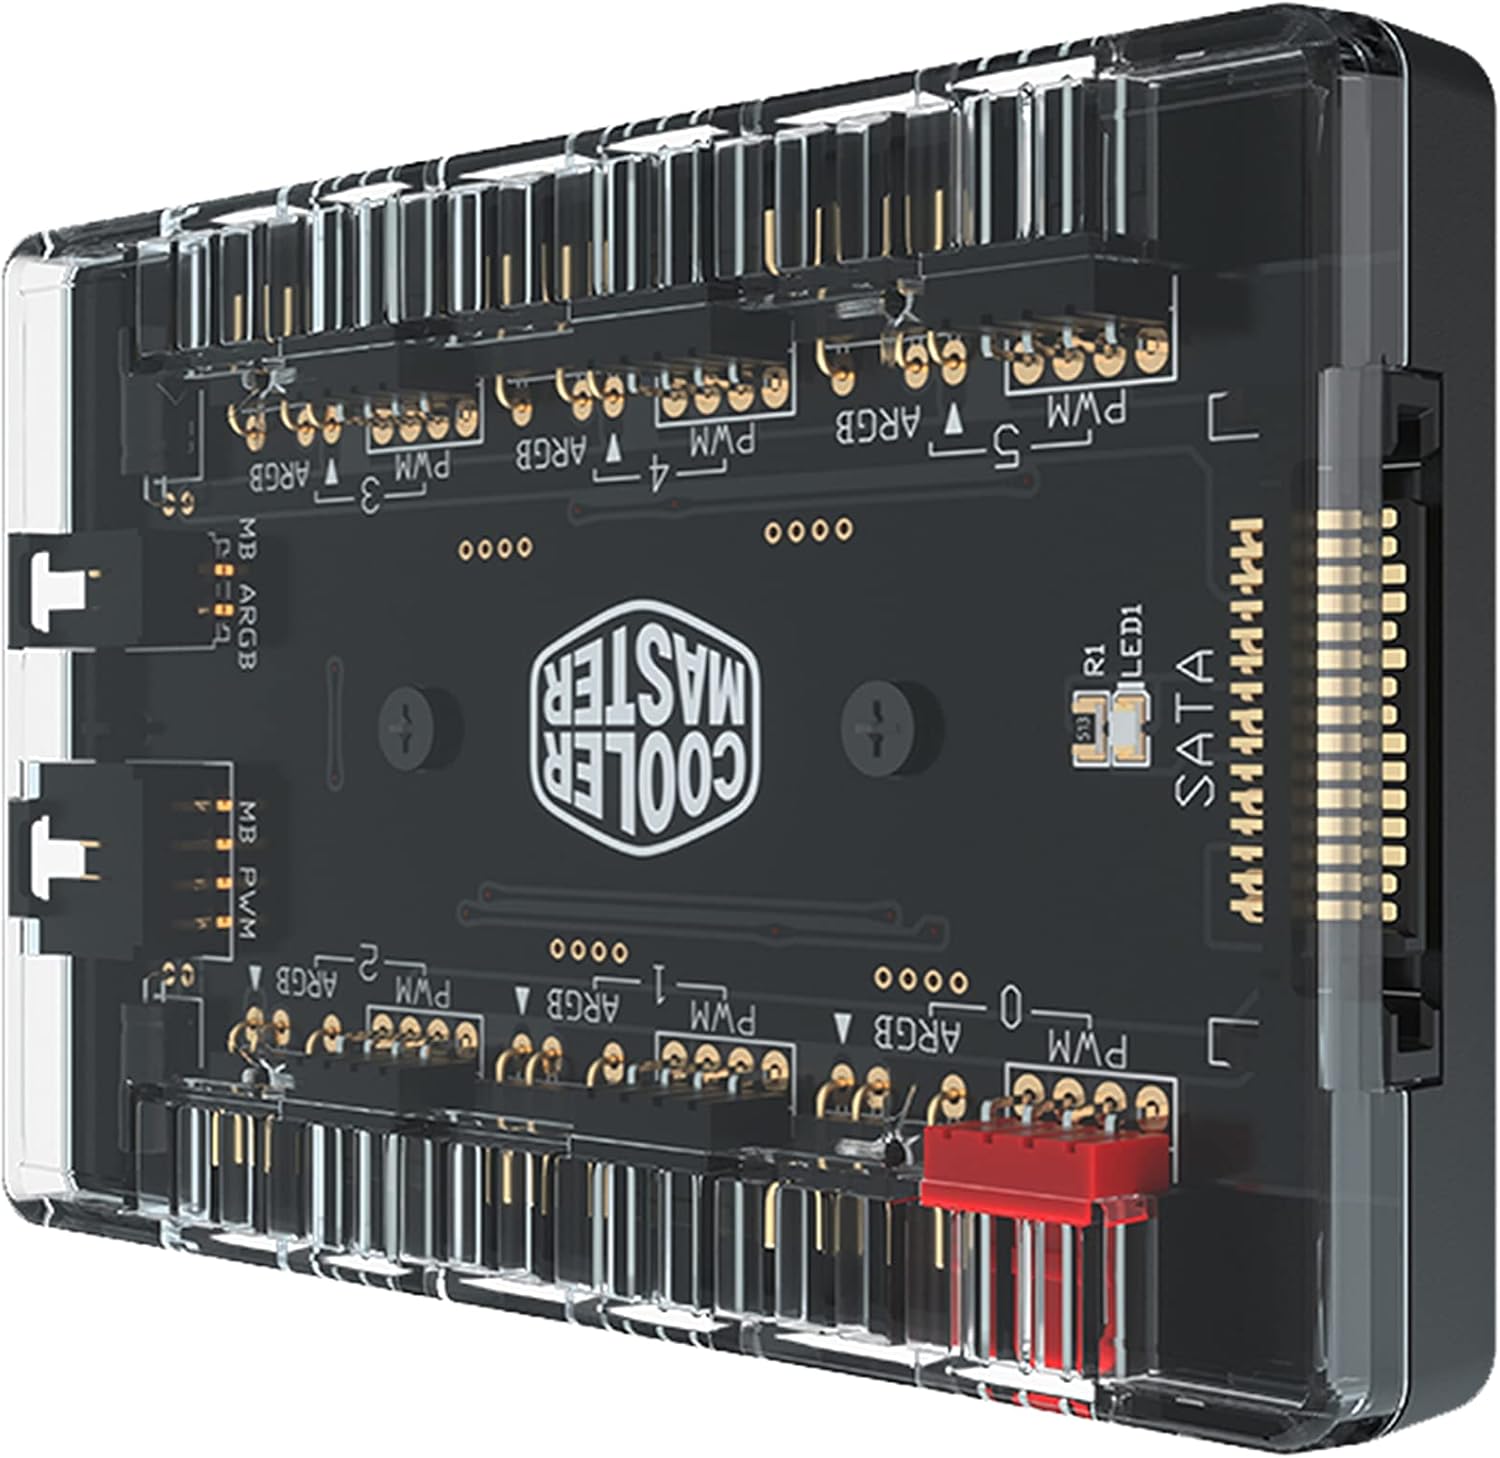
Image 2 : Inclinée view of the hub, highlighting the SATA power input connector on the side.
3.4 Connecting PWM Fans
Connect your 4-pin PWM fans to the designated PWM headers (labeled PWM 0-5) on the hub. Ensure the connectors are oriented correctly.
3.5 Connecting Addressable RGB Devices
Connect your 3-pin Addressable RGB devices (e.g., ARGB fans, LED strips) to the designated ARGB headers (labeled ARGB 0-5) on the hub. Pay close attention to the pin orientation to avoid damage. Incorrect connection can damage the ARGB device or the hub.
3.6 Motherboard Synchronization (Optional)
If you wish to synchronize the ARGB lighting and PWM fan control with your motherboard's software, connect the included motherboard ARGB sync cable to the 'MB ARGB' header on the hub and to a compatible 3-pin ARGB header on your motherboard. Similarly, connect the 'MB PWM' header on the hub to a 4-pin PWM fan header on your motherboard for fan speed control.
4. Fonctionnement
Once the hub is installed and connected, the connected PWM fans and ARGB devices will receive power. If connected to your motherboard, control of fan speeds and ARGB lighting effects will be managed through your motherboard's proprietary software (e.g., ASUS Aura Sync, MSI Mystic Light Sync, Gigabyte RGB Fusion, ASRock Polychrome Sync). Refer to your motherboard's manual for specific software instructions.
Note that this hub provides multiple ports for expansion but typically synchronizes all connected devices to a single control signal from the motherboard. Individual control of each fan or ARGB device may depend on the capabilities of your motherboard and its software.
5. Entretien
The Cooler Master ARGB & PWM Hub requires minimal maintenance. Periodically, ensure all cable connections are secure and free from dust buildup. Use a soft, dry cloth to gently clean the hub's exterior if necessary. Do not use liquid cleaners or abrasive materials.
6. Dépannage
- No Power to Fans/ARGB Devices: Ensure the SATA power cable is securely connected to both the hub and your power supply. Check that your PSU is powered on.
- L'éclairage ARGB ne fonctionne pas : Verify that the 3-pin ARGB connectors are correctly oriented and fully seated. Ensure the motherboard ARGB sync cable (if used) is properly connected to both the hub and the motherboard. Check your motherboard's ARGB software settings.
- Fans Not Spinning or Incorrect Speed: Confirm that the 4-pin PWM fan connectors are correctly attached. If using motherboard control, ensure the motherboard PWM sync cable is connected and check fan speed settings in your motherboard's BIOS or software.
- ARGB Connector Fit Issues: Some third-party ARGB connectors may have slightly different dimensions. Ensure your connectors are compatible with standard 3-pin ARGB headers. Do not force connectors, as this can cause damage.
- Hub Not Detected by Software: Ensure the motherboard sync cables are correctly connected. Restart your system and check your motherboard's software for device detection.
7. Spécifications
| Attribut | Valeur |
|---|---|
| Dimensions du produit | 1.73"L x 0.98"l x 0.59"H |
| Marque | Maître refroidisseur |
| Type de connecteur d'alimentation | SATA |
| Voltage | 12 volts |
| Quoitage | 260 watts |
| Méthode de refroidissement | Ventilateur |
| Appareils compatibles | Bureau |
| Matériel | Métal |
| Code UPC | 884102066849 |
| Fabricant | Cooler Master Europe BV |
| Nombre d'articles | 1 |
| Série | ARGB & PWM HUB 1 to 6 Port |
| Numéro de modèle de l'article | MFX-ZHHN-1NNN6-R1 |
| Poids de l'article | 2.19 onces |
| Couleur | RVB |

Image 3: The hub shown with its physical dimensions: 1.73 inches (length), 0.98 inches (width), and 0.59 inches (height).
8. Vidéos produits
8.1 Produit terminéview Vidéo
Vidéo 1 : Un produit officielview video demonstrating the Cooler Master ARGB & PWM Hub's features and design.
9. Garantie et assistance
This product is covered by Cooler Master's standard manufacturer warranty. For detailed warranty information, please refer to the official Cooler Master website or the warranty card included with your product. For technical support, troubleshooting assistance, or to inquire about replacement parts, please contact Cooler Master customer service through their official support channels.
Always ensure you are using genuine Cooler Master accessories and following recommended installation procedures to maintain warranty validity.