Introduction
The TFA-Dostmann Bingo Radio-Controlled Alarm Clock (Model 60.2528.02) is designed for intuitive and easy use. It features a clear display, silent operation, and an automatic LED backlight for visibility at night. The alarm function offers a gentle wake-up with a gradual increase in intensity. Two distinct alarm times can be set simultaneously using dedicated side switches, with a color indicator showing activation status. This alarm clock also displays the day of the week, date, and ambient room temperature, helping to maintain an optimal sleeping environment (ideally between 16°C and 18°C).

Figure 1 : Face avant view of the alarm clock showing the display and control buttons.
Installation
1. Installation de la batterie
The alarm clock requires 2 AA batteries (included). To install or replace batteries:
- Repérez le couvercle du compartiment à piles à l'arrière de l'appareil.
- Faites glisser le couvercle pour l'ouvrir.
- Insérez 2 piles AA en respectant la polarité (+/-).
- Fermez soigneusement le couvercle du compartiment à piles.

Figure 2 : Arrière view avec compartiment à piles et commandes.
2. Initial Power-On and Radio Control Synchronization
Upon battery installation, the clock will automatically attempt to synchronize with the radio-controlled time signal. This process may take several minutes. Ensure the clock is placed away from electronic interference for optimal reception.
- The radio signal icon on the display will flash during synchronization.
- Once synchronized, the icon will become solid, and the correct time, date, and day of the week will be displayed.
- If synchronization fails, the clock will operate as a standard quartz clock. You can manually set the time (see 'Setting Time Manually').
Mode d'emploi
1. Setting Time Manually (if radio control is unavailable)
If the radio-controlled time signal is not received, you can set the time manually:
- Appuyez et maintenez enfoncé le ENSEMBLE Appuyez sur le bouton situé à l'arrière de l'horloge jusqu'à ce que les chiffres des heures clignotent.
- Utilisez le + or - buttons on the front to adjust the hour.
- Presse ENSEMBLE à nouveau pour confirmer l'heure et passer aux minutes.
- Utilisez le + or - boutons pour régler les minutes.
- Continuez à appuyer ENSEMBLE to cycle through and adjust year, month, day, and 12/24-hour format as needed.
- Presse ENSEMBLE une dernière fois ou patientez quelques secondes pour que les paramètres soient enregistrés.
2. Réglage des alarmes (Alarme 1 et Alarme 2)
Cette horloge est dotée de deux alarmes indépendantes.
- Appuyez sur le ENSEMBLE 1 bouton (pour l'alarme 1) ou ENSEMBLE 2 button (for Alarm 2) on the front. The alarm time will appear on the display.
- While the alarm time is displayed, press and hold the respective ENSEMBLE appuyer sur le bouton jusqu'à ce que les chiffres de l'heure clignotent.
- Utilisez le + or - boutons pour régler l'heure de l'alarme.
- Appuyez sur la touche correspondante. ENSEMBLE Appuyez à nouveau sur le bouton pour confirmer l'heure et passer aux minutes.
- Utilisez le + or - boutons pour régler les minutes de l'alarme.
- Appuyez sur la touche correspondante. ENSEMBLE button one last time or wait a few seconds to save the alarm time.
3. Activation/Désactivation des alarmes
Use the slider switches on the side of the clock to activate or deactivate each alarm.
- Slide the switch for Alarm 1 (bell icon with '1') to ON to activate. A color indicator will show it's active.
- Slide the switch for Alarm 2 (bell icon with '2') to ON to activate. A color indicator will show it's active.
- Faites glisser le commutateur sur DÉSACTIVÉ pour désactiver l'alarme.

Figure 3 : Côté view showing alarm activation switch.
4. Fonction Snooze
Lorsqu'une alarme retentit, appuyez sur le grand bouton. SNOOZE & LIGHT button on top of the clock to activate the snooze function. The alarm will pause for approximately 5 minutes and then sound again. This can be repeated multiple times.
5. Rétroéclairage automatique
The clock features an automatic LED backlight for easy viewdans des conditions de faible luminosité.
- Localisez le ÉCLAIRAGE AUTOMATIQUE Interrupteur à l'arrière de l'horloge.
- Faites glisser le commutateur sur ON to enable the automatic backlight. A light sensor will detect ambient light levels and illuminate the display discreetly in the dark.
- Faites glisser le commutateur sur DÉSACTIVÉ to disable the automatic backlight.
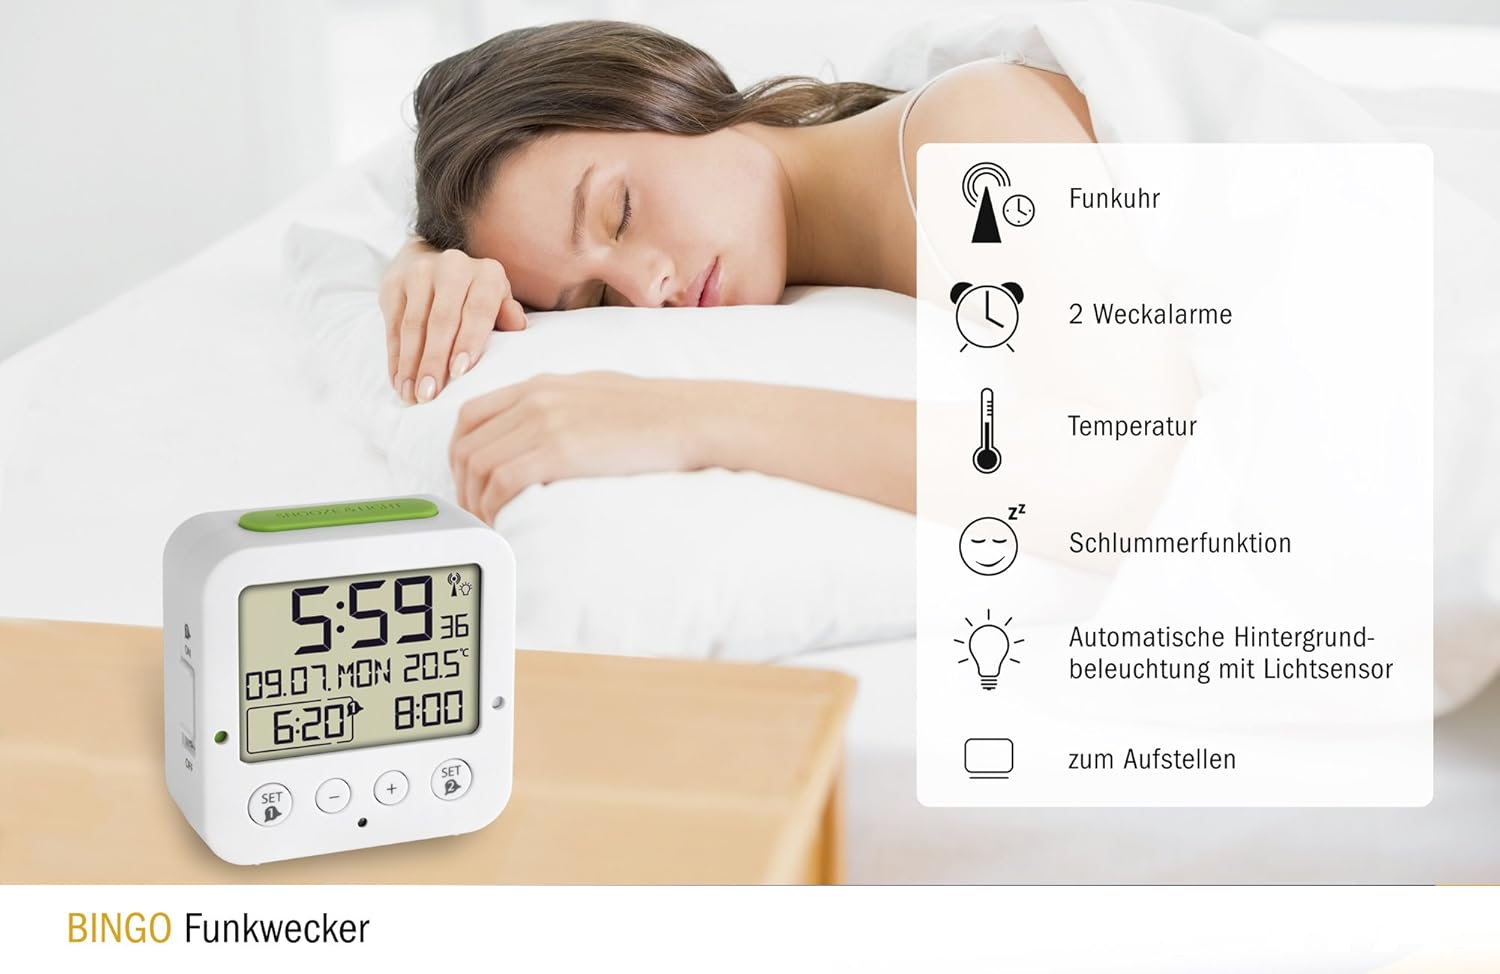
Figure 4: Display with automatic backlight in a dark environment.
6. Affichage de la température
The integrated thermometer continuously measures and displays the ambient room temperature. No special settings are required for this function.
Vidéo 1 : Terminéview of the alarm clock's features and basic operation.
Entretien
1. Nettoyage
To clean the alarm clock, use a soft, dry cloth. Do not use abrasive cleaners, solvents, or chemical agents, as these may damage the display or casing.
2. Remplacement de la batterie
Replace batteries when the display becomes dim or functions become erratic. Always replace both batteries at the same time with new AA batteries. Dispose of used batteries responsibly according to local regulations.
Dépannage
- Aucun affichage ou affichage faible : Check battery polarity. Replace batteries if they are low.
- Radio control not synchronizing: Move the clock to a different location, away from electronic devices that may cause interference. Ensure it is not near metal objects. Manual time setting is an alternative.
- L'alarme ne sonne pas : Ensure the alarm switch on the side is set to ON. Verify the alarm time is correctly set.
- Automatic backlight not working: Assurez-vous que ÉCLAIRAGE AUTOMATIQUE switch on the back is set to ON. The backlight only activates in dark conditions.
Caractéristiques
| Fonctionnalité | Détail |
|---|---|
| Numéro de modèle | 60.2528.02 |
| Dimensions (L x l x H) | 8.4 x 3.81 x 8.1 cm |
| Poids | 116 gramme |
| Source d'énergie | 2 piles AA (incluses) |
| Type d'affichage | Numérique |
| Type de mouvement | Quartz, Radio-Controlled |
| Caractéristiques spéciales | Dual Alarm, Snooze, Automatic Backlight, Date Display, Day of Week, Temperature Display |
| Matériel | Acrylonitrile Butadiène Styrène (Plastique) |
| Couleur | Blanc/Vert |
Garantie et assistance
TFA-Dostmann products are manufactured with quality and precision. For warranty information, please refer to the documentation included with your purchase or visit the official TFA-Dostmann website. For technical support or inquiries, please contact TFA-Dostmann customer service.
Disponibilité des pièces détachées : 1 an.