1. Introduction
This manual provides detailed instructions for the installation, operation, and maintenance of your Pioneer DEH-80PRS CD Receiver. Please read this manual thoroughly before using the product to ensure proper operation and to prevent damage.
The Pioneer DEH-80PRS is an advanced car audio CD receiver designed for superior sound quality, featuring a 3-Way Active Crossover Network, Auto EQ, Auto Time Alignment, Bluetooth connectivity, and HD Radio capabilities.

Figure 1: Pioneer DEH-80PRS CD Receiver
2. Consignes de sécurité
Précautions de sécurité importantes :
- Do not attempt to install or service this product yourself. Refer installation and service to qualified personnel.
- Do not operate this product in any way that distracts you from safe driving. Always observe traffic regulations.
- Keep the volume at a level where you can still hear outside sounds, such as emergency vehicle sirens.
- Évitez d'exposer l'appareil à l'humidité ou à des températures extrêmes.
Avertissement concernant la Proposition 65 :
Ce produit contient des produits chimiques reconnus par l’État de Californie comme pouvant provoquer le cancer, des malformations congénitales ou d’autres troubles de la reproduction.
3. Contenu du colis
Verify that all items are present in the box before proceeding with installation:
- Pioneer DEH-80PRS CD Receiver
- Télécommande
- External Microphone for Auto EQ/Time Alignment
- Faisceau de câblage
- Câble de rallonge USB
- RCA Cables (for pre-outs)
- Installation Hardware (screws, mounting cage)
- Manuel du propriétaire (ce document)

Figure 2: Included accessories for the DEH-80PRS
4. Produit terminéview
4.1 Commandes du panneau avant
The front panel features a large rotary volume knob, various function buttons for source selection, menu navigation, and audio adjustments, and a multi-line display. The display provides information on the current source, track, radio station, and audio settings.

Figure 3: Front panel of the DEH-80PRS and remote control
4.2 Connexions du panneau arrière
The rear panel provides connections for power, speakers, external amplifiers (RCA pre-outs), USB devices, and the external microphone. It also includes a fuse for protection.
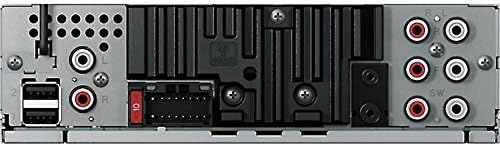
Figure 4: Rear panel showing power, speaker, and RCA connections
5. Configuration et installation
Professional installation is recommended for optimal performance and to avoid damage to your vehicle's electrical system. Ensure the vehicle's battery is disconnected before starting installation.
5.1 Connexions de câblage
- Connect the wiring harness to the vehicle's power, ground, and speaker wires according to the wiring diagram provided in the separate installation guide.
- Connect the RCA pre-out cables to your external ampAmplificateurs pour les canaux avant, arrière et subwoofer.
- Connect the external microphone to the designated input for Auto EQ and Auto Time Alignment functions.
- Connect any USB devices or storage via the USB extension cable.
5.2 Paramètres initiaux
After installation, reconnect the vehicle's battery. The unit will power on. Follow the on-screen prompts for initial setup, including language selection and clock settings.
Important: The DEH-80PRS features a switch on the chassis to select between Standard (STD) mode and Network (NW) mode for the 3-Way Active Crossover. Ensure this switch is set correctly for your speaker configuration before performing audio adjustments. Changing this switch requires a system reset.
6. Mode d'emploi
6.1 Fonctionnement de base
- Marche/Arrêt : Appuyez sur le bouton SRC (Source) pour allumer l'appareil. Maintenez le bouton SRC enfoncé pour l'éteindre.
- Contrôle du volume : Rotate the large rotary knob to adjust the volume.
- Sélection de la source : Press the SRC button repeatedly to cycle through available sources (CD, Tuner, USB, SD, Bluetooth Audio, AUX).
6.2 Lecture de CD
Insert a CD into the disc slot. Playback will begin automatically. Use the track skip buttons to navigate between tracks. Press the BAND button to switch between CD text display modes.
6.3 Tuner Operation (AM/FM/HD Radio)
Select the Tuner source. Press the BAND button to switch between FM1, FM2, FM3, and AM bands. Use the seek buttons to find stations. For HD Radio, the unit will automatically detect and tune to HD Radio broadcasts where available.
6.4 Connectivité Bluetooth
The DEH-80PRS supports Bluetooth for audio streaming and hands-free calling.
- Jumelage : Enable Bluetooth on your mobile device. On the DEH-80PRS, navigate to the Bluetooth menu and select 'Pairing'. Select 'Pioneer DEH-80PRS' from your device's Bluetooth list. Enter the PIN if prompted (default is '0000').
- Streaming audio: Once paired, select 'Bluetooth Audio' as the source to stream music from your device.
- Appels mains libres : When a call comes in, the unit will display the caller ID. Press the phone button to answer or end a call.
6.5 Lecture USB/SD
Insert a USB device into the USB port or an SD card into the SD card slot. The unit will automatically detect and begin playback of compatible audio files. Use the navigation buttons to browse folders and tracks.
6.6 Advanced Audio Settings
The DEH-80PRS offers extensive audio customization for audiophile-grade sound.
- 3-Way Active Crossover Network: This feature allows precise control over the frequency ranges sent to your tweeters, mid-range speakers, and subwoofers. Access this in the Audio menu to set crossover points and slopes for each channel. This is especially powerful in Network mode.
- Égalisation automatique : Use the supplied microphone to automatically equalize the sound output to your vehicle's acoustics. Place the microphone in the listening position (e.g., driver's headrest), ensure the car is quiet with windows closed, and initiate the Auto EQ process from the Audio menu.
- Auto Time Alignment: This feature measures the distance from each speaker to the listening position and adjusts the sound output timing to ensure all sound reaches the listener simultaneously, creating a more focused soundstage. Use the same microphone placement as Auto EQ and initiate from the Audio menu.
- Manual EQ/Sound Adjustments: For further fine-tuning, the unit provides a 16-band graphic equalizer, listening position selector, and other manual sound controls.
7. Entretien
7.1 Nettoyage de l'appareil
Wipe the front panel with a soft, dry cloth. Do not use harsh chemicals or abrasive cleaners. For stubborn dirt, lightly dampet le chiffon avec de l'eau.
7.2 Batterie de la télécommande
If the remote control stops responding, replace the lithium coin cell battery (CR2025). Refer to the remote control's specific instructions for battery replacement.
8. Dépannage
En cas de problème, reportez-vous au tableau ci-dessous pour connaître les problèmes courants et leurs solutions.
| Problème | Cause possible | Solution |
|---|---|---|
| Pas de courant | Blown fuse; incorrect wiring | Check the fuse; verify wiring connections. |
| Pas de son | Volume too low; incorrect source; speaker wiring issue | Augmentez le volume ; sélectionnez la source appropriée ; vérifiez les connexions des haut-parleurs. |
| Bluetooth ne se connecte pas | Device not in pairing mode; unit not discoverable | Ensure both devices are in pairing mode; delete previous pairings and try again. |
| CD error | Dirty or scratched disc; disc inserted incorrectly | Clean the disc; ensure it is inserted correctly. |
If the problem persists after trying these solutions, contact Pioneer customer support or a qualified service technician.
9. Spécifications
- Dimensions du produit : 11.7 x 6.4 x 8.9 pouces
- Poids de l'article : 2.64 livres (1.2 kilogramme)
- Numéro de modèle de l'article : DEH80PRS
- Piles : 1 Lithium Metal battery required (for remote)
- Technologies de communication sans fil : Bluetooth
- Technologies de connectivité : Câblé
- Caractéristiques spéciales : CD Player, 3-Way Active Crossover Network, Auto EQ, Auto Time Alignment
- Appareils compatibles : Enceinte, Smartphone
- Type de connecteur : Prise 3.5 mm, USB
- Mode de sortie audio : Stéréo
- Configuration du canal de son surround : 5.1 (via pre-outs)
- Fabricant: Pionnier
- Date de mise en ligne sur Amazon : 16 janvier 2012
10. Garantie et assistance
For warranty information, please refer to the separate warranty card included with your product or visit the official Pioneer website. For technical support, product registration, or to find authorized service centers, please contact Pioneer customer service directly.
You can typically find support contact details on the official Pioneer website: www.pioneerelectronics.com