1. Introduction
Merci pour votre achatasing the Caliber RMD 068-2 Car Radio USB/SD Player. This manual provides detailed instructions for the installation, operation, and maintenance of your new car radio. Please read this manual thoroughly before using the product to ensure proper functionality and safety. Keep this manual for future reference.
2. Consignes de sécurité
- Installation: Ensure the unit is installed by a qualified technician to prevent damage to the vehicle's electrical system. Incorrect wiring can cause fire or electrical shock.
- Alimentation: Branchez l'appareil uniquement à une batterie de voiture 12 V CC avec une masse négative.
- Fusibles: Always replace fuses with new ones of the specified rating. Using an incorrect fuse can cause damage to the unit or vehicle.
- Niveau de volume : Do not operate the unit at excessively high volume levels, as this may impair your ability to hear external traffic sounds and could be dangerous.
- Nettoyage: Utilisez un chiffon doux et sec pour le nettoyage. N'utilisez pas de nettoyants abrasifs ni de solvants.
- Humidité: N'exposez pas l'appareil à l'humidité ou à l'eau.
3. Contenu du colis
Veuillez vérifier que tous les articles sont présents :
- Caliber RMD 068-2 Car Radio Unit
- Panneau avant amovible
- Faisceau de câblage ISO
- Cadre de montage
- Disassembly Keys (2 pcs)
- Manuel de l'utilisateur (ce document)
4. Produit terminéview
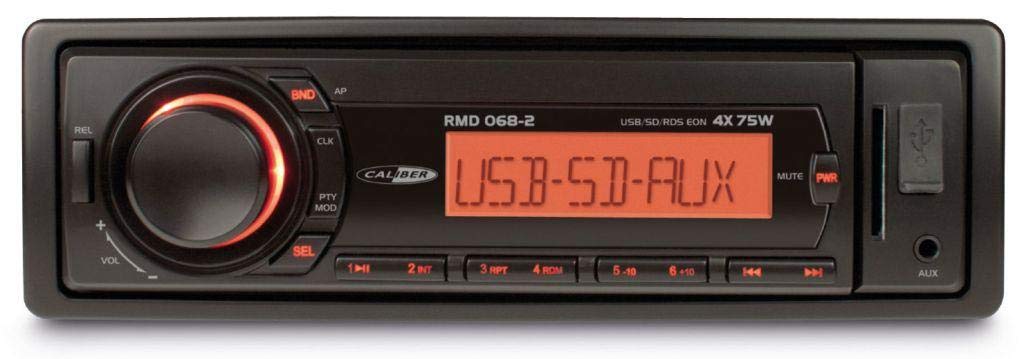
Figure 1 : Face avant view of the Caliber RMD 068-2 Car Radio. This image shows the main unit with its detachable front panel, including the display, control buttons, USB port, and SD card slot.
4.1 Commandes du panneau avant
- POWER/MODE Button: Press to turn on/off. Short press to switch between Radio, USB, SD, AUX modes.
- Bouton VOLUME : Rotate to adjust volume. Press to access audio settings (Bass, Treble, Balance, Fader).
- AFFICHER: Shows current time, radio frequency, track information, etc.
- Port USB : Connectez des clés USB pour la lecture multimédia.
- Emplacement pour carte SD : Insérez les cartes SD pour la lecture multimédia.
- Entrée AUX (prise jack 3.5 mm) : Connectez des périphériques audio externes.
- Bouton BAND/AMS : In radio mode, press to select radio band (FM1, FM2, FM3). Long press for Automatic Memory Store.
- Boutons PRÉRÉGLÉS (1-6) : Store and recall radio stations. In USB/SD mode, use for direct track selection.
- Bouton PLAY/PAUSE : Lancer ou mettre en pause la lecture multimédia.
- FORWARD/BACKWARD Buttons: Skip tracks or tune radio frequency.
- Bouton ÉJECTER : Release the detachable front panel.
4.2 Connexions arrière
The rear of the unit features standard ISO connectors for power and speakers, along with an antenna input.
- ISO Power Connector: For connecting to the vehicle's power supply (constant 12V, ignition 12V, ground).
- ISO Speaker Connector: For connecting to the vehicle's speakers (Front Left, Front Right, Rear Left, Rear Right).
- Entrée d'antenne : Pour connecter l'antenne radio de la voiture.
5. Installation
5.1 Installation
- Déconnecter la batterie : Before starting, disconnect the negative terminal of your car battery to prevent short circuits.
- Retirer l'ancienne unité : Retirez soigneusement votre autoradio actuel du tableau de bord.
- Installer le cadre de montage : Insert the supplied mounting frame into the dashboard opening and bend the tabs to secure it.
- Connecter le câblage : Refer to the wiring diagram in section 5.2. Connect the ISO wiring harness to the car's wiring and then to the Caliber RMD 068-2 unit. Connect the antenna cable.
- Slide Unit In: Carefully slide the Caliber RMD 068-2 unit into the mounting frame until it clicks into place.
- Rebranchez la batterie : Rebranchez la borne négative de votre batterie de voiture.
- Fixer le panneau avant : Fixez le panneau avant amovible à l'unité principale.
5.2 Schéma de câblage
The Caliber RMD 068-2 uses standard ISO connectors. Ensure correct connections as shown below. If your vehicle does not have ISO connectors, an adapter may be required.
| Broche | Couleur du fil (typique) | Fonction |
|---|---|---|
| 4 | Jaune | 12 V constant (batterie) |
| 7 | Rouge | Commuté 12 V (allumage) |
| 8 | Noir | Sol |
| 5 | Bleu | Antenna Remote Out |
| Broche | Couleur du fil (typique) | Fonction |
|---|---|---|
| 1 | Violet | Arrière Droit (+) |
| 2 | Violet/Noir | Arrière droit (-) |
| 3 | Vert | Arrière gauche (+) |
| 4 | Vert/Noir | Arrière gauche (-) |
| 5 | Gris | Avant droit (+) |
| 6 | Gris/Noir | Avant droit (-) |
| 7 | Blanc | Avant gauche (+) |
| 8 | Blanc/Noir | Avant gauche (-) |
Note: Wire colors may vary depending on vehicle manufacturer. Always consult your vehicle's wiring diagram.
6. Mode d'emploi
6.1 Fonctions de base
- Marche/Arrêt : Appuyez sur le ALIMENTATION/MODE bouton pour allumer ou éteindre l'appareil.
- Contrôle du volume : Faites pivoter le VOLUME Tournez le bouton dans le sens des aiguilles d'une montre pour augmenter le volume, dans le sens inverse pour le diminuer.
- Sélection du mode : Appuyez brièvement sur le ALIMENTATION/MODE button to cycle through available modes: Radio (FM), USB, SD, AUX.
- Paramètres audio : Appuyez sur le VOLUME knob to enter audio settings. Rotate the knob to select settings like BASS, TREBLE, BALANCE, FADER. Press the knob again to confirm or move to the next setting.
6.2 Fonctionnement radio
- Sélection de bande : En mode Radio, appuyez sur la touche BANDE/AMS bouton permettant de basculer entre les bandes FM1, FM2 et FM3.
- Réglage manuel: Appuyez brièvement sur le EN AVANT EN ARRIÈRE boutons pour régler la fréquence avec précision.
- Recherche automatique: Appuyez longuement sur le EN AVANT EN ARRIÈRE boutons pour rechercher automatiquement la prochaine station puissante.
- Mémoriser les préréglages : Tune to your desired station. Long press one of the PRÉRÉGLAGE (1-6) buttons until you hear a beep. The station is now stored.
- Rappeler les préréglages : Appuyez brièvement sur l'un des PRÉRÉGLAGE (1-6) boutons pour rappeler une station enregistrée.
- Automatic Memory Store (AMS): Appuyez longuement sur le BANDE/AMS bouton permettant de scanner et d'enregistrer automatiquement les stations les plus puissantes dans les préréglages de la bande actuelle.
6.3 Lecture USB/SD
- Insérer un média : Insert a USB flash drive into the USB port or an SD card into the SD card slot. The unit will automatically switch to USB/SD mode and begin playback.
- Lecture/Pause : Appuyez sur le LECTURE/PAUSE bouton pour mettre en pause ou reprendre la lecture.
- Sauter la piste: Appuyez brièvement sur le EN AVANT EN ARRIÈRE pour passer à la piste suivante ou précédente.
- Avance/Retour rapide : Appuyez longuement sur le EN AVANT EN ARRIÈRE boutons pour avancer ou reculer rapidement dans un morceau.
- Navigation dans les dossiers : Utilisez le PRÉRÉGLAGE 5 et PRÉRÉGLAGE 6 buttons to navigate between folders on your USB/SD media.
6.4 Entrée AUX
- Connecter l'appareil : Connect your external audio device (e.g., smartphone, MP3 player) to the 3.5mm AUX input jack on the front panel using an audio cable.
- Sélectionnez le mode AUX : Appuyez sur le ALIMENTATION/MODE button repeatedly until "AUX" is displayed.
- Contrôler la lecture : Control playback (play, pause, skip) directly from your connected external device. The car radio will control the volume.
7. Entretien
- Nettoyage de l'unité : Use a soft, dry cloth to wipe the front panel and display. Do not use harsh chemicals, cleaning sprays, or abrasive cloths, as these can damage the surface.
- Detachable Front Panel: When detaching the front panel, handle it carefully. Store it in a protective case (if supplied) to prevent scratches or damage.
- Ports USB/SD : Keep the USB port and SD card slot free from dust and debris.
8. Dépannage
| Problème | Cause possible | Solution |
|---|---|---|
| Pas de courant | Fusible grillé ; câblage incorrect ; connexion desserrée | Check and replace fuse; Verify wiring connections (Yellow to constant 12V, Red to ignition 12V, Black to ground); Ensure front panel is securely attached. |
| Pas de son | Volume too low; Mute activated; Incorrect speaker wiring; Damaged speakers | Increase volume; Check if mute is active; Verify speaker connections; Test with known good speakers. |
| mauvaise réception radio | Antenne non connectée ; antenne endommagée ; zone de faible signal | Ensure antenna is securely connected; Check antenna for damage; Try tuning to a stronger station or move to a different location. |
| Lecture impossible du périphérique USB/SD | Non pris en charge file format; Corrupted media; Incorrectly inserted media; Max capacity exceeded | Assurer files are MP3/WMA format; Try a different USB/SD card; Reinsert media correctly; Check media capacity (max 32GB recommended). |
| Front panel cannot be detached | Eject button not fully pressed; Mechanism jammed | Press the EJECT button firmly; Do not force the panel. |
If the problem persists after trying these solutions, please contact your dealer or a qualified service center.
9. Spécifications
- Modèle: Caliber RMD 068-2
- Puissance de sortie : 4 x 75 Watts Max
- Alimentation: 12V DC (10.8V-15.6V), Negative Ground
- Fusible: 10A
- Formats audio pris en charge : MP3, WMA (via USB/SD)
- USB/SD Compatibility: Jusqu'à 32 Go (format FAT32)
- Tuner FM: RDS, 18 Presets
- Entrée AUX: Prise jack stéréo 3.5 mm
- Detachable Front Panel: Oui
- Poids: Environ 0.95 kg (2.09 lb)
10. Garantie et assistance
This Caliber product is covered by a warranty in accordance with applicable European laws. For detailed warranty terms and conditions, please refer to the warranty card included with your product or visit the official Caliber website. For technical support, troubleshooting assistance, or service inquiries, please contact your authorized Caliber dealer or the customer service department in your region. Please have your product model number (RMD 068-2) and proof of purchase ready when contacting support.
Note: Specifications and design are subject to change without notice for improvement.