1. Introduction
This manual provides essential instructions for the safe and efficient operation of your Sharp CD-DH950P 240W Mini-Component System. This system features a 5-disc CD changer, a cassette deck, an iPod/iPhone docking station, a USB host for digital audio playback, and an AM/FM tuner. Please read this manual thoroughly before using the system and retain it for future reference.
2. Consignes de sécurité
- Source d'alimentation : Branchez l'appareil uniquement à une prise secteur de la tension spécifiée.tage.
- Ventilation: Assurez une ventilation adéquate. Ne bloquez pas les ouvertures de ventilation.
- Eau et humidité : N’exposez pas l’appareil à la pluie, à l’humidité ou aux projections de liquides.
- Chaleur: Tenez l'appareil éloigné des sources de chaleur telles que les radiateurs, les bouches de chauffage, les poêles ou tout autre appareil produisant de la chaleur.
- Nettoyage: Unplug the unit from the wall outlet before cleaning. Use a soft, dry cloth.
- Entretien: N'essayez pas de réparer vous-même ce produit. Confiez tous les travaux d'entretien à du personnel de service qualifié.
3. Contenu du colis
Vérifiez que votre colis contient les éléments suivants :
- Main Unit (CD-DH950P)
- Haut-parleur gauche
- Haut-parleur droit
- Télécommande avec piles
- Antenne boucle AM
- Antenne filaire FM
- Cordon d'alimentation
4. Installation
4.1 Connexion des haut-parleurs
Connect the speaker wires from the main unit to the corresponding terminals on the back of each speaker. Ensure correct polarity (red to red, black to black) for optimal sound quality. The left speaker connects to the left speaker output, and the right speaker to the right speaker output.
4.2 Connexion des antennes
- Antenne FM : Connect the supplied FM wire antenna to the FM antenna terminal on the rear of the main unit. Extend the wire for better reception.
- Antenne AM : Connect the supplied AM loop antenna to the AM antenna terminals on the rear of the main unit. Position the antenna for best reception.
4.3 Connexion d'alimentation
Plug the power cord into the AC IN jack on the rear of the main unit, then plug the other end into a standard AC wall outlet.
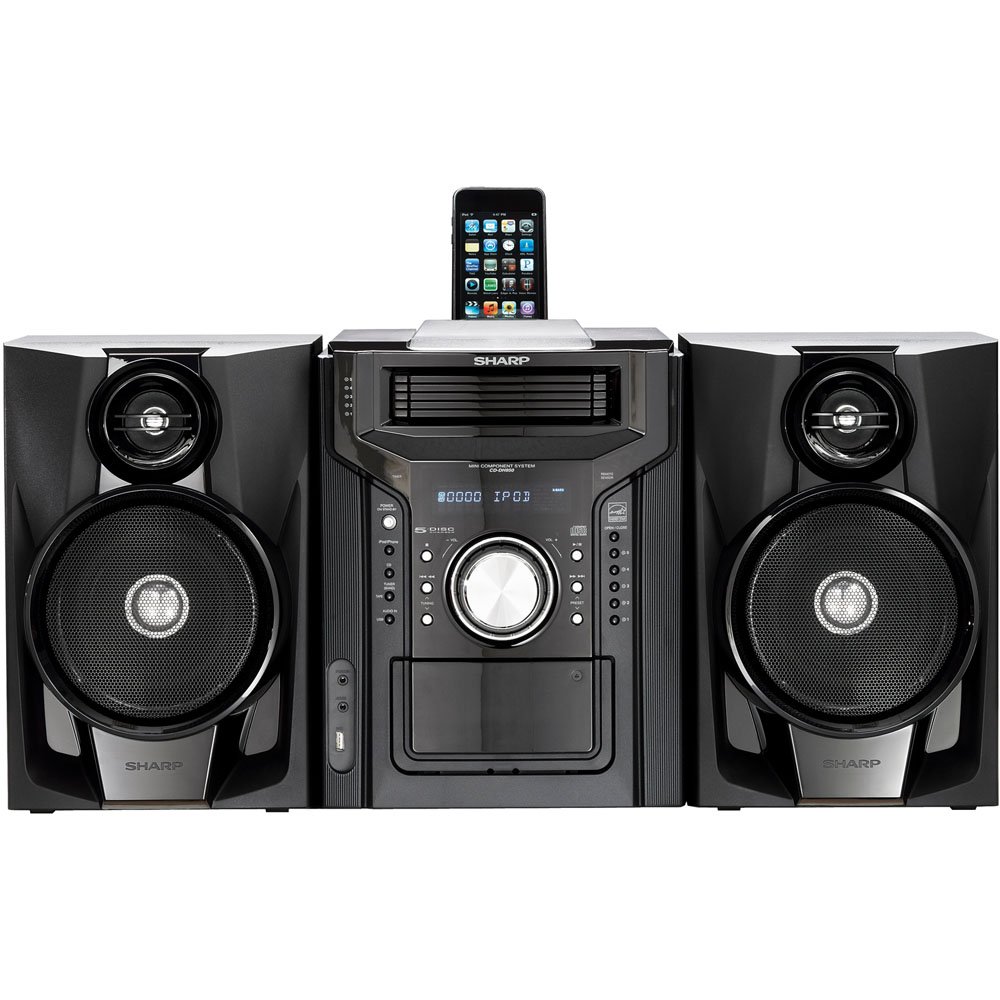
Figure 4.3.1 : Dans l'ensemble view of the Sharp CD-DH950P Mini-Component System, showing the main unit flanked by two speakers, with an iPhone docked on top of the main unit.
5. Mode d'emploi
5.1 Marche/Arrêt et contrôle du volume
- Appuyez sur le POUVOIR Bouton sur le panneau avant ou télécommande pour allumer ou éteindre l'appareil.
- Faites pivoter le VOLUME bouton sur le panneau avant ou utilisez le VOL +/- boutons sur la télécommande pour régler le niveau sonore.
5.2 Lecture de CD
This system features a 5-disc CD changer.
- Appuyez sur le OUVRIR/FERMER bouton pour ouvrir le plateau du CD.
- Place up to five CDs on the disc trays, label side up.
- Presse OUVRIR/FERMER à nouveau pour fermer le plateau.
- Appuyez sur le CD bouton pour sélectionner la fonction CD.
- Appuyez sur le LECTURE/PAUSE bouton pour démarrer la lecture.
- Utilisez le SAUTER buttons to navigate between tracks or discs.
5.3 Fonctionnement du lecteur de cassettes
- Appuyez sur le TAPE OPEN/CLOSE bouton pour ouvrir le lecteur de cassettes.
- Insérez une cassette.
- Appuyez sur le RUBAN bouton pour sélectionner la fonction cassette.
- Presse JOUER pour commencer la lecture.
- To record, ensure the source is selected (e.g., CD, Tuner) and press the ENREGISTRER button on the cassette deck.
5.4 iPod/iPhone Docking
The system includes a top-mounted docking slot for compatible iPod and iPhone devices (30-pin connector).
- Carefully place your iPod or iPhone into the docking slot.
- The system will automatically switch to iPod/iPhone mode or you may need to press the iPod / iPhone bouton.
- Use the system's controls or your device's controls to play music. The device will also charge while docked.
5.5 USB Host Playback
Connect a USB storage device containing MP3 or WMA audio files au port USB du panneau avant.
- Insérez le périphérique USB dans le port USB.
- Appuyez sur le USB button to select the USB function.
- Utilisez les commandes de lecture pour naviguer et jouer. files.
Tuner AM/FM 5.6 GHz
- Appuyez sur le TUNER button to select AM or FM radio.
- Utilisez le RÉGLAGE +/- boutons pour régler manuellement une station.
- Pour effectuer une numérisation automatique, appuyez longuement sur RÉGLAGE +/- boutons.
- To store a preset, tune to the desired station, then press MÉMOIRE suivi d'un numéro prédéfini.
5.7 entrée audio
Connect an external audio device (e.g., MP3 player, smartphone) to the AUDIO IN jack on the front panel using a 3.5mm stereo cable.
- Connect your device to the AUDIO IN jack.
- Appuyez sur le ENTRÉE AUDIO button to select this source.
- Contrôlez la lecture depuis votre appareil connecté.
6. Entretien
6.1 Nettoyage de l'appareil
Wipe the exterior of the unit with a soft, dry cloth. Do not use abrasive cleaners, waxes, or solvents. Ensure the unit is unplugged before cleaning.
6.2 CD and Cassette Care
- Handle CDs by their edges to avoid fingerprints and scratches. Clean discs with a soft, lint-free cloth from the center outwards.
- Store cassette tapes away from strong magnetic fields and direct sunlight.
7. Dépannage
| Problème | Cause possible | Solution |
|---|---|---|
| Pas de courant | Cordon d'alimentation non branché ; prise de courant défectueuse | Vérifiez que le cordon d'alimentation est bien branché ; essayez une autre prise. |
| Pas de son | Volume too low; Speakers not connected; Incorrect source selected | Augmentez le volume ; vérifiez les connexions des haut-parleurs ; sélectionnez la source d'entrée appropriée. |
| Le CD ne joue pas | Disc inserted incorrectly; Disc is dirty or scratched | Insert disc correctly (label side up); Clean or replace disc |
| Mauvaise réception radio | Antenne mal positionnée ; signal faible | Adjust position of AM/FM antennas; Try auto-tuning or manual fine-tuning |
| iPod/iPhone not charging/playing | Device not properly docked; Device not compatible (e.g., newer connector) | Re-dock the device; Note that this system uses a 30-pin connector, newer devices may require an adapter (not included) |
8. Spécifications
- Marque: Pointu
- Modèle: CD-DH950P
- Puissance de sortie totale: 240 Watts RMS (85W/ch FTC)
- Configuration des haut-parleurs : Canal 2.1
- Formats audio pris en charge : CD, MP3, WMA
- Rapport signal sur bruit: 100 dB
- Appareils compatibles : MP3 Player, Smartphone (via 30-pin dock or USB/Audio In)
- Dimensions (L x l x H) : 27.6 x 13.6 x 13.5 pouces
- Poids de l'article : 24.4 livres
- Code à barres : 074000369863 074000369290
9. Informations sur la garantie
This product is covered by a 1-year limited warranty from the date of purchase. Please refer to the warranty card included with your product for full terms and conditions, or contact Sharp customer service for details.
10. Assistance
For further assistance, technical support, or service inquiries, please contact Sharp customer service. Contact information can typically be found on the Sharp official websur le site ou dans la documentation fournie avec votre produit.