1. مقدمه
ممنون از خریدتونasing the RCA 50-inch UHD 4K LCD TV. This manual provides essential information for setting up, operating, and maintaining your television. Please read this manual thoroughly before using the product to ensure safe and optimal performance. Keep this manual for future reference.
2. اطلاعات ایمنی مهم
هنگام استفاده از تلویزیون، همیشه این اقدامات احتیاطی ایمنی اولیه را رعایت کنید:
- برای جلوگیری از آتشسوزی یا برقگرفتگی، تلویزیون را در معرض باران یا رطوبت قرار ندهید.
- منافذ تهویه را مسدود نکنید. فضای کافی در اطراف تلویزیون برای جریان هوای مناسب فراهم کنید.
- تلویزیون را روی یک سطح صاف و پایدار قرار دهید تا از افتادن آن جلوگیری شود.
- Use only the power cord supplied with the TV. Do not overload power outlets.
- در هنگام رعد و برق یا زمانی که برای مدت طولانی از تلویزیون استفاده نمیشود، آن را از برق بکشید.
- قاب تلویزیون را باز نکنید. تمام مراحل سرویس را به پرسنل خدمات واجد شرایط ارجاع دهید.
- قطعات کوچک و باتریها را دور از دسترس کودکان نگه دارید.
3. محتویات بسته
Carefully unpack your television and check that all items are included. If any items are missing or damaged, please contact your retailer.

شکل ۲: لوازم جانبی همراه
- RCA 50-inch UHD 4K LCD TV
- کنترل از راه دور (نیازمند ۲ باتری قلمی، شامل)
- کابل برق
- TV Stand Bases (x2)
- Screws for Stand Installation (x4)
- Anti-tip Screw (x1) and Clips (x3)
- دفترچه راهنما (ژاپنی)
4. راه اندازی
4.1. Physical Setup (Stand / Wall Mount)
You can install your TV on the included stand or mount it on a wall using a VESA-compatible bracket (sold separately).

Figure 4.1: TV Dimensions and Stand Installation
نصب پایه:
- برای جلوگیری از آسیب دیدن، صفحه تلویزیون را رو به پایین روی یک سطح نرم و صاف قرار دهید.
- پایههای پایه را با سوراخهای پیچ در پایین تلویزیون تراز کنید.
- پایههای پایه را با استفاده از پیچهای ارائه شده محکم کنید.
نصب دیواری:
This TV supports VESA mount standard 400x300mm. Use a compatible wall mount bracket and follow the instructions provided with the bracket. Ensure the wall can support the TV's weight (approximately 9 kg).

Figure 4.2: Wall Mounting Options
4.2. اتصال دستگاه های خارجی
Connect your external devices to the appropriate ports on the TV's rear and side panels.

Figure 4.3: TV Connectivity Ports

Figure 4.4: Rear Panel and Connection Terminals
| نوع بندر | توضیحات |
|---|---|
| HDMI (x3) | Connect to Blu-ray players, game consoles, set-top boxes, etc. HDMI 2 supports ARC. |
| USB (x2) | Connect external USB HDD for recording (FAT32 format compatible). |
| ورودی AV | دستگاههای قدیمیتر را با استفاده از کابلهای کامپوزیت ویدیو و صدای استریو متصل کنید. |
| خروجی صوتی دیجیتال نوری | برای صدای دیجیتال، به یک ساندبار یا سیستم سینمای خانگی متصل شوید. |
| LAN | For service or firmware updates. This TV does not support internet streaming services. |
| mini B-CAS Slot | Insert your mini B-CAS card for digital broadcast reception. |
| BS/CS Antenna Input | Connect to a BS/CS satellite antenna. |
| Terrestrial Digital Antenna Input | Connect to a terrestrial digital antenna. |
| ورودی صدا 3.5 میلی متر | منابع صوتی خارجی را وصل کنید. |
4.3. Initial Power On and Channel Setup
- پس از اتصال تمام کابلهای لازم، سیم برق را به پریز برق وصل کنید.
- دکمه روشن/خاموش را روی کنترل از راه دور یا روی تلویزیون فشار دهید.
- Follow the on-screen instructions to perform initial setup, including language selection and channel scanning.
5. دستورالعمل های عملیاتی
5.1. توابع کنترل از راه دور
The remote control allows you to access all TV functions. Insert two AAA batteries (included) into the remote control before use.

Figure 5.1: Remote Control Layout and Key Functions
- قدرت: تلویزیون را روشن یا خاموش می کند.
- دکمه های عددی (0-12): مستقیماً کانالها را انتخاب کنید.
- ورودی: Select input source (HDMI, AV, etc.).
- حجم (+/-): تنظیم سطح صدا
- کانال (بالا/پایین): کانالها را به ترتیب عوض کنید.
- Directional Buttons (Up/Down/Left/Right) & OK: در منوها حرکت کنید و انتخابها را تأیید کنید.
- منو: Access the main settings menu.
- EPG (راهنمای برنامه الکترونیکی): راهنمای برنامه را نمایش دهید.
- ثبت: ضبط برنامه فعلی را شروع کنید.
- کنترل های پخش: Play, Pause, Stop, Fast Forward, Rewind for recorded content.
5.2. Background Program Recording
Your RCA TV is equipped with dual tuners, allowing you to record one digital broadcast program while watching another. An external USB Hard Disk Drive (HDD) is required for recording (FAT32 format compatible, up to 6TB).

Figure 5.2: Dual Tuner Recording Function

Figure 5.3: External HDD Recording
مراحل ضبط:
- Connect a FAT32-formatted external USB HDD to one of the TV's USB ports.
- Access the program guide (EPG) to select a program for recording.
- Use the remote control to set a recording timer or initiate instant recording.
- The TV supports series recording and automatically adjusts for broadcast time changes or extended final episodes.
۳. تنظیمات تصویر و صدا
خود را بهینه کنید viewبا تنظیم تنظیمات تصویر و صدا، تجربه کاربری بهتری داشته باشید.
کیفیت عکس:
This TV features a high-performance image processing engine that reproduces fine details and natural colors. It supports UHD 4K resolution and HDR content for enhanced contrast and vibrant colors.
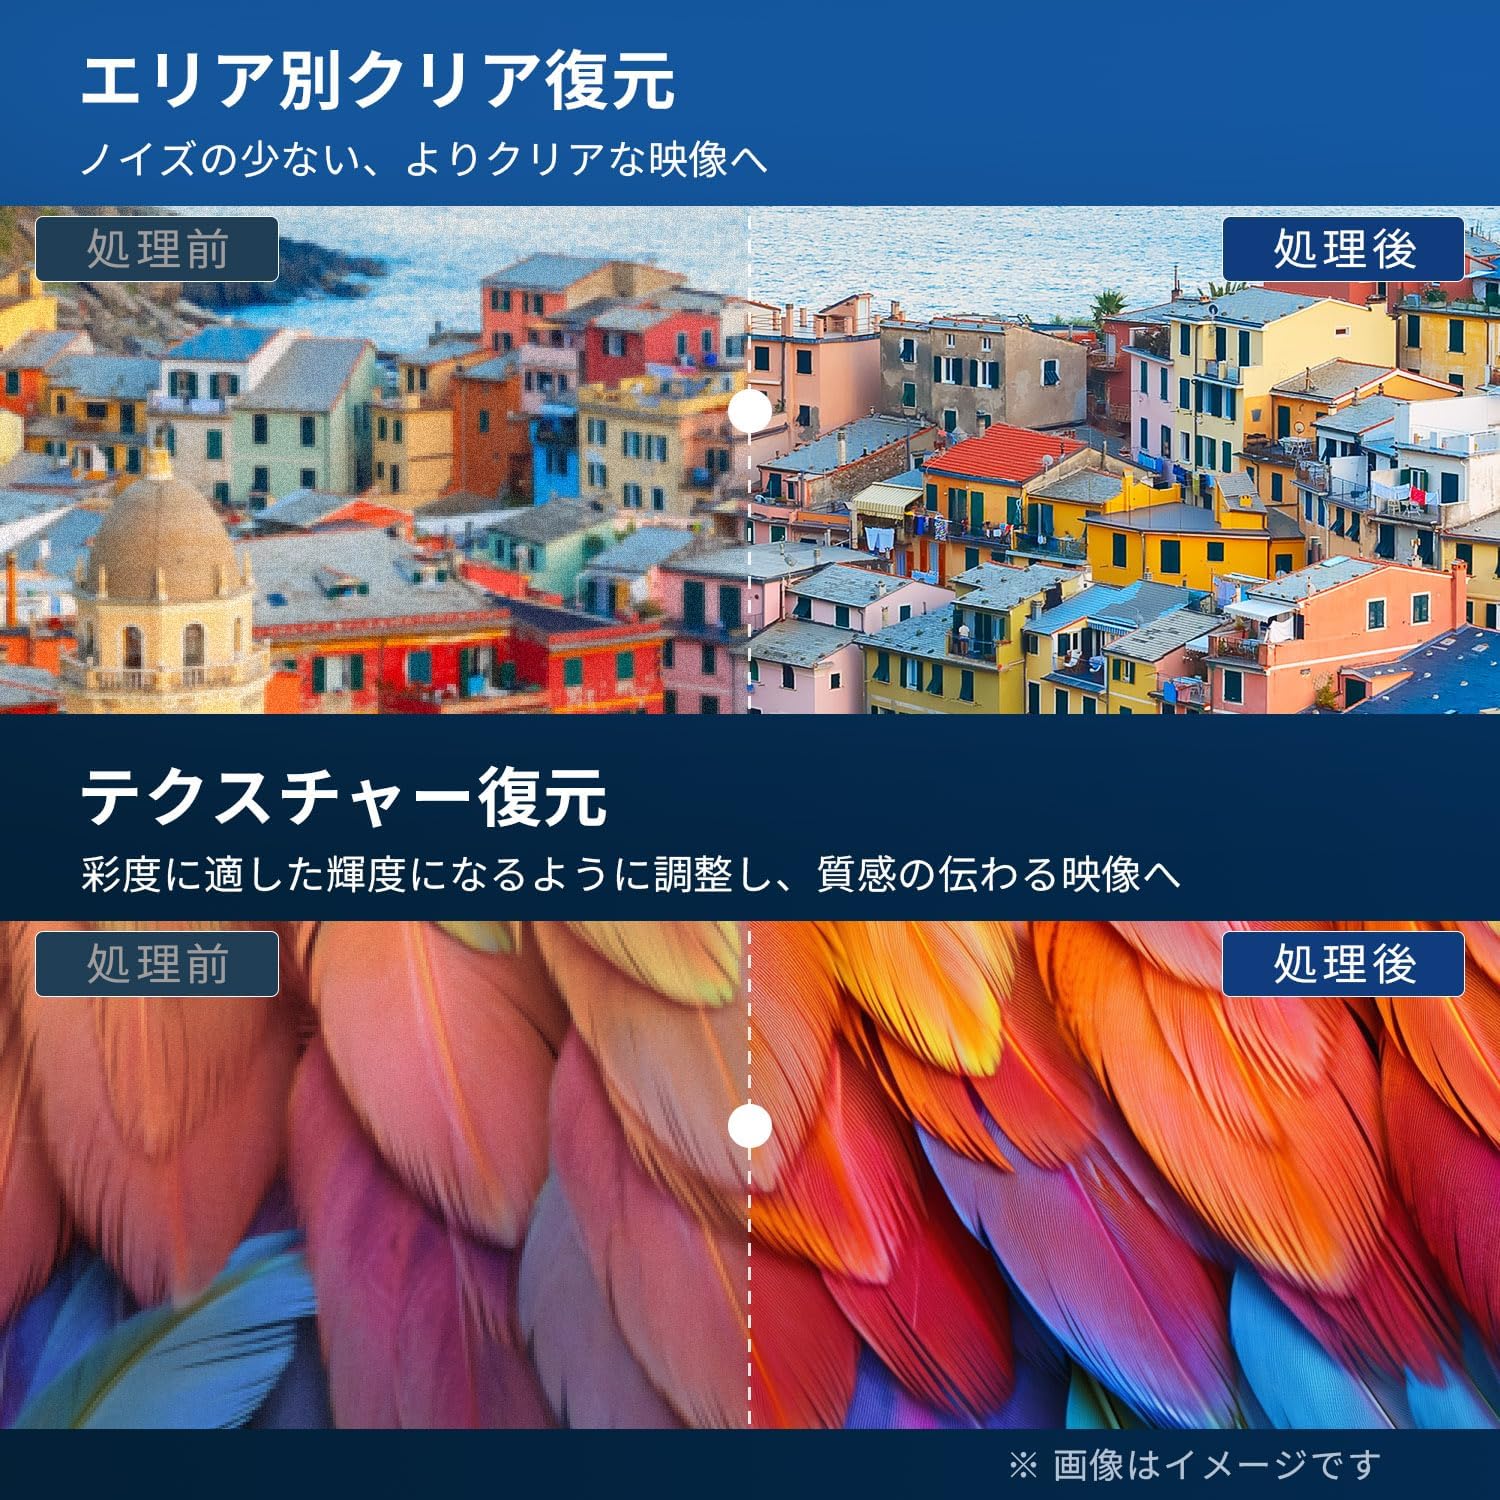
Figure 5.4: Image Processing for Clarity and Texture

Figure 5.5: High-Performance Multi-Speed Processing for Motion Clarity
حالت بازی:
Activate Game Mode to reduce input lag and image processing delay, providing a smoother and more responsive gaming experience, especially for fast-paced games like FPS and fighting games.
صدای دالبی:
Experience immersive, high-quality sound with built-in Dolby Audio technology. Adjust sound modes in the audio settings menu to suit your preferences.

Figure 5.6: Dolby Audio for Immersive Sound
6. تعمیر و نگهداری
نگهداری صحیح، طول عمر و عملکرد تلویزیون شما را تضمین میکند.
- تمیز کردن صفحه نمایش: Gently wipe the screen with a soft, lint-free cloth. For stubborn marks, use a screen cleaner specifically designed for LCD/LED displays. Do not spray cleaner directly onto the screen.
- تمیز کردن کابینت: Use a soft, dry cloth to wipe the TV cabinet. Do not use abrasive cleaners, waxes, or solvents.
- تهویه: مطمئن شوید که منافذ تهویه در پشت تلویزیون مسدود نشده باشند.
- سیم برق: مرتباً سیم برق را از نظر هرگونه آسیب بررسی کنید. در صورت آسیب، برای تعویض با پشتیبانی مشتری تماس بگیرید.
7 عیب یابی
قبل از تماس با پشتیبانی مشتری، راهحلهای زیر را برای مشکلات رایج امتحان کنید:
| مشکل | راه حل ممکن |
|---|---|
| بدون قدرت | Check if the power cord is securely plugged into the TV and the outlet. Press the power button on the remote or TV. |
| تصویر ندارد، اما صدا دارد | منبع ورودی را بررسی کنید. مطمئن شوید که دستگاههای خارجی روشن و به درستی وصل شدهاند. |
| صدا نداره ولی تصویر داره | سطح صدا را بررسی کنید. مطمئن شوید که حالت بیصدا فعال نیست. کابلهای صوتی مربوط به دستگاههای خارجی را بررسی کنید. |
| کنترل از راه دور کار نمی کند | باتریها را تعویض کنید. مطمئن شوید که هیچ مانعی بین کنترل از راه دور و حسگر IR تلویزیون وجود ندارد. |
| Poor picture quality / distorted image | Check antenna connection. Adjust picture settings in the menu. Try a different input source. |
| قابلیت ضبط برنامهها ندارد | Ensure an external USB HDD is connected and formatted to FAT32. Check available storage space. Verify tuner reception. |
| تلویزیون هنگ میکند یا پاسخ نمیدهد | Unplug the TV from the power outlet, wait for 1 minute, then plug it back in and power on. |
8. مشخصات
| ویژگی | جزئیات |
|---|---|
| شماره مدل | RCA-NS-50Q1 |
| اندازه صفحه نمایش | 50 اینچ |
| فناوری نمایش | ماژول LED |
| قطعنامه | 4K UHD (3840 2160 XNUMX) |
| نرخ تازه سازی | 60 هرتز |
| نسبت تصویر | 16:9 |
| Viewing angle | 178 درجه |
| زمان پاسخگویی | 2 میلی ثانیه |
| نسبت کنتراست | 200:1 |
| حداکثر روشنایی | 220 سی دی در متر مربع |
| پشتیبانی از HDR | HDR |
| تیونرها | Dual Terrestrial/BS/110-degree CS Digital Tuners (ISDB-T) |
| در حال ضبط | External USB HDD Recording (FAT32 compatible, up to 6TB) |
| صوتی | Dolby Audio, Built-in Speakers (Max Output: 10W) |
| قابلیت اتصال | HDMI (x3), USB (x2), AV Input, Optical Digital Audio Out, LAN, 3.5mm Audio Input |
| استاندارد نصب VESA | 400 × 300 میلی متر |
| منبع تغذیه | AC 100-240 ولت، 50/60 هرتز |
| مصرف برق | 120 وات |
| ابعاد (با پایه) | 111.8 سانتیمتر (عرض) × 69.6 سانتیمتر (بالا) × 21.5 سانتیمتر (D) |
| وزن (با پایه) | تقریبا 9 کیلوگرم |
| ویژگی های تلویزیون هوشمند | None. This TV does not support internet connection or streaming services. |
9. گارانتی و پشتیبانی
9.1. گارانتی محصول
This RCA television comes with a سه سال ضمانت from the date of purchase, covering manufacturing defects. Please retain your proof of purchase for warranty claims. Note that some specific components may have a 12-month quality guarantee.

شکل ۸.۱: اطلاعات گارانتی
9.2. پشتیبانی مشتری
For any inquiries, technical assistance, or warranty claims, please contact our customer support team. Our offices are located in Tokyo, and our customer service team provides nationwide support.

Figure 9.2: RCA Customer Support Network
روش های تماس:
- LINE Support: Scan the QR code below to add our after-sales service account on LINE for quick assistance.
- پشتیبانی ایمیل: Send your inquiries to our dedicated email address. We aim to respond within 24 hours.

Scan for LINE Support: https://lin.ee/AOq4pQs

ایمیل: tutu@tutuelec.com