1. مقدمه
Thank you for choosing the GOYOJO Preset Torque Wrench. This tool is designed for precise fastening and loosening tasks, ensuring optimal torque application for various applications including automotive, bicycle, motorcycle, and general machine maintenance. This manual provides essential information for safe and effective use of your torque wrench.

Image 1.1: The GOYOJO 2-24N.m 1/4-inch Drive Preset Torque Wrench.
2. اطلاعات ایمنی
Always observe the following safety precautions to prevent injury or damage to the tool and workpiece:
- Read and understand this manual completely before operating the torque wrench.
- Wear appropriate personal protective equipment, such as safety glasses, when using the tool.
- Do not exceed the maximum torque capacity of 24 N.m.
- Do not use the torque wrench as a breaker bar or for loosening excessively tight fasteners.
- Ensure the socket or bit is correctly seated on the fastener and the drive before applying torque.
- Keep the tool clean and free from oil or grease to maintain a secure grip.
- Store the torque wrench in its protective case when not in use, and set the torque to the lowest setting (but not below the minimum) to relieve spring tension.
3. محتویات بسته
The GOYOJO 2-24N.m 1/4-inch Drive Preset Torque Wrench 16-Piece Set includes the following items:
- 1 x GOYOJO Torque Wrench Body (1/4-inch drive)
- 7 x 1/4-inch Hex Bits: 2mm, 2.5mm, 3mm, 4mm, 5mm, 6mm, 8mm
- 4 x 1/4-inch Torx Bits: T10, T20, T25, T30
- 3 x 1/4-inch Short Sockets: 6mm, 8mm, 10mm
- ۱ عدد میله کششی ۵ اینچی
- 1 عدد جعبه ذخیره سازی
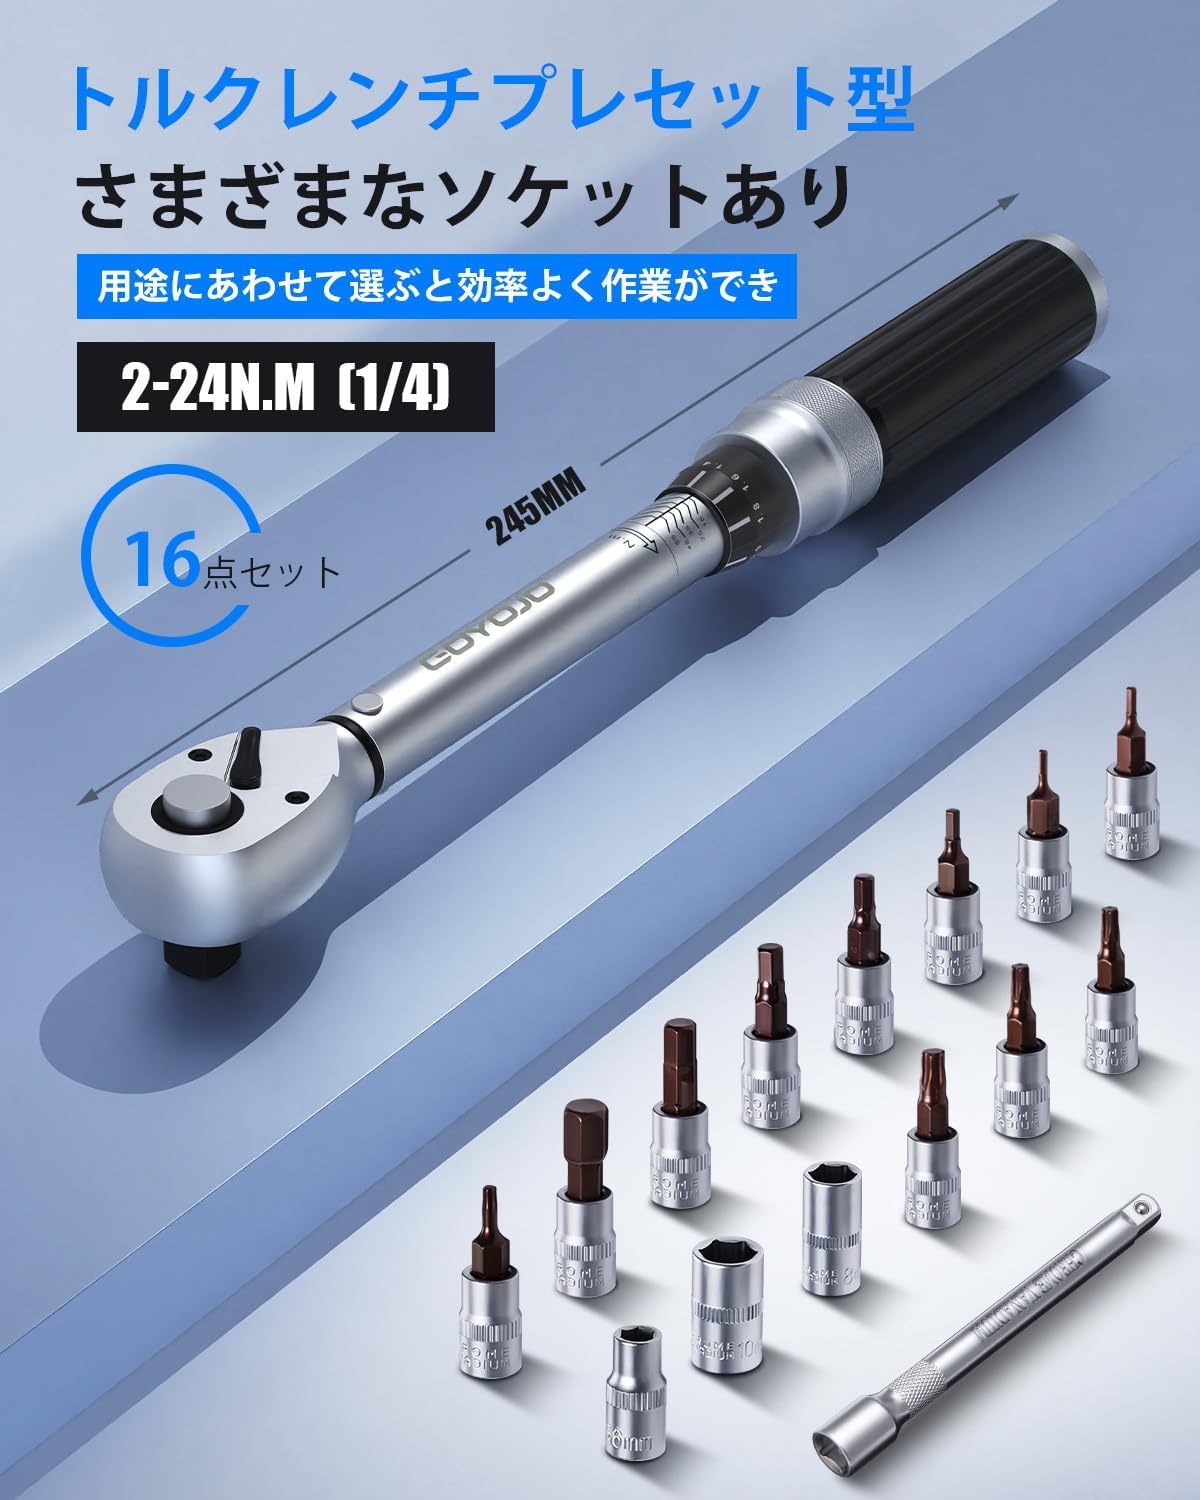
Image 3.1: All components included in the 16-piece torque wrench set.
4. راه اندازی
Before using the torque wrench, follow these steps to set the desired torque value and attach the appropriate accessory:
۳.۲ تنظیم مقدار گشتاور
- Unlock the Adjustment Mechanism: Grip the handle and pull down the locking ring located at the base of the handle. This will allow the handle to rotate freely.
- Rotate the Handle: While holding the locking ring down, rotate the handle clockwise to increase the torque value or counter-clockwise to decrease it. Align the desired torque value on the main scale with the zero mark on the micrometer scale. Then, rotate the micrometer scale until the exact desired value aligns with the main scale line.
- Lock the Setting: Release the locking ring. It will automatically spring back into place, securing the set torque value and preventing accidental changes during operation.

Image 4.1: Visual guide for unlocking, adjusting, and locking the torque setting.
4.2 Attaching Sockets/Bits
- لوازم جانبی صحیح را انتخاب کنید: Choose the appropriate 1/4-inch socket or bit for your fastener.
- Attach to Drive: Press the quick-release button on the head of the torque wrench and firmly push the socket or bit onto the 1/4-inch square drive. Ensure it clicks securely into place.
- حذف: To remove, press the quick-release button again and pull the socket or bit off.

Image 4.2: Demonstrating the quick-release button for attaching and detaching sockets.
5. دستورالعمل های عملیاتی
Follow these steps for proper operation of your GOYOJO torque wrench:
5.1 Direction Selection (Tightening/Loosening)
The torque wrench supports both clockwise (for tightening right-hand threads) and counter-clockwise (for loosening or tightening left-hand threads) operations. Use the small lever on the wrench head to select the desired direction:
- Move the lever to the درست است for clockwise rotation (tightening).
- Move the lever to the سمت چپ for counter-clockwise rotation (loosening or left-hand thread tightening).

Image 5.1: The lever on the wrench head allows selection between clockwise and counter-clockwise operation.
۵.۲ اعمال گشتاور
- Ensure the torque value is set correctly and locked.
- Place the socket/bit onto the fastener.
- Apply steady, smooth force to the handle in the desired direction. Do not use jerky movements.
- Continue applying force until you feel and hear a distinct "click" from the wrench. This indicates that the preset torque has been reached.
- Stop applying force immediately after the click. Further tightening will over-torque the fastener.

Image 5.2: Applying torque to a fastener in an automotive application.
6. تعمیر و نگهداری
Proper maintenance ensures the longevity and accuracy of your torque wrench:
- تمیز کردن: After each use, wipe the wrench clean with a soft, dry cloth. Do not use solvents or harsh chemicals, as these can damage the finish and markings.
- ذخیره سازی: Always store the torque wrench in its protective case. Before storing, set the torque value to the lowest setting (2 N.m) to relieve tension on the internal spring. This helps maintain calibration accuracy over time.
- کالیبراسیون: Torque wrenches are precision instruments and should be recalibrated periodically, typically every 12 months or after 5,000 cycles, whichever comes first. Consult a professional calibration service.
- اجتناب از افتادن: Dropping the torque wrench can severely affect its accuracy and internal mechanisms. Handle with care.
7 عیب یابی
If you encounter issues with your torque wrench, consider the following:
- No "Click" Sound:
- Ensure the torque value is set above the minimum range (2 N.m).
- Verify the locking ring is fully engaged after setting the torque.
- Apply force smoothly and steadily. A quick, jerky motion might prevent the click from being felt or heard.
- If the issue persists, the wrench may require recalibration or service.
- Inaccurate Torque:
- Check if the torque value was set correctly and locked.
- Ensure the wrench is clean and free from debris.
- The wrench may require recalibration.
- Socket/Bit Not Attaching Securely:
- Ensure the quick-release button is fully depressed when attaching.
- Check for any debris in the drive head or on the socket/bit.
- Verify that you are using 1/4-inch drive accessories.
8. مشخصات
| ویژگی | مشخصات |
|---|---|
| نام تجاری | GOYOJO |
| مدل | 2-24N.m 1/4-inch Drive 16-Piece Set |
| اندازه درایو | 1/4 اینچ |
| محدوده گشتاور | 2-24 نیوتن متر |
| دقت گشتاور | 3% ± |
| جهت | Bi-directional (Clockwise & Counter-clockwise) |
| مواد | فولاد آلیاژی |
| رنگ | نقره ای |
| وزن مورد | 820 گرم |
| ابعاد بسته بندی | 27.3 × 17.3 × 6.2 سانتی متر |
| سبک سر | انتهای جعبه |
| نوع پایان | پایان مات |

Image 8.1: The easy-to-read scale displays torque in both N.m and ft.lb units.
9. گارانتی و پشتیبانی
این محصول به همراه یک ۱ سال گارانتی سازنده from the date of purchase. In the event of any defects or malfunctions under normal use within this period, the manufacturer offers a free replacement service. You do not need to return the original product.
For warranty claims or any product-related inquiries, please contact customer support with your order number and product model. Our customer support team aims to respond within 12 hours.

Image 9.1: Manufacturer's 1-year warranty details.