1. مقدمه
The GVDA GD128PLUS Smart Rechargeable Digital Multimeter is an advanced, versatile tool designed for accurate and reliable electrical measurements. Featuring a 10000-count display, auto-ranging capabilities, and True RMS functionality, it is suitable for professionals and electronics enthusiasts alike. This manual provides essential information for safe and effective operation, setup, maintenance, and troubleshooting of your multimeter.
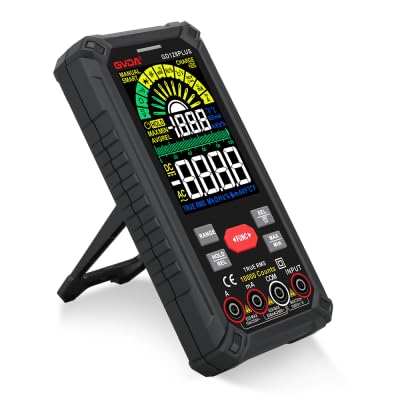
Figure 1.1: GVDA GD128PLUS Digital Multimeter with its integrated kickstand.
2. اطلاعات ایمنی
برای جلوگیری از آسیب شخصی یا آسیب به مولتی متر، همیشه اقدامات احتیاطی ایمنی زیر را رعایت کنید:
- از حداکثر محدودیتهای ورودی برای هر محدوده اندازهگیری تجاوز نکنید.
- هنگام کار با voltagولتاژهای بالاتر از 30 ولت AC RMS، 42 ولت پیک یا 60 ولت DC. این ولتاژهاtagاین یک خطر شوک است.
- همیشه برق مدار را قطع کرده و تمام بارهای ولتاژ بالا را تخلیه کنید.tagقبل از انجام تستهای مقاومت، پیوستگی یا دیود، خازنهای e را بررسی کنید.
- مطمئن شوید که سیمهای تست در وضعیت خوبی هستند و عایقبندی آنها آسیب ندیده است.
- اگر مولتیمتر آسیبدیده به نظر میرسد یا قاب آن باز است، از آن استفاده نکنید.
- برای هر اندازهگیری از تابع و محدوده صحیح استفاده کنید.
- در طول اندازهگیریها، انگشتان خود را پشت محافظ انگشتان روی پروبهای آزمایش نگه دارید.
- Do not use the multimeter in wet environments or in the presence of explosive gases or dust.
- The Non-Contact Voltage (NCV) function is for indication only; always verify voltage presence with direct measurement.
3. محتویات بسته
پس از باز کردن بستهبندی، بررسی کنید که تمام اقلام ذکر شده در زیر موجود و در وضعیت خوبی باشند:
- 1 x GVDA GD128PLUS Digital Multimeter
- ۱ جفت سیم تست (قرمز و مشکی)
- 1 عدد کابل شارژ USB
- 1 x K-type Thermocouple Probe
- 1 x Cloth Carrying Bag
- ۱ عدد دفترچه راهنمای کاربر (این سند)
- ۱ عدد جعبه کادو (بستهبندی)
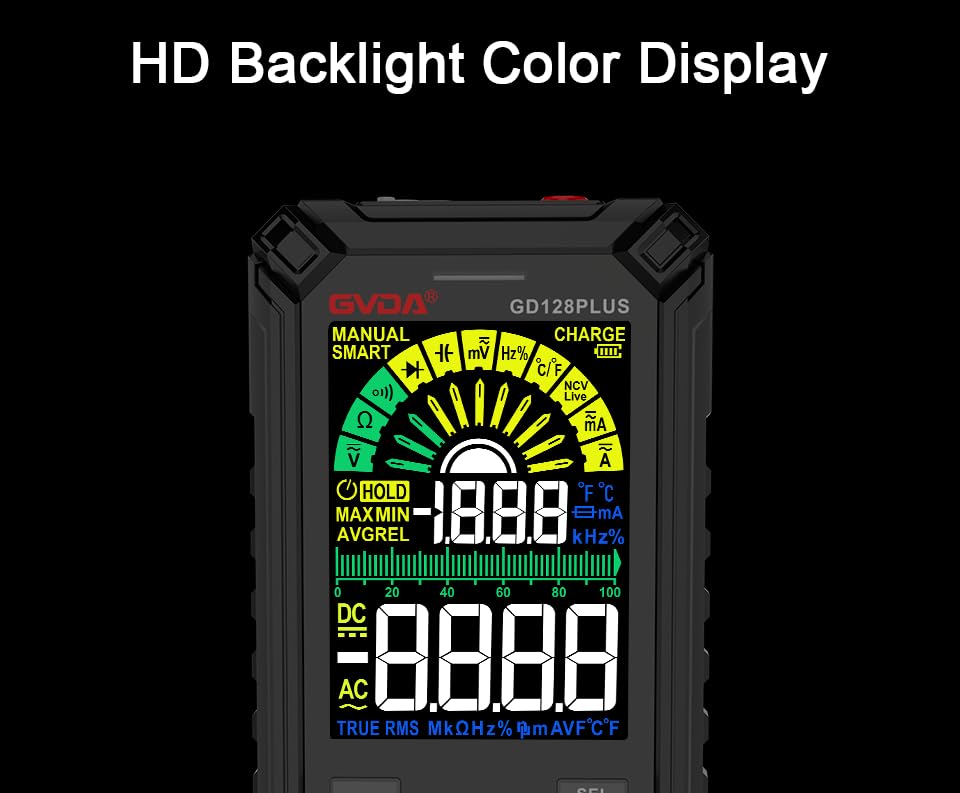
Figure 3.1: All components included in the GVDA GD128PLUS Multimeter package.
۴. ویژگیها و اجزای محصول
The GD128PLUS multimeter is equipped with a range of features for comprehensive electrical testing:
- نمایش 10000 تعداد: Provides high resolution for precise measurements.
- محدوده خودکار: به طور خودکار محدوده اندازهگیری مناسب را انتخاب میکند و عملیات را ساده میکند.
- RMS واقعی: Ensures accurate readings for non-sinusoidal AC waveforms.
- باتری لیتیومی قابل شارژ: Built-in 3.7V battery for convenience and portability.
- HD Backlight Color Display: Clear and easy-to-read display in various lighting conditions.
- جلد بدون تماسtagتشخیص الکترونیکی (NCV): با خیال راحت وجود ولتاژ AC را تشخیص میدهدtage بدون تماس مستقیم
- چراغ قوه چراغ: چراغ یکپارچه برای روشن کردن مناطق کاری تاریک.
- نگهداری داده (HOLD): مقدار فعلی روی صفحه نمایش را ثابت نگه میدارد.
- اندازهگیری نسبی (REL): Displays the difference between a stored reference value and the current reading.
- اندازه گیری MAX/MIN: Records the maximum and minimum values during a measurement session.
- Input Jack LED Indication: Guides correct test lead connection for selected function.
- حفاظت از اضافه بار: Protects the device from damage due to excessive input.
4.1. Multimeter Layout

Figure 4.1: Key components and input jacks of the GVDA GD128PLUS Multimeter.
برای محل قرارگیری اجزای زیر به شکل ۲ مراجعه کنید:
- نمایش: HD Backlight Color LCD for readings and indicators.
- دکمه های عملکرد: RANGE, HOLD/REL, FUNC, SEL, MAX/MIN.
- جک های ورودی:
- جک COM: ورودی مشترک (منفی) برای همه اندازهگیریها.
- VΩHzCap°C/°F Jack: ورودی مثبت برای Voltagاندازهگیریهای مقاومت، فرکانس، ظرفیت خازنی و دما.
- mAμA Jack: Positive input for milliampاینجا و میکروampاندازهگیریهای جریان وجود دارد.
- جک 10A: Positive input for 10 Ampاندازهگیریهای جریان وجود دارد.
- دکمه روشن / خاموش: در لبه بالایی قرار دارد.
- جک شارژ: پورت USB-C برای شارژ مجدد باتری داخلی
- کلید چراغ قوه: Button to activate the integrated LED flashlight.
- نشانگر هشدار: LED light for safety alerts.
- براکت: Integrated kickstand on the back for hands-free viewing.
5. راه اندازی
۱. شارژ اولیه
Before first use, it is recommended to fully charge the multimeter's internal lithium battery. Connect the provided USB charging cable to the multimeter's charge jack and to a standard USB power adapter (not included) or a computer USB port. The display will indicate charging status. A full charge typically takes a few hours.

Figure 5.1: The multimeter's rechargeable lithium battery can be charged directly using a USB cable.
5.2. Attaching Test Leads
For most measurements, connect the black test lead to the COM jack and the red test lead to the appropriate positive input jack (VΩHzCap°C/°F, mAμA, or 10A) depending on the desired measurement function. The input jack LED indicators will illuminate to guide correct connection.
6. دستورالعمل های عملیاتی
6.1. روشن/خاموش
را فشار داده و نگه دارید روشن/خاموش برق button (located on the top edge) to turn the multimeter on or off. The device features an auto-power-off function to conserve battery life after a period of inactivity.
6.2. حالت های اندازه گیری
The GD128PLUS offers various measurement modes, accessible via the rotary dial and function buttons:
6.2.1. جلدtagاندازهگیری الکترونیکی (AC/DC)
- صفحه چرخشی را به سمت V position. The multimeter will automatically detect AC or DC voltage.
- سرب تست سیاه را به COM جک و تست قرمز به ... منتهی میشوند VΩHzCap°C/°F جک
- پرابهای تست را به صورت موازی به مدار یا قطعه تحت تست وصل کنید.
- جلد را بخوانیدtagمقدار e بر روی صفحه نمایش
۵.۲ اندازهگیری جریان (AC/DC)
- صفحه چرخشی را به سمت mA/μA or 10A position depending on the expected current.
- سرب تست سیاه را به COM جک. سیم تست قرمز را به آن وصل کنید mAμA جک برای جریانهای کوچک یا 10A jack for larger currents.
- Connect the multimeter in series with the circuit. Ensure the circuit is de-energized before connecting.
- Apply power to the circuit and read the current value.
- احتیاط: Never connect the multimeter in parallel for current measurement, as this can damage the device and the circuit.
۵.۳ اندازهگیری مقاومت (Ω)
- صفحه چرخشی را به سمت Ω موقعیت
- سرب تست سیاه را به COM جک و تست قرمز به ... منتهی میشوند VΩHzCap°C/°F جک
- قبل از اندازهگیری مقاومت، مطمئن شوید که مدار بدون برق است و تمام خازنها دشارژ شدهاند.
- پرابهای تست را به قطعهای که قرار است اندازهگیری شود، وصل کنید.
- مقدار مقاومت را بخوانید.
۵.۸ اندازهگیری ظرفیت (F)
- صفحه چرخشی را به سمت سرپوش موقعیت
- سرب تست سیاه را به COM جک و تست قرمز به ... منتهی میشوند VΩHzCap°C/°F جک
- قبل از اتصال پروبها، مطمئن شوید که خازن کاملاً تخلیه شده است.
- پروب های آزمایش را در سراسر خازن وصل کنید.
- مقدار ظرفیت خازن را بخوانید.
۶. اندازهگیری فرکانس (هرتز)
- صفحه چرخشی را به سمت Hz موقعیت
- سرب تست سیاه را به COM جک و تست قرمز به ... منتهی میشوند VΩHzCap°C/°F جک
- پرابهای تست را به صورت موازی به منبع سیگنال وصل کنید.
- Read the frequency value.
۵.۸ تست دیود و تست پیوستگی
- صفحه چرخشی را به سمت دیود/تداوم موقعیت استفاده کنید SEL دکمه برای تغییر بین تست دیود و تست پیوستگی.
- سرب تست سیاه را به COM جک و تست قرمز به ... منتهی میشوند VΩHzCap°C/°F جک
- تست دیود: پراب قرمز را به آند و پراب مشکی را به کاتد دیود وصل کنید. یک ولت متر رو به جلوtagقطره e نمایش داده خواهد شد. پروبها را برعکس کنید؛ باید یک مدار باز (OL) نمایش داده شود.
- تست تداوم: Connect the probes across the circuit or component. A continuous beep indicates a low resistance (continuity).
6.2.7. غیر تماسی جلدtage (NCV) تشخیص
- صفحه چرخشی را به سمت NCV موقعیت
- Move the top end of the multimeter near the conductor suspected of having AC voltage.
- The multimeter will emit an audible beep and the warning indicator will flash, with the display showing signal strength, if AC voltage شناسایی می شود.
- توجه: This function is for preliminary detection only. Always use direct contact measurement for precise voltagتایید e
۵.۷ اندازهگیری دما (°C/°F)
- صفحه چرخشی را به سمت ° C / ° F موقعیت
- Connect the K-type thermocouple probe to the COM و VΩHzCap°C/°F جک ها، رعایت قطبیت.
- نوک ترموکوپل را روی یا نزدیک جسمی که قرار است دمای آن اندازهگیری شود قرار دهید.
- Read the temperature on the display. Use the SEL دکمه تغییر بین درجه سانتیگراد و فارنهایت.
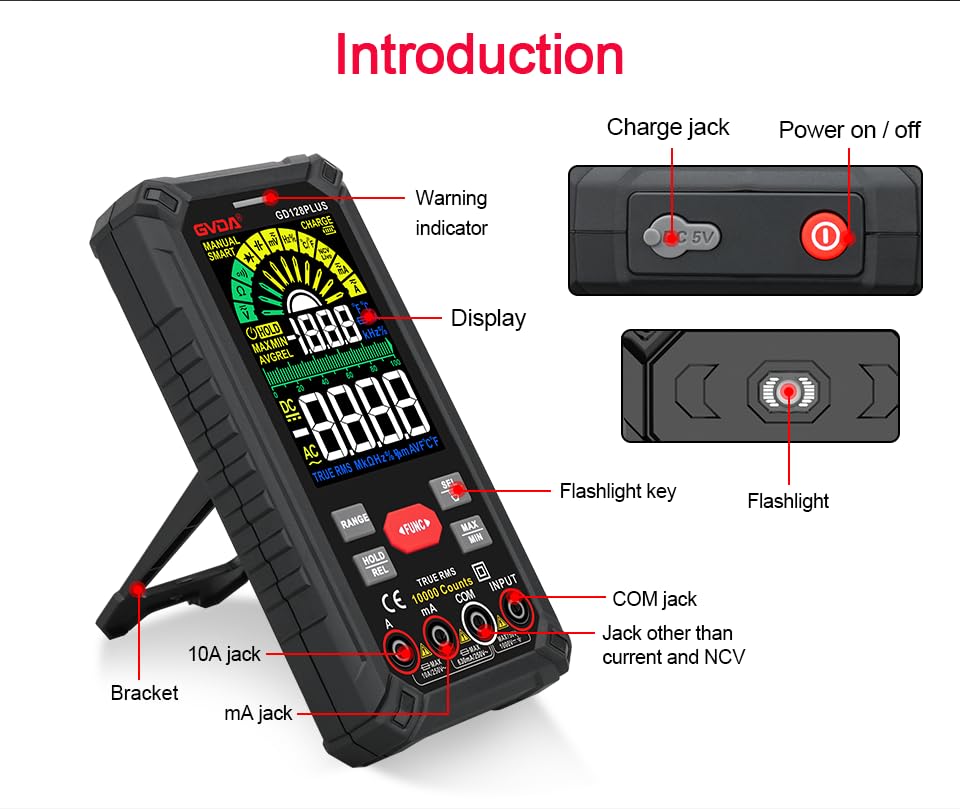
Figure 6.1: The multimeter can perform temperature tests using the included K-type thermocouple probe.
6.3. توابع ویژه
- دکمه RANGE: In manual range mode, press to cycle through available ranges. In auto range mode, press to switch to manual range.
- دکمه HOLD/REL:
- Short press: Activates Data Hold, freezing the current reading. Press again to release.
- Long press: Activates Relative Measurement (REL). The current reading becomes the reference, and subsequent readings show the difference from this reference. Long press again to exit.
- دکمه MAX/MIN: Press to enter MAX/MIN recording mode. The display will show the maximum, minimum, and average values detected since activation. Press again to cycle through MAX, MIN, AVG. Long press to exit.
- دکمه عملکرد: Used to switch between different functions within the same rotary dial position (e.g., AC/DC voltage, Diode/Continuity).
- چراغ قوه: Press the dedicated flashlight key on the side to turn the LED flashlight on or off.

Figure 6.2: The multimeter features a convenient LED flashlight for illuminating work areas.
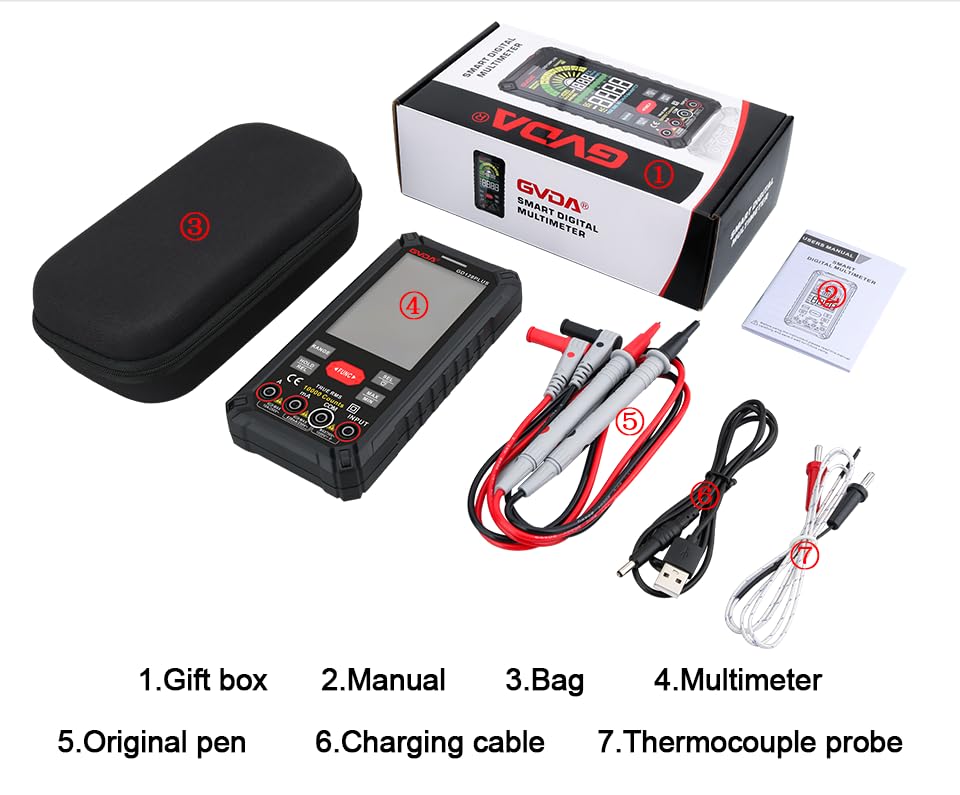
Figure 6.3: The HD Backlight Color Display provides clear and comprehensive measurement information.
7. تعمیر و نگهداری
7.1. تمیز کردن
پاک کردن مورد با آگهیamp cloth and mild detergent. Do not use abrasives or solvents. Ensure the multimeter is off and disconnected from any circuits before cleaning.
7.2 شارژ باتری
The multimeter is equipped with a rechargeable lithium battery. When the low battery indicator appears on the display, connect the multimeter to a USB power source using the provided charging cable. Avoid fully discharging the battery frequently to prolong its lifespan.
7.3. ذخیره سازی
When not in use for extended periods, store the multimeter in a cool, dry place, away from direct sunlight and extreme temperatures. It is advisable to charge the battery periodically (e.g., every 3-6 months) to maintain its health.
8 عیب یابی
| مشکل | علت احتمالی | راه حل |
|---|---|---|
| مولتی متر روشن نمی شود. | باتری کم یا خالی. | Charge the multimeter using the USB cable. |
| عبارت «OL» (اضافه بار) نمایش داده میشود. | اندازهگیری از محدوده انتخابشده یا حداکثر ظرفیت دستگاه فراتر رفته است. | Switch to a higher range (if in manual range) or ensure the measurement is within the meter's specifications. |
| قرائت های نادرست | Incorrect function/range selected; poor test lead connection; external interference. | Verify function and range; ensure test leads are securely connected; move away from strong electromagnetic fields. |
| بوق تداوم صدا وجود ندارد. | Circuit is open; multimeter not in continuity mode. | Check the circuit for breaks; ensure the multimeter is set to continuity mode (use SEL button if necessary). |
9. مشخصات
| پارامتر | ارزش |
|---|---|
| نمایش | 10000 Counts, HD Backlight Color LCD |
| محدوده | محدوده خودکار / دستی |
| RMS واقعی | بله |
| DC جلدtagمحدوده | تا 1000 ولت |
| AC جلدtagمحدوده | تا 750 ولت |
| محدوده جریان DC | تا 10 آمپر |
| محدوده جریان AC | تا 10 آمپر |
| محدوده مقاومت | Yes (Ohm) |
| محدوده ظرفیت | Yes (Farad) |
| محدوده فرکانس | Yes (Hz) |
| محدوده دما | -40 درجه سانتی گراد تا 1000 درجه سانتی گراد / -40 درجه فارنهایت تا 1832 درجه فارنهایت |
| تست دیود | بله |
| تست تداوم | بله (با زنگ هشدار) |
| NCV (جلد غیر تماسیtage) | بله |
| منبع تغذیه | باتری لیتیومی قابل شارژ 3.7 ولت |
| Sampنرخ لینگ | تقریبا 3 بار در ثانیه |
| ابعاد | ۲۲ میلیمتر × ۲۲ میلیمتر × ۱۴ میلیمتر (تقریباً ۰.۸۶۶ × ۰.۸۶۶ × ۰.۵۵۱ اینچ) |
| وزن | تقریباً 1.26 پوند (0.57 کیلوگرم) |
| محیط عملیاتی | 0-40°C, relative humidity <80% |
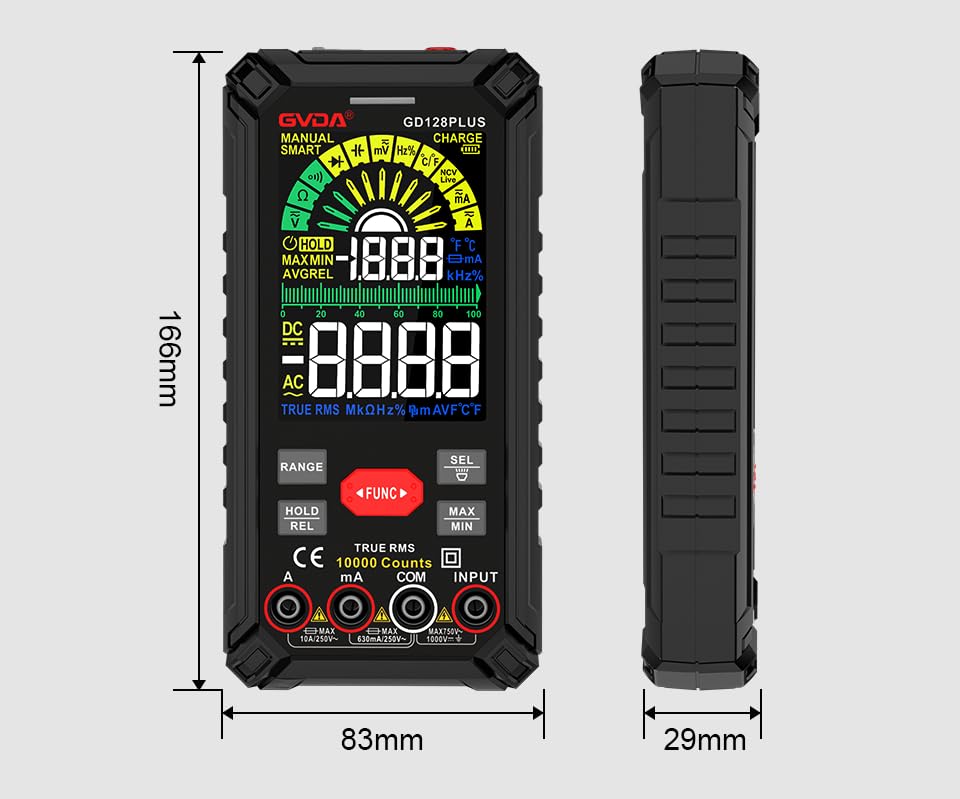
Figure 9.1: Physical dimensions of the GVDA GD128PLUS Multimeter.
10. گارانتی و پشتیبانی
This GVDA GD128PLUS Digital Multimeter is designed for reliability and performance. For warranty information, technical support, or service inquiries, please refer to the contact details provided by your retailer or visit the official GVDA webلطفاً رسید خرید خود را برای استفاده در گارانتی نگه دارید.