1. اطلاعات ایمنی مهم
Please read these instructions carefully before installation. If you do not understand these instructions or have doubts about the safety of the installation, please contact a qualified installer. The manufacturer is not responsible for damage or injury caused by incorrect mounting or operation.
- ظرفیت وزنی: This TV wall mount is designed for TVs weighing up to 110 پوند (50 کیلوگرم)از این حد وزن تجاوز نکنید.
- سازگاری با اندازه تلویزیون: سازگار با اکثر 40-82 اینچ flat or curved TVs.
- سازگاری با VESA: Supports VESA mounting patterns from 200x100mm تا 600x400mm. Verify your TV's VESA pattern before installation.
- نوع دیوار: This mount is designed for installation on گل میخ های چوبی or solid concrete/brick walls. به تنهایی روی دیوار خشک نصب نکنید.
- فهرست UL: This product is UL Listed, indicating it meets specific safety standards.
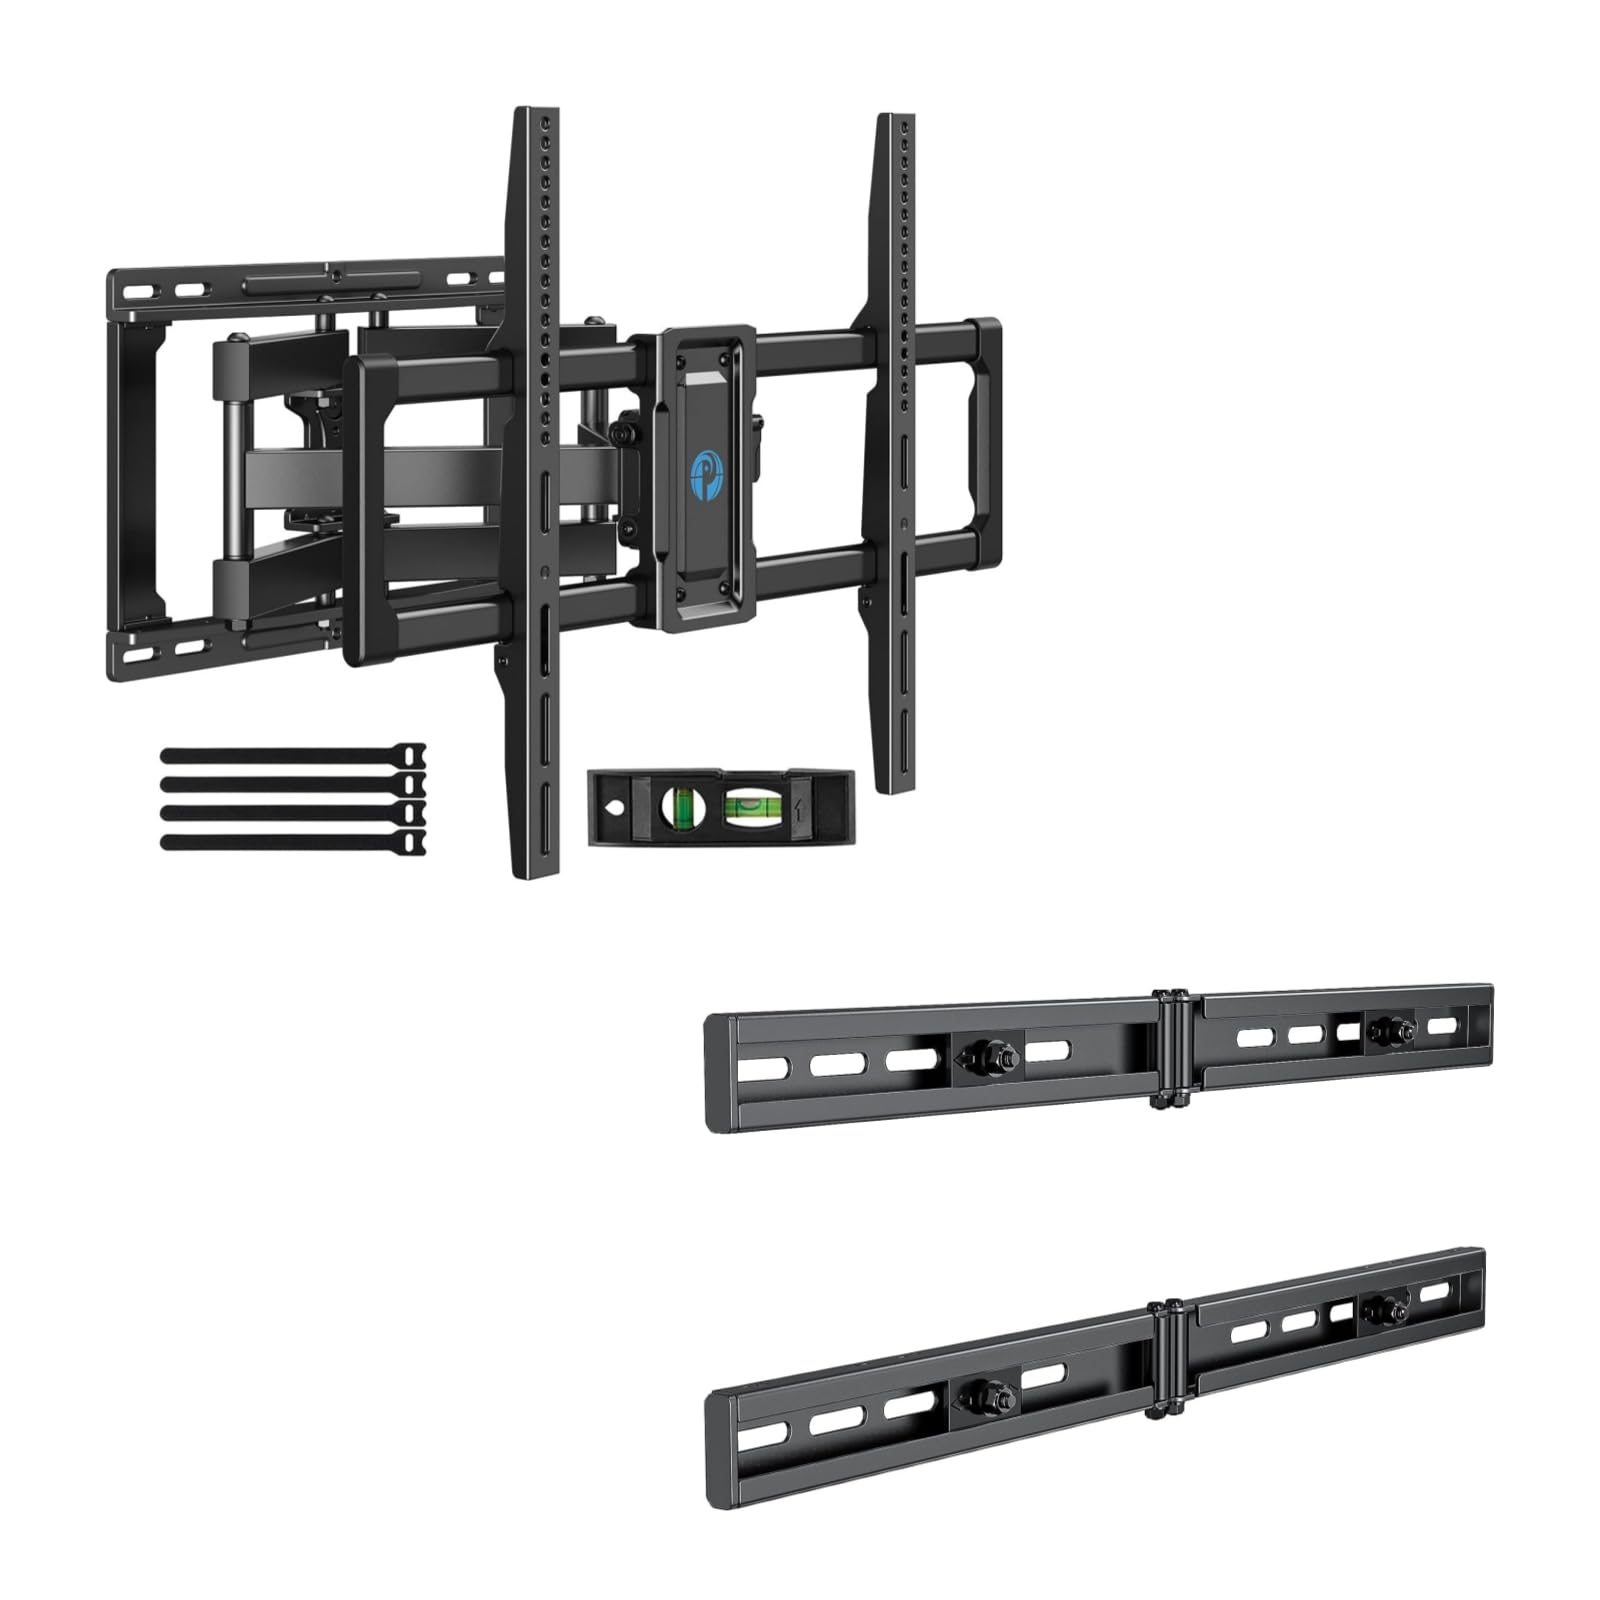
Image 1.1: Reinforced stability of the mount, highlighting heavy-duty steel arms and UL certification for safety and durability.
2. محتویات بسته
Please check to ensure all components are present and undamaged before beginning installation. If any parts are missing or defective, contact Pipishell customer service.
۳.۱ ابزار مورد نیاز (شامل نمیشود)
- مداد
- گل یاب
- Drill with appropriate drill bits (e.g., 5/32" (4mm) for wood studs, 3/8" (10mm) for concrete)
- سطح
- نوار اندازه گیری
- آچار بکس یا آچار فرانسه قابل تنظیم
- پیچ گوشتی فیلیپس
2.2 Hardware and Components (Included)
- مونتاژ صفحه دیواری
- براکت تلویزیون (2)
- Extension Brackets (2)
- Various TV Screws, Washers, and Spacers (M4, M6, M8)
- Lag Bolts and Concrete Anchors
- حباب سطح
- اتصالات کابل
3. راه اندازی و نصب
3.1 بررسی های قبل از نصب
- Verify your TV's weight, size, and VESA pattern are within the mount's specifications.
- Determine the desired viewing height for your TV.
- Locate the wall studs using a stud finder. Mark the center of the studs.
3.2 نصب ورق دیوار
The extension bracket feature allows for installation on wood studs with spacing between 16 and 24 inches.
- Position the wall plate assembly on the wall at your desired height, ensuring it is level. Mark the drill holes.
- For wood stud installation, drill pilot holes (e.g., 5/32" or 4mm) into the center of the studs. For concrete/brick, drill pilot holes (e.g., 3/8" or 10mm) and insert concrete anchors.
- Attach the wall plate to the wall using the provided lag bolts. Tighten securely.

Image 3.1: The extended wall plate design provides a flexible solution for mounting on walls with stud spacing between 16 and 24 inches.

Image 3.2: This feature helps center your TV for optimal viewing, even when wall studs are not perfectly centered.
۴.۳ اتصال براکتهای تلویزیون به تلویزیون
- تلویزیون خود را با دقت رو به پایین روی یک سطح نرم و تمیز قرار دهید.
- Select the appropriate screws, washers, and spacers for your TV's VESA mounting holes.
- Attach the two TV brackets to the back of your TV. Ensure they are securely fastened and evenly spaced.
۴.۴ نصب تلویزیون به دیوارپوش
- با کمک، تلویزیون را با دقت بلند کنید و براکتهای تلویزیون را به صفحه دیواری وصل کنید.
- مطمئن شوید که تلویزیون به طور محکم روی دیوار نصب شده است.
- Tighten the safety screws or locking mechanisms on the TV brackets to prevent accidental dislodgement.
4. Operating the TV Mount
This full motion mount allows for flexible adjustment to achieve the best viewزاویه
۵.۱ تنظیم چرخش
The mount allows for a swivel range of +/-45 درجه. Gently push or pull the TV to the desired left or right angle.

Image 4.1: The mount offers a smooth swivel motion of up to 45 degrees in either direction for flexible viewing.
4.2 تنظیم شیب
Adjust the tilt angle from +5 درجه تا -15 درجه to reduce glare and optimize viewing. This adjustment is tool-free.

Image 4.2: Easily adjust the TV's vertical angle from +5° to -15° without tools to minimize glare and improve comfort.
4.3 Extension and Retraction
The mount allows the TV to extend from the wall by 2.89 اینچ تا 16.3 اینچ. Gently pull the TV forward or push it back towards the wall to adjust the distance.

Image 4.3: Adjust the TV's distance from the wall, extending up to 16.3 inches or retracting to 2.89 inches for optimal viewفضای ing
5. تعمیر و نگهداری
- بررسی های منظم: به طور دورهای تمام پیچها و اتصالات را بررسی کنید تا از محکم و ایمن بودن آنها اطمینان حاصل شود.
- تمیز کردن: پایه را با یک پارچه نرم و خشک تمیز کنید. از پاک کننده ها یا حلال های ساینده خودداری کنید.
- روغن کاری: The moving parts are designed for smooth operation. No lubrication is typically required. If movement becomes stiff, check for debris or loose components.
6 عیب یابی
- تلویزیون تراز نیست: Check the level of the wall plate during installation. Most mounts have a post-installation leveling adjustment. Refer to the specific mechanism on your mount.
- Difficulty adjusting swivel/tilt/extension: Ensure no cables are snagged or obstructing movement. Check if any adjustment knobs or screws are overtightened. The mount features improved torque accuracy for smoother movement.
- Mount feels loose on the wall: Immediately remove the TV from the mount. Re-check all wall plate fasteners and ensure they are securely anchored into the studs or concrete. If issues persist, consult a professional installer.
- TV brackets do not fit TV: Verify your TV's VESA pattern matches the mount's compatibility (200x100mm to 600x400mm). Ensure you are using the correct screws and spacers for your TV model.
7. مشخصات
| ویژگی | مشخصات |
|---|---|
| نوع نصب | پایه دیواری |
| نوع حرکت | مفصلبندی (حرکت کامل) |
| نام تجاری | Pipishell |
| مواد | فولاد آلیاژی |
| دستگاه های سازگار | تلویزیون |
| Minimum Supported Screen Size | 40 اینچ |
| Maximum Supported Screen Size | 82 اینچ |
| حداکثر ظرفیت وزنی | 110 پوند (50 کیلوگرم) |
| سازگاری با VESA | 200x100mm تا 600x400mm |
| محدوده چرخان | +/-45 درجه |
| محدوده شیب | +5 / -15 Degrees (Tool-Free) |
| امتداد از دیوار | ۴.۰ تا ۶.۹ اینچ |
۹. گارانتی و پشتیبانی مشتری
Pipishell products are designed for durability and performance. For warranty information or technical assistance, please contact Pipishell customer support through their official webسایت یا خرده فروشی که محصول از آنجا خریداری شده است.
لطفاً هنگام تماس با پشتیبانی، مدل محصول و تاریخ خرید خود را در دسترس داشته باشید.