1. مقدمه
This manual provides detailed instructions for the installation, operation, and maintenance of your ECHOGEAR 6U Network Rack. This enclosed wall-mount rack is designed to organize and protect networking, AV, and DVR equipment in home or small office environments.
ویژگی های کلیدی:
- طراحی همه کاره: Includes two 1U shelves, pre-mounted fans, a lockable front door, and necessary hardware for a complete setup.
- ساخت و ساز قوی: Manufactured from heavy-duty alloy steel, capable of holding up to 132 lbs of equipment.
- خنک کننده کارآمد: Features a vented design and two pre-mounted fans to maintain optimal operating temperatures for your gear.
- Compact and Spacious: Offers 6U of rack space with a 600mm depth, suitable for various standard rack-mountable devices while maintaining a small footprint.
- دسترسی آسان: Side panels are removable without tools for convenient access to equipment and cabling.
2. راه اندازی و نصب
Follow these steps for proper assembly and wall mounting of your ECHOGEAR 6U Network Rack. It is recommended to have two people for the wall mounting step due to the weight of the unit.
۲.۲ اجزای موجود
قبل از شروع مونتاژ، از وجود همه اجزا اطمینان حاصل کنید:
- 6U Rack Frame (top, bottom, side frames)
- 2x 1U Shelves
- 2x Pre-mounted Fans (integrated into top/bottom panels)
- Lockable Front Door
- Wall Mounting Hardware (lag bolts, washers)
- Cage Nuts + Screws
- Hook + Loop Straps for cable management

Figure 2.1: All components included in the ECHOGEAR 6U Network Rack kit.
2.2 ابزارهای مورد نیاز
- نوار اندازه گیری
- مداد
- پیچ گوشتی فیلیپس
- سطح
- مته برقی
- 1/2 inch (13 mm) Socket Wrench
- For Wood Stud Installation: Stud Finder, Awl, 7/32 inch (5.5 mm) Drill Bit for wood
- For Concrete Installation: 3/8 inch (10 mm) Drill Bit for concrete, Hammer
2.3 مراحل مونتاژ
- قاب را جمع کنید: Sit the side frames onto the bottom panel. Place the top panel onto the assembled side frames. Secure all connections with the provided hex bolts.
- Attach Wall Bracket: Secure the wall mounting bracket to the rear of the rack using the provided screws.
- Mark Wall for Mounting: Use a stud finder to locate and mark the center of two adjacent wood studs. Ensure marks are level. For concrete, mark desired drill points.
- سوراخ های پایلوت را دریل کنید: Drill pilot holes at the marked locations. Use a 7/32 inch (5.5 mm) drill bit for wood studs or a 3/8 inch (10 mm) drill bit for concrete.
- Mount the Rack: With assistance, lift the rack and align the wall bracket with the drilled holes. Secure the rack to the wall using the provided lag bolts and a socket wrench.
- Insert Cage Nuts: Determine the desired height for your shelves and equipment. Insert cage nuts into the square holes on the rack rails at these positions.
- نصب قفسه ها: Slide the 1U shelves into place and secure them using the cage nuts and screws.
- پنلهای کناری را وصل کنید: Align and attach the removable side panels to the rack.
- Attach Front Door: The front door can be attached to either the left or right side of the rack. Align the hinges and secure the door.
Video 2.1: Detailed assembly and installation guide for the ECHOGEAR Enclosed Network Rack.

Figure 2.2: Visual guide for the quick installation process, including frame assembly, wall mounting, and shelf installation.

Figure 2.3: The rack can be securely mounted on either wood studs or concrete walls.
3. دستورالعمل های عملیاتی
Once installed, the ECHOGEAR 6U Network Rack provides a secure and organized environment for your equipment.
3.1 Equipment Placement
- Utilize the two 1U shelves for non-rack-mountable devices such as modems, routers, or small servers.
- Mount rack-mountable equipment directly to the vertical rails using appropriate rack screws and cage nuts.
- Ensure even weight distribution to maintain stability. The rack supports up to 132 lbs.
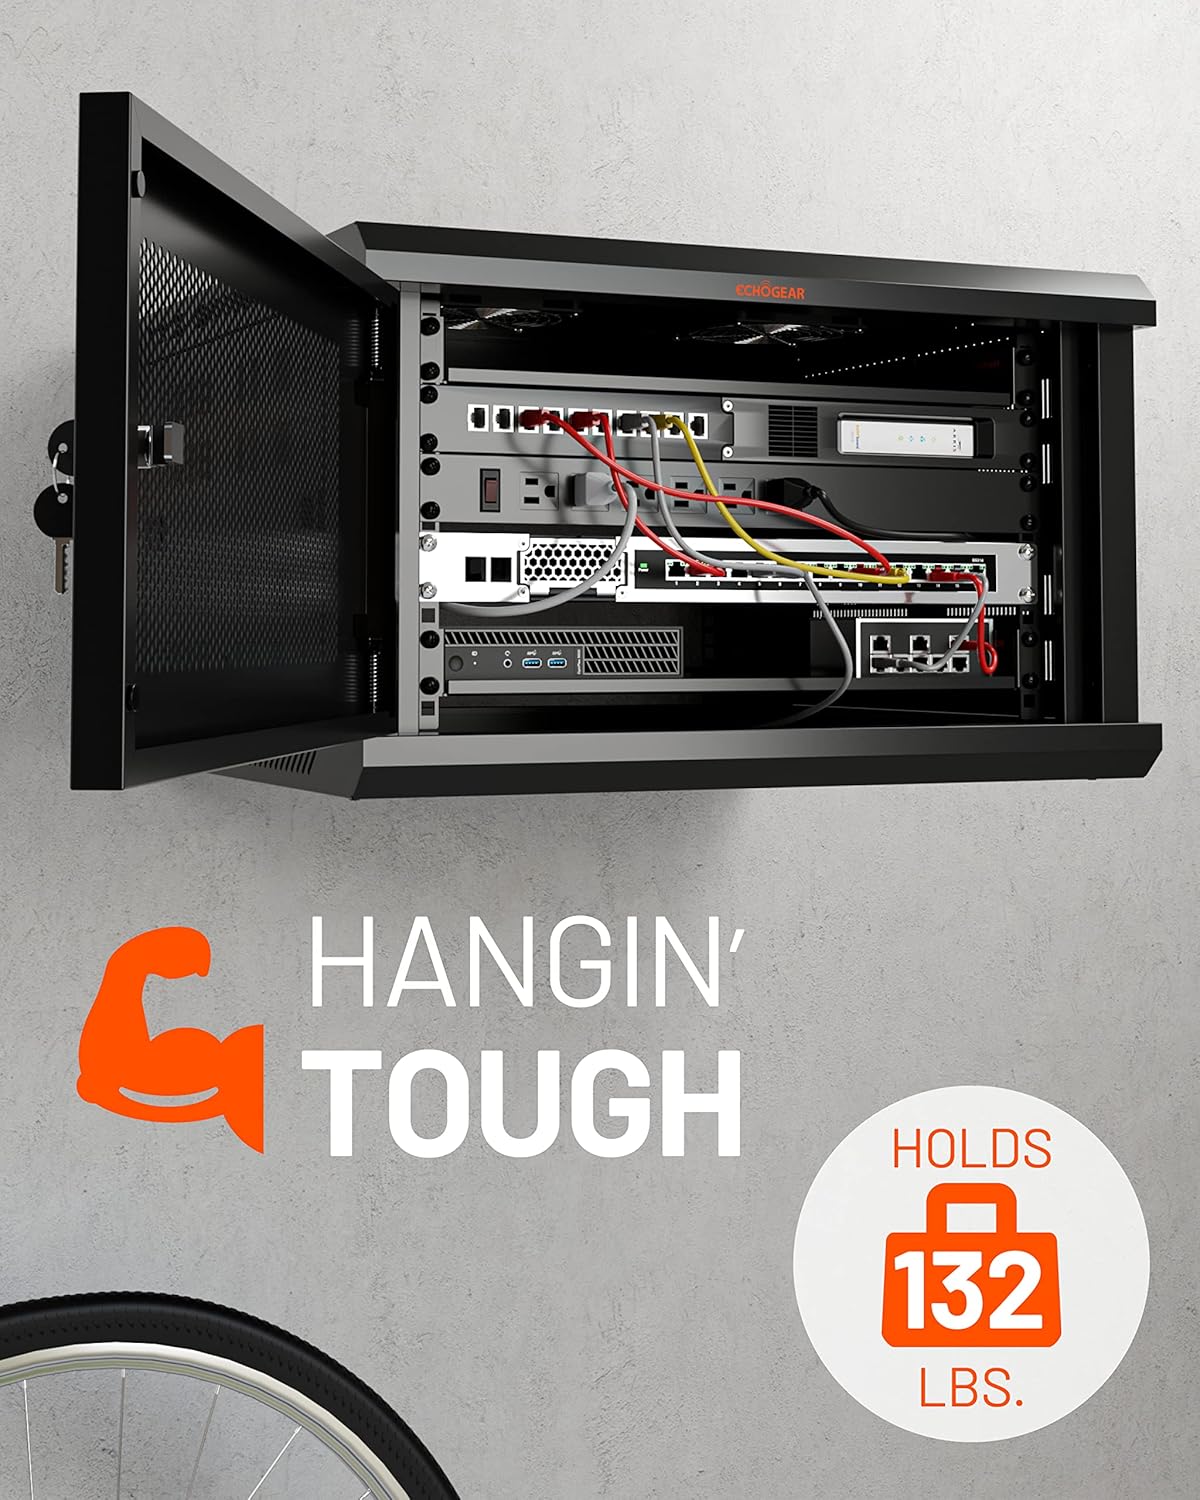
Figure 3.1: The rack accommodates various networking, AV, and DVR equipment.
3.2 مدیریت کابل
- Use the included hook and loop straps to bundle and secure cables, preventing clutter and improving airflow.
- Route cables through designated openings to maintain a clean and organized setup.
- The optional cover on the top panel can be left off to facilitate cable routing.
3.3 سیستم خنک کننده
- The rack includes two pre-mounted fans to ensure adequate airflow and prevent equipment overheating.
- Ensure the fans are connected to a power source for continuous operation.
- The vented design of the rack further aids in heat dissipation.

Figure 3.2: The rack features two pre-mounted fans for optimal cooling.
3.4 امنیت
- The front door is lockable to secure your valuable equipment. Use the provided keys to lock and unlock the door.
- The door hinge can be mounted on either the left or right side to suit your installation needs.
- Side panels are removable for access but should be secured when not actively working inside the rack.
ویدیوی ۱: تمام شدview of the ECHOGEAR Enclosed Rack, highlighting features like removable side panels and security.
4. تعمیر و نگهداری
Regular maintenance ensures the longevity and optimal performance of your ECHOGEAR 6U Network Rack and the equipment housed within it.
4.1 تمیز کردن
- Periodically wipe down the exterior surfaces of the rack with a soft, damp پارچه از پاک کننده های ساینده خودداری کنید.
- Ensure the fan grilles and ventilation openings are free from dust and debris to maintain proper airflow. Use compressed air if necessary.
4.2 بازرسی
- Regularly check all mounting bolts and screws to ensure they remain tight.
- کابلها را از نظر هرگونه علائم ساییدگی، پارگی یا آسیب بررسی کنید. کابلهای آسیبدیده را فوراً تعویض کنید.
- Verify that the fans are operating correctly and quietly.
5 عیب یابی
This section addresses common issues you might encounter with your network rack.
5.1 Overheating Equipment
- مسئله: Equipment inside the rack is running hot.
- راه حل: Ensure both pre-mounted fans are powered on and functioning. Check for any obstructions to airflow within the rack or at the ventilation points. Verify that cables are neatly managed and not blocking vents.
5.2 Rack Instability
- مسئله: The wall-mounted rack feels unstable or wobbly.
- راه حل: Re-check all lag bolts securing the rack to the wall to ensure they are tightened properly. Confirm that the rack was mounted into solid wood studs or concrete as per installation instructions. Redistribute equipment weight evenly if possible.
5.3 Difficulty with Side Panels/Door
- مسئله: Side panels or the front door are difficult to open or close.
- راه حل: Check for any physical obstructions or misalignments. Ensure the rack frame is square and level. Lubricate hinges if necessary.
6. مشخصات
| ویژگی | جزئیات |
|---|---|
| نام تجاری | ECHOGEAR |
| شماره مدل | B0BS755RDD |
| رنگ | مشکی |
| ابعاد محصول (عرض x ارتفاع) | ۳۲ اینچ در ۱۲ اینچ |
| عمق | 600 میلی متر |
| واحدهای رک (U) | 6U |
| مواد | فولاد آلیاژی |
| وزن مورد | 23.36 کیلوگرم |
| ظرفیت وزنی | 132 پوند (60 کیلوگرم) |
| نوع نصب | پایه دیواری |
| مونتاژ مورد نیاز است | No (refers to pre-assembled main components, but user assembly is required) |
| UPC | 793795538260 |

Figure 6.1: Key dimensions of the ECHOGEAR 6U Network Rack.
7. ضمانت و پشتیبانی
7.1 گارانتی محصول
The ECHOGEAR 6U Network Rack is covered by a 5 سال گارانتی محدود از تاریخ خرید. این ضمانتنامه شامل نقص در مواد و ساخت در شرایط استفاده عادی میشود. لطفاً فاکتور خرید خود را برای موارد گارانتی نگه دارید.
7.2 پشتیبانی مشتری
For any questions regarding installation, troubleshooting, or accessorizing your ECHOGEAR network rack, please contact our customer support team. Our Minnesota-based product specialists are available 7 days a week to assist you.
Contact information can be found on the official ECHOGEAR webاز طریق سایت یا از طریق کانالهای پشتیبانی فروشگاه شما.